


Drywall surrounds us and for good reasons. It is an inexpensive wall covering that goes up quickly. It is neutral and can be covered with paint, wall paper or wood paneling easily. Other benefits include some sound proofing and insulation value.
Tools
Part of the beauty of drywall is that it can be installed with a few common and inexpensive hand tools. These include a measuring tape, chalk line, utility knife, a selection of broad knifes, inside corner tool, spackle tray, key hole saw, sponge, Surform Tool, sanding pole, tin snips and drill. Additional, but not necessary tools include spiral saw, screw gun, 4-foot T-square, drywall saw, power pole sander, stilts (for ceiling work), panel lifter and power mixer.
In new construction, dry wall is hung directly on the wall studs. In remodeling, drywall can be hung over any flat surface including existing wall coverings and cinder block and masonry walls, as long as firring strips are installed first. Several types of drywall are available, including standard drywall, waterproof drywall and even bullet proof drywall. Thicknesses include 1/4 inch, 1/2 inch and 5/8 inch. The standard and most common size is a 4-by-8-foot sheet but also available are 4-by-10, 4-by-12 and 4-by-14 feet. The long edges on all drywall are tapered slightly to help in the finishing process.
Surface Preparation
Part of the secret of a successful drywall project lies in installing over walls that are flat, and this means the framing must be true. Studs or rafters that have a bow or cup must be worked to make them flat. This can be accomplished with a hand-held planer for bowing, and with the use of shims for cupped framing. Use a string to help determine how true your walls are before hanging drywall. Simply stretch the string across the face of the wall – in several places – to see if all studs are on the same plane. If they are not, fix the problem before beginning the project.
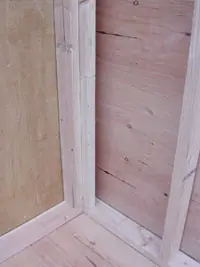
Another important framing consideration, prior to attaching drywall, is that all end joints must be supported. Sometimes an extra stud must be added to accomplish this, especially for inside corners.
Framing around windows and doors must also provide a fastening surface for drywall. It is common to run the drywall up to the window or door frame where it will later be covered with molding and trim.
Fasteners
While drywall can be attached to wall studs with drywall nails, drywall screws – ‘Grabbers’ – do a much better job. Over time, nails have a tendency to pull away from the studs, causing sags in ceilings and cracks and holes in the spackle. For 1/2-inch drywall use 1-5/8-inch long screws and for 5/8-inch drywall, use 2-inch-long screws.
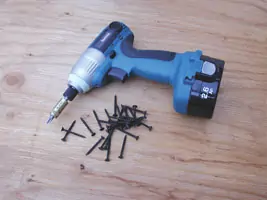
When driving screws, run them just below the face of the drywall without breaking through the surface paper. The resultant holes will later be filled with spackle during the finishing process. For large drywall projects consider purchasing or renting a drywall screw gun. For smaller projects, use a corded or cordless drill/driver. Professional drywall hangers use a drywall screw gun because this tool is fast and sets every screw at a predetermined depth. Have on hand a few extra Phillips head or square drive bits as these important tips will break or become rounded over time.
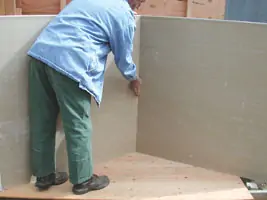
When drywalling an entire room, begin by installing panels on the ceiling first. Next, install the bottom panels on the walls. Lastly, install the top wall panels. The bottom panel will hold the top panel up for fastening. The top wall panel will also help support the edges of the ceiling panels.
Cutting Drywall
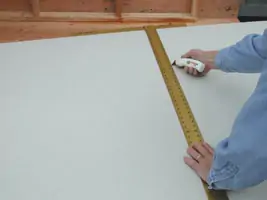
In any drywall project, panels will need to be cut. The most common type of cut is across a panel. Use a chalk line or drywall ‘T’ square and pencil to mark the panel prior to cutting. Use a utility knife to make the cut, keeping in mind that you do not have to cut all of the way through the panel – just through the surface paper. Once the cut has been made, lift the panel and ‘break it’ along the cut line. This action is much like opening a book. Then you must cut the back paper to complete the cut. Occasionally a cut edge will be rough. Use a Surform Tool to smooth the edge of the panel for a good fit.
Another common cut is around electrical boxes – light switches, outlet boxes and light fixture boxes including hot caps. The most difficult part of these types of cuts is determining the location of the cut relative to the box location on the wall or ceiling. Measure carefully and mark the panel for the cut.
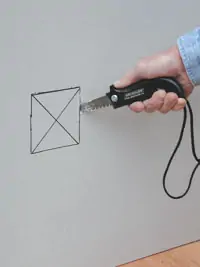
Electrical outlet box cuts can be made with a utility knife by first measuring and outlining the cut, then cutting the outline of the box – through the surface paper. Next make an ‘X’ cut diagonally from one corner to the next. Press the center of the ‘X’ cut and then cut the back paper.
Another way to make cuts for electrical boxes is with a keyhole or drywall saw. Mark the location of the electrical box and pierce the face of the drywall with the saw and cut out. This method is much quicker than using a utility knife but produces more drywall dust.
Probably the easiest way to make electrical outlet box cuts is with a spiral saw, fitted with a special drywall cutting bit. With this tool it is possible to make an accurate cut for an electrical box in less than a minute. The one drawback is the amount of gypsum dust generated.
Once all of the drywall has been securely fastened to the wall studs and ceiling joists, look over the entire project and make sure that all screws have been driven below the surface. If any screw heads protrude above the surface paper they must be driven deeper to enable proper finishing. It is much easier to do this now rather than when spackling.
Taping
Historically, drywall joints were finished with paper tape. Now most professionals use fiberglass mesh tape. This tape is self stick, stronger than paper tape and is much easier to use. Simply cover all joints – including inside and outside corners – with the tape and you are ready to spackle.
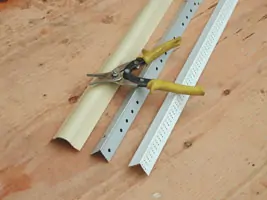
Outside corners require special attention, in addition to fiberglass mesh tape. Because of the potential damage to outside corners, they are covered with ‘corner bead’ prior to spackling. Corner bead is available in metal and plastic. Both square and rounded corner bead are available. Simply cut to length, install with drywall screws and cover the corner bead joint with fiberglass tape.
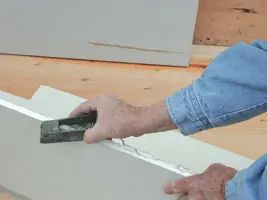
When installing fiberglass mesh tape into inside corners, you may find it helpful to use a spackle knife to press the tape fully into the corner. When installed correctly, the tape will lie flat on the two inside corner surfaces.
Spackle & Spackle Tools
The tools needed for spackling are few and simple. These include a ‘mud’ tray, an assortment of spackle knives (4-, 8- and 12-inch widths) and an inside corner tool. Some professionals also use an outside corner tool especially for curved arch ways. With this small collection of spackling tools and a little experience, you can professionally finish almost any drywall project. For best results always keep your spackling tools clean. Use clean water and a small brush to remove dried spackle from your tools.
Spackle is a paste-like material consisting of fine limestone, dolomite, water, mica, perlite, polymers and pyroohvllite. Spackle is commonly referred to as “mud” in the trade and is available in 12-, 48- (box) and 61-pound (5-gallon bucket) containers. The large size is handy because the spackle can be mixed in the bucket. For large projects, purchase several 5-gallon buckets and several boxes of spackle. Mix the boxed spackle in the empty buckets. When the project is complete the 5-gallon buckets have many uses around the home and shop.
Spackle is available in ‘All Purpose’ and ‘Topping.’ As a rule, All Purpose spackle is used for most types of finishing. Topping is finer in consistency and is preferred by some professional drywallers for the final coat.
Before beginning, spackle must be mixed and this is most easily accomplished with a power mixer, as shown. An electric drill and a mixing paddle will make short work of this and ensure a good consistency to the spackle. In some cases, a small amount of water may be added to thin the spackle slightly. Be careful not to add too much water as this will make the spackle too ‘runny.’ Good spackle is the consistency of smooth peanut butter.
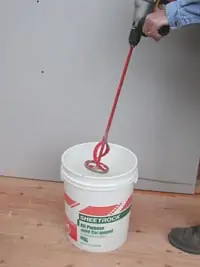
Once mixed, many professionals add enough water to cover the top of the spackle. This may seem like a contradiction, but the water ‘lid’ will prevent the spackle from drying as it forms a barrier between the spackle and the atmosphere.
Finishing Drywall
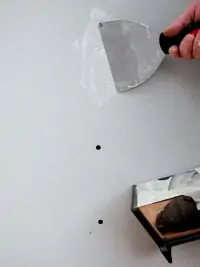
Most professionals begin finishing drywall by filling all nail or screw holes first. Use a 4-nch knife to ‘swipe’ a dab of spackle over each hole. The idea is to fill the hole and remove the excess spackle in one pass. Nail or screw holes require two fillings, allowing the first fill to dry thoroughly before applying the second and final coat.
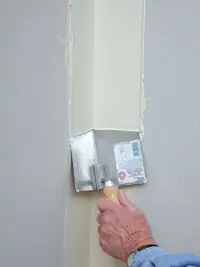
Long horizontal joints are finished next. Use an 8- or 10-inch broad knife for this. Apply a heavy coat of spackle over the tape, filling the depression between the drywall. Long joints will commonly require three coats. The first coat is the heaviest and uses the most spackle. The second coat, applied after the first has dried completely, levels the joint. The third and final coat – once again allowing the previous coats to dry thoroughly – feathers the edges of the joint making it invisible. For the third coat use a 12-inch-wide broad knife.
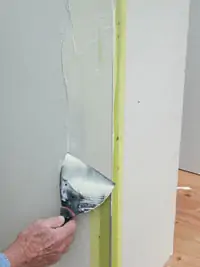
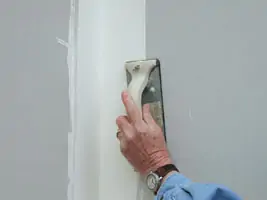
Outside corners are finished in three coats. The first is the heaviest and fills the space between the wall and corner bead. Use an 8-inch knife for this coat – one edge of the knife rides on the corner bead and the other runs over the drywall. Once dry, apply a second and lighter coat using a 10-inch knife. Finally, finish the outside corner by feathering the edges with a 12-inch broad knife.
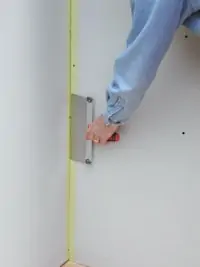
Inside corners are the most challenging. These include corners and the wall ceiling joint. Begin by applying a heavy coat of spackle to the inside corner with an 8-inch spackle knife. Next, use an inside corner tool to press the spackle into the corner and make it square. Use long strokes of the tool to help create a perfect inside corner. You may find it helpful to wet the inside corner tool with a small amount of water before making a pass. Keep the tool clean at all times and the inside corner should finish nicely.
Once the first coat has dried, apply another coat of spackle to both sides of the inside corner. In most cases, the actual inside corner will be finished by the first pass of the inside corner tool. The second and third coat feathers and finishes the edges of the joint outward from the inside center.
For all spackling tasks, it is important to let each coat dry thoroughly between applications of more spackle. In colder weather, use a heater in the room to help the spackle dry. Look at the spackled joint – if it is white, the spackle is dry but, if it appears gray, it is not dry enough yet.
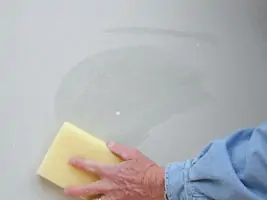
You may notice raised edges on joints and screw holes as they dry. These must be removed before applying additional coats. This can easily be accomplished by using a damp sponge or the edge of a clean spackle knife. You can also use a sanding pole to smooth and flatten a dried spackle joint before applying additional coats. If you choose to sand, wear a respirator to prevent inhaling sanding dust.
After the third and lightest coat of spackle has dried, look over the work and lightly sand if required. In some cases, additional spackle may be required to fill in gouges or feather an edge. The main point to remember about finishing drywall is that the best joint is one that is unnoticeable. In short, if you can see the edges of a joint, you are not finished yet.
After the drywall has been finished, vacuum the area thoroughly. If you plan on painting, you must apply a coat of drywall sealer or primer first. Follow this with two coats of your choice of paint. Many experts also recommend priming newly installed drywall prior to installing wallpaper as well.
A properly installed and finished drywall project should last for years with little care other than occasional washing and painting. If patching is required – such as the common door knob hole – use fiberglass tape and spackle. To make the patch blend in with the existing wall, spackle about 8to 10 inches out from the hole, feathering the edges.
