Visit Extreme How-to for thousands more articles.
  Link to http://www.extremehowto.com
Google


For
related articles

click here
Click here for a printer-friendly
version of this article!

Click here to email
this article to a friend!

Crown Molding in Review
By Matt Weber


Crown molding can add greatly to a room's overall dcor, especially when it's installed correctly. But a molding installation with gaping corner joints only adds as much style as a ragged fedora. Although precision cutting and gluing inside miters can help the joint stick, the expansion and contraction of the molding material is a powerful force. Nine times out of ten, miter joints will open. To prevent this, many carpenters bypass cutting miters on inside corners in favor of coped joints. A coped piece of molding has the end carved in the shape of the molding profile so it fits over the intersecting strip of molding like a puzzle piece. Coping the joints hides the problem of inside corners that tend to spread open.


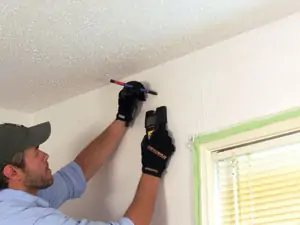
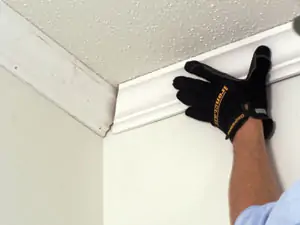
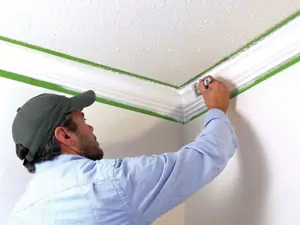
First step is to mark the framing locations on the wall and ceiling.


Planning

Fortunately, with ceiling trim there are generally no doors or other room openings with which to contend. This simplifies the layout somewhat, but you should plan the layout according to the locations of the coped joints.


In a basic square-room installation, the first piece of crown should be installed on the wall opposite the door with two square-cut ends butted tightly to the adjacent wall surfaces. Then install the adjacent pieces of molding, each having one coped end that nests against the square-cut first piece, while the other end is cut square to butt against the opposite wall. This means that as someone walks into the room, they are presented with the best face of the crown joints on the opposite side of the room. The final run of molding will have two coped ends, but these are at the least noticeable locations in the room.


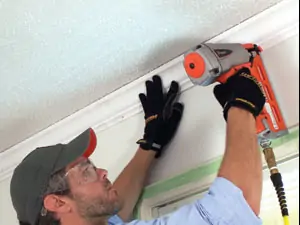
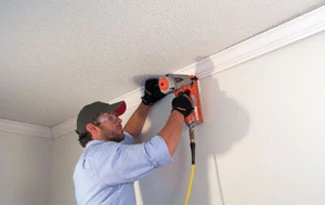
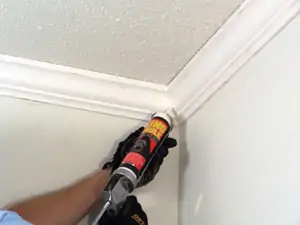
A pneumatic nailer can speed up the fastening process.


Before installing the first piece, use a stud finder and pencil to mark the wall studs and ceiling joists around the perimeter of the room. Mark just outside the molding location so you'll know where to drive the nails.


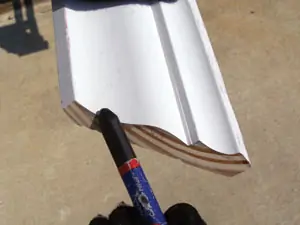
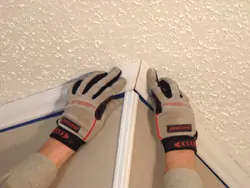
When making a cope joint, begin by tracing the molding profile with a pencil for better visibility.


First Run

Requiring no angled cuts, the first piece of molding is the easiest to install. Simply make a 90-degree cut to trim the molding to length, using a powered miter saw or handsaw and miter box. Use finish nails to fasten through the molding and into the wall and ceiling framing. A hammer and nail set will suffice, but be careful not to bang up the molding profile. A better tool for the job is a pneumatic nail gun, such as the Paslode 16-gauge angled finish nailer shown, which frees up one of your hands, affords greater nailing precision and really picks up the pace of the installation.


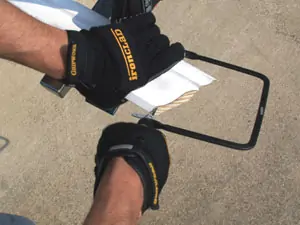
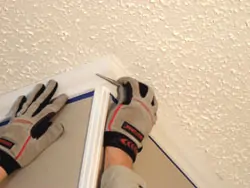
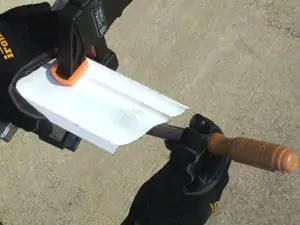
Above and Below: Back-cut the mitered piece with a coping saw, staying 1/16" from the profile edge. Use a variety of files to create a shaped edge that will be the only point of contact with the intersection piece.


Learning to Cope

The intersecting ends of the next two adjacent molding strips is where you'll begin the coping operation. The idea is for the intersecting cut to duplicate the molding profile, or shape, so it nests tightly against the face of the adjoining molding for a nearly perfect fit.


Measure the wall and mark your measurement onto the intersecting end of the second piece of molding. Cut a 45-degree inside miter at the mark. Remember, when cutting crown molding on a miter saw, you typically have to cut it upside-down and backwards, so the saw's base represents the ceiling and the saw's fence represents the house wall. With 45-degree inside corners, the cut should be made so the lower, longer point of the molding (when positioned on the wall) meets the mark you made for the molding strip's overall length. (See the Crown 45 sidebar for a handy tool that simplifies this cutting process).


The coped piece of molding should nest perfectly against the square-cut first piece. Fasten securely and then seal all seams with caulk.


Next, run a pencil along the mitered edge, marking the edges and curves of the profile for better visibility. Clamp the molding securely and use a coping saw to back-cut along the pencil line, following the contours of the profile. Keep the blade 1/16 inch to the waste side of the cutline. Then use a file to clean up the profile, revealing a shaped edge that will be the only point of contact between the intersecting molding pieces. This should create a socket that fits snugly over the face of the first piece. After checking for fit on the wall, cut the uncoped end square and butt it against the far corner to meet another coped piece on the third wall. Repeat this process for the molding strip that intersects the first piece on the opposite wall.


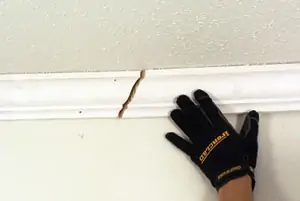
Cut scarf joints to join straight pieces of molding in a continuous run.


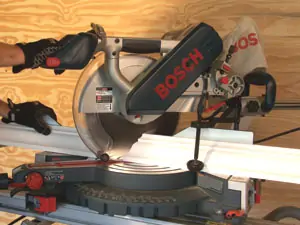
Position the molding upside-down and backwards when cutting on a miter saw.


Scarfing

The final molding strip on the fourth wall, above the door, is coped at both ends. Admittedly, it is difficult to successfully fit a piece of molding that is coped at both endseven for a pro. To make this easier, you can fit each coped corner on a separate piece of molding and cut a scarf joint to join the two pieces in a continuous run. In fact, use a scarf joint anytime you need to join two pieces of molding along a straight run of the wall. To make a scarf joint, cut opposite miters on the two molding pieces and nail the joint securely over a wall stud. After fastening the first half of the run over the stud, cope the corner end of the second half and then cut a supplementary miter, making the strip just a little too long. Test-fit this last piece and then cut way the excess on the miter until it fits snugly into the scarf joint with no visible gap.


Finishing

With the molding solidly fastened in place, fill the nail holes and seal seams with a high-quality caulk or wood filler. The molding used in this material was pre-primed pine. If you're painting the molding, it improves paint adhesion to sand the caulk after it dries and to spot prime the seams and nail patches. Once the primer dries, simply mask off the molding and finish up with a couple of coats of you're favorite interior paintwe recommend using the high-gloss variety.


Editor's Note: Thanks to Lowe's Home Improvement Store for supporting this article. Visit www.lowes.com.


Check Out More EHT Crown Moulding Stories

For a Look at How to Install Basic Crown Molding, click here.

For a look at Professional Cutting Advice for Crown, click here.

For 13 Pro Tips for Crown Molding and Trim, click here.

For a Look at All Types of Molding, from Crown to Base and even Elaborate Built-up Profiles, click here.


Side Note: 

Easy No-Nail Crown Molding

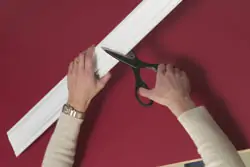
Easy Crown Molding from EZAPEEL provides a simpler way to install crown to enhance a room's dcor. It takes the guesswork out of the installation process and allows DIY'ers the ability to trim out a 17-by-17-foot room for just $49.95. Unlike wood or composite molding, the material can be cut with household scissors. And instead of using nails, installation is a simple peel-and-stick procedure in which the installer removes tape from the molding to reveal an adhesive backing. Each kit contains 16 pieces just over 4 feet long, which are pre-mitered for easy corners. Just press the molding tightly to the wall and ceiling to adhere it in place, overlapping the seams at each joint. No measuring is necessary. The molding can be painted and caulked after installation. Also, check out the company's Easy Door Crown system. Visit www.ezapeel.com or call 1-888-EZAPEEL.


Side Note:

Installing Outside Crown Corners

To install molding at an outside corner, first cope the end of the molding opposite the outside corner. Hold that strip along the wall, nesting the cope against the preceding piece, letting the other end run long over the corner.


Mark the cutline where the molding overhangs the corner. Do the same for the adjoining piece. Then make a miter cut at that mark.


For outside corners on crown molding, position the molding upside down and face up on the miter saw (or miter box). In other words, place the molding so its ceiling-side will be flat against the bottom of the base, and its wall-side will be flat against the vertical back fence. Ideally you will need to make a 45-degree cut on one end of one piece, and another 45 on the intersecting piece. However, walls are often out of square, so first check the angle with an angle gauge and cut accordingly.


Install the pieces by applying a bead of carpenter's glue to the joint and securing with finish nails. You can then smooth the joint by running the rounded edge of a nail set over it to press the fibers closed. For thick, heavy moldings or problem gaps, drill pilot holes at the top and bottom of the joint, and drive 4d finish nails perpendicular through one molding into the end of the other.


Other Related Articles


Prevent Home Electrical Fires
Everything Auto: DIY Wheel Alignment
Install a Rock Floor Inside Your Home
Prevent Home Electrical Fires
A Guide to Pressure Washers
A Lesson in Lathes
Fix Common Clog Problems
Remodel Your Attic Space
DIY Closet Shelves
A Radiant Restoration
A Smart Way to Frame a Corner
A Solid Choice: DIY Solid Surface Countertop
A Tunnel for the Sun
Adding Style with Wainscoting
All About Sanders
All Fenced In
All Hands on Deck
Alternative Trim: The Power of Plastics
Everything Auto: Aluminum Wheel Repair
Everything Auto: Alternator Check and Replacement
Everything Auto: Automatic Transmission Service
Backyard Gardening
Backyard Gazebos
Backyard Planters: Big & Small
Backyard Ponds Get A Makeover
Basement Dweller: Remodeling Tips
Up Close with Tankless Water Heaters
Big Storage Below the Deck
Block by Block: Segmental Retaining Walls
Fighting Allergic Asthma in the Home
Brick Picks
Bringing in the Light: Install a Skylight
Build a Garden Tool Shed
Build an Air-Station Assembly Table
Build Your Own Patio
Building a Drive-Thru Backyard Shed
Building a Red Cedar Pergola
Building a Swing Arbor
How to Build Stairs
Building with Glue-Laminated Beams
Cabinet Building Basics for DIY'ers
Everything Auto: Car Care Tips
How to Light Kitchens and Baths
Building a Fireplace Mantel
Chainsaws 101
Chalk it up to Caulk
Choosing a Tiller
Choosing Lumber for Your Deck
Everything Auto: Clutch Play
Common Framing Errors with Engineered Wood
Concrete Creations
Cooling Off with Fresh Air - Whole House Fans
Counter Culture: DIY Plastic Laminate Countertop
Covering Your Ground: Carpet Installation
Creative Concrete Stamping
Crown Molding ABC's
Curb Appeal 101: Cedar Siding Upgrade
Everything Auto: Dash Painting
Deck Helpers: Innovations and Accessories
Deck Building Basics
Design with Flexibility -- Ceramic Tile Installation
Designing a Sprinkler System
Diggin' Peace: Create a Water Garden
Everything Auto: Distributor Cap Replacement
DIY Acoustic Ceiling Tile
DIY Garden Benches
DIY Container Water Garden
DIY Crown Molding & Trim
Do-It-Yourself: Joining Wood Made Simple
Don't Forget the Deck When Winterizing the Yard
Dovetail Joints for Quality Construction
Drills and Drivers Unplugged
Drywall Tips from the Pros
12-Step Toilet Installation
13 Pro Tips for Crown Molding and Trim
A Closer Look at Composite Decking
A Good Look at Greenhouses
How to Use Hand Planes
Inside HOUSE RULES
Everything Auto: Install a Precision Sport Shifter
Install a Whole House Fan
Installing a Floating Subfloor
Installing Doorknobs and Locks
Build a Roll-around Tool Cabinet
Keeping the Water at Bay: Build a Sea Wall
Lawn Aeration
Lawn Care Tips from a Pro
Lawn Edgers Are Put to the Test
Make a Statement with Brick Pavers
Make New Cabinets Old
Matchmaking for Windows
Material Market
Material Market: Counter Culture
Material Market: New Floor Materials
Material Market: Siding Selections
Mortise and Tenon Joints
New Options in Concrete Decor
Build an Office Desk
Open Sesame! Install a Garage Door
Organize This: Build Storage Shelves
Organizing the Home Workshop
Out with Old Grout
Plate Compactor Basics for the DIY'er
Paint it Beautiful
Build a Bar Pass-Through
Everything Auto: Turbocharger Basics
Prep Steps for Outdoor Painting
Everything Auto - Windshield Chip Repair
Everything Auto: Adding Tubular Sidesteps
Everything Auto: CV-Joint Rehab
Everything Auto: Getting Greased
Everything Auto: Replacing Ball Joints
Everything Auto: Replacing Rotors, when your discs have seen better days
Exterior Finishes For Wood
Extreme Woodwork: From Trees to Lumber
Fast and True Deck Framing
Faux-to Finish
Fight Wood Rot
Finishing Moves: Repairing Hardwood Floors
Fire Up the Brick Barbecue
Flooring in a Snap: Installing Laminates
Flushing Upward
From Slicing to Sliding: Adding a Deck Door
From Window to Wall
Getting Jiggy
Everything Auto: Getting Rid of Motor Muck
Getting Wired
Girl Power
Give Wood Furniture a Great Look
Giving Walls a Drywall Update
Goodbye to Water Worries - Install a Shower Pan & Liner
Grasscycling: Waste Not, Want Not
Gutter Repair, Installation and Upgrade
Home Wiring for the Information Age
Professional Tile Layout
Putting Up Knockdown Texture
Recip Saw Roundup
Wood Refinishing 101
Renewing Plaster Walls
Everything Auto: Replacing a Water Pump
Everything Auto: Replacing Brake Shoes
Everything Auto: Replacing Disc Brake Pads
Everything Auto: Replacing Tie-Rod Ends
Everything Auto: Replacing Window Door Glass
Restoring Tile Grout
Righting the Wrongs with IN A FIX
Roof Flashing Done Right
Roof of Steel
Roofing Done the Right Way
Roofing Revisited
Save Money: Rent Lawn and Garden Equipment
Scouting Out Routers
Selecting a Hardwood Entry
Selecting Engineered Wood
Serenity Now! Build a Gazebo
Sinks with Style
Skill Savvy
Soldering Copper Tube
Spring Into Action
Prevent Mold in the Home
Stone Age: Simple Stone Projects
Everything Auto: Build an Auto Storage Box
The Beauty of Bamboo Flooring
Everything Auto: Buying a Diesel
The Bright Outdoors: Landscape Lighting
The Grass is Always Greener
The Ins and Outs of Gutters and Downspouts
Screened Porch
The Latest in Kitchen Cabinets
The Lowdown on Cork Flooring
The New Face of Bamboo
The New Face of Vinyl Siding
Enhance a Room with Skylights
The Wonders of Wood Siding
Tips From a Scroll Saw Pro
To Build a Better Home
Tool School: Circular Saws
Exploring Lithium-Ion Power Tools
Tool School: Choosing Air Compressors and Air Tools
Tool School: Hammer Drills and Masonry Bits
Tool School: Radial Arm Saws
Top Tips for Installing Vinyl Siding
Up Close with Table Saws
Upward Thinking: Overhead Storage Space
Wall Tile Tips from a Pro
Waves of Warmth: Radiant Heat Flooring
Welding 101
Close Look at Drill Bits
Windows of Opportunity: DIY Window Replacement
Winterize Your Home
Working with Concrete
Working with Copper Pipe
Working with Steel Pipe
Working with Wood Filler
Working with Wood Stains: Inside and Out
Everything Auto: Wrangle More Power
Spray-in-Place Concrete Fencing
Trimming Out a Room
Revitalize a Dormant Lawn
Build a Locking Tool Cabinet
Up Close with Circular Saws
Easy Garage Storage
Everything Auto: DIY U-Joint Replacement
Build a Basic Case of Shelves
Installing a PVC Deck Rail
DIY Shop and Garage Heating
Pro Tips For Tongue & Groove Flooring
Build a Playground Slide
Brighten Up with Landscape Lighting
Drywall: Handy Tools, Smart Techniques
Hammers and Nails
DIY Drywall Repair
Sealing and Waterproofing
Cedar Siding Success
Everything Auto: How to Install a Ram-air Hood
A Close Look at Asphalt Roofs
A World of Uses for the RotoZip
Creating Super Wood Joints
All About Band Saws
Hot Alternatives to Home Heating
Patching & Repairing Concrete
Strong, Sturdy Retaining Walls
Guard Your Home from Electrical Fires
Everything Auto: Automotive Radiator Repair
How to Select a Wood-Burning Stove
How to Install Wainscoting
The Low Down on Low Decks
Crown Molding Basics: Tips and Tricks
How to Finish Pine Furniture
Choosing a Metal Roof
Everything Auto: Install a Throttle Body Spacer
Making Magic with Your Router
New Garage Floor Lifts Spirits of Injured Auto Enthusiast
Painting Kitchen Cabinets
EHT's New Digital Magazine
One-Day Garage Makeover
Skil's Octo Sander
Dressing Up Windows and Doors
Simply Radiant
Air Power
Decked Out with Accessories
Deck Makeover
Window Trim Basics
How to Use a Layout Square
Detailing your Deck
11 Keys to Stain Your Deck like a Pro
DIY Deck Remodeling
High-Pressure Cleaning
Build an Attached Carport
Outfitting a Kitchen
How to Sand and Finish Wood Floors
Everything Auto: Install an Alarm
Under Floor Heating
How to Install Skylights
How to Cope Base Molding
Five Garden Projects You Can Build
Deck Basics for DIY'ers
Troubleshooting Toilets
Installing Slate Tile
Build a Butcher Block Countertop
DIY Gluing Tips
Installing Integrated Deck Handrails
Radical Re-deck
DIY Outdoor Lawn Furniture
Install an Ornamental Metal Fence
Soffits Up Close
Build a Deck Sunroof
Build a Home Library
Making Frame and Panel Doors
Pinning Down Nailers and Staplers
Congratulations to EHT's Sweepstakes Winner!
Build a Classic Workbench
Build a Retaining Wall
Re-Laminate Your Countertops
Build a Gun/Trophy Case
The Latest Ladders & Ladder Accessories
Drill Bit Update
Install an Exterior Door
Build a Classic Workbench
Molding Magic
Decking Done Right with David Billings
Everything Auto: Performance Coilover Suspension System
Woodworking Helpers
Install Deck Lighting & Accessories
Install Snap-Together Garage Tile
Everything Auto: Battery Basics
How to Replace a Window
Do-it-Yourself Cedar Siding
New Cordless Drill/Drivers
Make a Mantel Shelf
Everything Auto: Paint the Chassis for Rust Resistance
DIY Laminate Floor Installation
Spray Foam Saves Energy
Warming Up with Radiant Heat
How To Clean Brick Stains
How Long Should Concrete Cure?
Pro Tips on Built-up Crown Molding
Fix a Door Hinge
Grout Stuck in a Tub
Paint Aluminum Siding
Oven Burner: Fix or Replace?
Repair Loose Siding
Repair a Vinyl Floor Seam
Fix a Bouncy Deck
DIY Fountain Kits
Don't Cover Turbine Vents
Easy-to-Build Workbench
Refinishing Hardwood Floors for the DIY'er
Cutting Costs by Building Smart
Fix a Metal Handrail
Repair a Crack in Drywall
Repair a Stone Patio
Drippy Heat Pump
How to Cut Cement Board
Add Eave Vents
DIY Wallpaper tip
Build a Porch Swing
Pro Tips for Paint Brushes and Rollers
Installing a Front-Mount Receiver for a Winch or Trailer Hitch
How to Apply Primer Like a Pro
Remove Paint from Concrete
Can a DIY'er Re-shingle a Roof?
Deodorize your Air Conditioner
Should I Insulate my Crawlspace?
How Do I Prevent Puddling on my Deck?
How to Clean Hardwoods
How Can I Solve a Serious Toilet Clog (Bar of Soap)?
How Do I Install Quarter-Round Trim?
What's the Best Drill Bit for the Job?
How Do I Stop a Chimney Backdraft?
The Grout Gun: Reader Tip for Grout Application
How Do I Hang Drywall?
Should I Use Textured Paint?
How Do I Become a Professional Contractor?
Should I Use PT Lumber for a Shed?
How to Install Roof Sheathing
How to Remove a Stripped Screw
Stucco a Foundation
Should I Tile a Tub?
Installing Crown Molding Solo
Reduce Wood Warping
How to Calculate Concrete Required
Re-Laminate over Existing Laminate Countertops
Paint Vinyl Siding
Taping Inside Corners of Drywall
What's the Difference in Granite Countertops?
Can I Match Roof Shingles?
Stop Pipes from Banging
Installing Base Molding
PVC as a Backsplash?
A Good Start-up Toolbox
Caulk a Tub with the Right Stuff
Five Lathe Projects You Can Build
Building Basic Closet Shelving
Install Column Wraps for a Stylish Front Porch
DIY Thermostat Upgrade
Build a Brick Garden Wall
Outdoor Living Spaces
Security Solution
Repair a Run in Carpet
Clean your Gutters the Easy Way (Reader Tip)
Repair a Shower Head
Upgrade Your Truck's Exhaust System
Clean Oil Stains from the Driveway
Repair Damaged Plaster
DIY Block Windows (Glass vs. Acrylic)
Refinish a Tub
Which Flooring Over Concrete?
Checking Your Tire Pressure is as Easy as Pumping Gas
Video: Deck Recovery
Chainsaw Rx
Next-Gen Decks
Installing a Tile Pattern Laminate Floor
Pour a Concrete Floor
How to Install Vinyl Siding like the Pros
Build a Carpenter's Box
Home Stretch
Congratulations to June's Skil Sweepstakes Winner!
Kit-Built Log Homes
Build a Squeak-Free Floor
Everything Auto: Anti-Sway Bar Install
Installing Granite Countertops
Converting a Closet to Cabinets
Wiring a Garden Shed
Build Your Outdoor Living Room
Understanding House Framing
Replace an Old Deck with Composite Decking
Tighter Miters
Adjustable Pliers & Wrenches
Think Green with Cordless Lawn Tools
Building Shop Shelves
How to Choose Lumber for Outdoor Projects
Demolition Devices
Circular Saw Blades Up Close
Best New Products for Your Deck
Replace an Old Mower Deck
Router Essentials
Fireplace Safety: Avoiding the Dangers of Creosote Buildup
Building a Cooking Table for Your Ceramic Grill
The Kitchen Facelift
Roof Framing 101
Fix a Squeaky Floor from Above
Why Choose a Tankless Water Heater?
Remove Candle Wax from Carpet
Quick Fix for Squeaky Hinge
Pressure Problem with Faucet
Flatten Plywood Subfloor for New Flooring
Prep Floor for Peel & Stick Tile
Replace an Interior Door
The Summer Digital Issue is Now Live!!
Do-it-Yourself Brick Patio & Walk
Making Outdoor Log Furniture is Quick and Easy
Install a Patio Door
How To Build a Bar Stool
13 Pro Tips for Crown Molding
Bathroom Design Guide, by Sunset Books
Master Suite Masterpiece
Wood Handle Replacement for Striking Tools
Heated Tile in a Snap
Bathroom Redo
Hot Water Options
Christmas Presents You Can Build
Gasket Replacement for Ceramic Grills
Organize Your Kitchen with Rev-a Shelf
Save Energy with Insulated Siding
Working for the Clampdown
How to Remove Wallpaper
Holiday Digital Issue is Now Live
What are Architectural Shingles?
How to Apply Stucco to Concrete Block
Is this Old Paint Oil- or Latex-based?
Is the Plumbing Clog in the Drain or Septic Tank?
Fix a Noisy Ceiling Fan
Adjust an Automatic Garage Door
How to Paint a Steel Door
Can I Install a Toilet where there is No Drain?
How to Shim a Granite Countertop
Use UV light to Clean HVAC System
How Do I Match Old Brick?
Troubleshoot Automatic Garage Door Opener
Prevent Mold on Bathroom Caulk
Keep Mice Away from the House
How to Install Outlet Extensions
Installing a Brick Accent Wall
Down on the Farm, Up Goes a Wall
How to Bend Drywall
Use House Wrap on a Shed
DIY Faux Finish: Stippling
Creating Concrete Sculptures
How to Eliminate Floor Pops
Can New Tile Go Over Old Tile?
Keep Ceiling Joists Level when Installing
Adding a Camo Wrap
Replace an Old Roof With New Shingles
DIY Storage Helpers
Extreme Outdoor Cooking Center
Repair a Kitchen Cabinet
Woodworking Tools 2008
Solving Common Household Drain Problems
Sealing Interior Brick
How to Remove a Popcorn Ceiling
Extra-Mile Hero Contest
Install Mosaic Floor Tile
Stock Parts, Custom Door
Cordless Fastening in Tight Spots
Heating Homes with Hot Water
Just Getting Started
Build a Temporary Closet
Hardwoods in a Heartbeat
Fold Away Hide Away
Installing a Synthetic Railing System
Build a Shadowbox Privacy Fence
Today's Handsaws
How to Make a Knife
The Fun and Fascination of Wallpaper
Do-it-yourself Mirror Frames
Window Re-View
Remodel with Prefinished Stair Treads
Build an Oak and Walnut Nightstand
Five Portable Workstations Reviewed
Tiling Over Concrete
Replace a Ceiling Fixture
Exterior Wood Coatings
How Do I Lay Sod on a Lawn?
Should I Use Faced Insulation?
Deck Demolition Made Easy
Easy Homemade Wood Jigs
Build a Kid's Cubby
Siding Maintenance & Repairs
Choosing a Pool Location
A Home with a Personal Stamp
Adding a PVC Jamb Extension
Bathroom on a Budget
Everything Auto: Upward Thinking with Overhead Consoles
How to Preserve the Look of Copper
How Soon to Paint Concrete?
How to Repair Worn Hardwoods
How Do I Add a Dimmer Switch?
How Do I Connect an Ice Maker Supply Line?
What is an Incinerating Toilet?
How Do I Remove a Mirror from a Wall?
How to Fix a Bi-fold Door that Sticks
How Do I Build a Fence Gate?
How to Remove a Water Stain from Hardwoods
How to Repair a Sagging Floor
Hot Products April 2009
Energy Efficiency in the Home
Expert Advice on Planning a Kitchen
DIY Tile Countertop
Trim Tips for Doors and Windows
Adding a Cased Opening for Windows and Doors
Working with Crown Molding
Base Molding, Learning to Cope
Installing Toilets, the 12 Step Method
How-To Wire Split Receptacles
Install Landscape Lighting
Interior Rock Floor Installation
Refinishing Cabinets to Look Old
Refinishing Kitchen Cabinets for the D-I-Y
Installing Rods and Hardware
Installing Window Treatments
Extreme How-To's Guide to Painting
Bookshelves You Can Build Yourself
Build a Patio or Walkway from Pavers
Build a Patio Using Pavers
Build a Firepit
How to Repair/Replace a faucet
Replacing a Faucet
Build a Stone Firepit
Install Utility Sink
Adding Wire Shelving to Your Closet
Deck Lighting
Installing Laminate Tiles
Countertop Pros and Cons
How to Repair a Cracked Porch
Clipped-Head or Round-Head Nailer?
Invisible Cold Air Return (Reader Tip)
How Do I Build a Header?
Reinventing a 100-Year-Old Bedroom
Surviving Extreme Winds
An Overview of Today's Powered Hand Sanders
Replacing Drawer Slides
Handy Drywall Tools
How to Make Cope Joints in Molding
Paint with Success
How to Build Deck Stairs
Brand New Tune
Tips on Cleaning and Staining Your Deck
Island Workspace for The Kitchen
How to Build a Bar Pass-through
Deck Framing Gone Wild
New Tools for the Green Season
Bright Ideas for Deck Lights
Grid Guidelines for a Great Look
Building a Pergola
Concrete Patio Stamped with Style
Cordless Tool Update
Installing a New Tub or Shower
Test Page for Iframe link
Artificial Stone up Close
Paint a Countertop to Look Like Granite
DIY Countertops with Solid Surface Material
Build a Spiral Staircase
Easy Steps to Replacing a Bay Window
Deck Product Roundup
Waterproofing Basement Walls
Open to Change
All About Insulation
How-To Stain or Paint a Deck
Adding a Kitchen Island
Bathroom Vanity Installation
Level-headed
DIY Shock & Strut Installation
Your House is a System
Coat of Armor for Outdoor Wood
Install Plywood Underlayment for Vinyl Flooring
When to Install New Shingles
Can I Paint Asphalt Roof Shingles?
How to Paint Baseboard Heaters
What is the Best Firewood?
How Does a Heat Pump Work?
How to Refinish a Clawfoot Tub
How to Paint Window Shutters
Installing Wainscoting Adds Style
Installing a Shower Pan Liner
Installing a Laminate Floor
Installing Granite Countertops
Installing a Ceiling Fan
Ceiling Fan Installation
Selecting Energy-Efficient Replacement Windows
Comment construire l'escalier French Version of How To Build Stairs
Extreme How-To leert Trap bouwen "How To Build Stairs, Dutch Version"
ɊK'ig\'z邽߂̎菇ł How To Build Stairs Japanese Version
Happiness is a Warm Shower
Q&A
Tool Transport
How to Stop Water Intrusion on Foundation Block
Repair a Metal Chair
Wallpaper Installation
"Extreme How-To" Uč Jak se stav schody.
Subfloors and Underlayments
The Laminate Flooring Boom
Sidewalk Repair for the Do It Yourselfer
Creating a Workshop
Inexpensive Kitchen Makeover Using Tile as a Countertop Material
Adding a deck canopy/pergola
Tips for Building a Retaining Wall
Adding Lighting to Your House Interior
Fantastic, Fun, Furniture Finishes
Gutters & Downspouts for the DIY'er
Build a Basic Set of Shelves
Replacing Old Aluminum Windows
Build a Deck
Upgrade Your Garage or Workshop
Cmo Construir Escaleras
"Extreme How-To" Wird Erlutert, Wie Treppen Stellen.
" How-To "
Extreme How-To lr ut hur man bygger Trappor. How To Build Stairs
Building Stairs Hindi Version
Building Stairs Chinese 建筑楼梯的说明


CORK FLOORING ARCHIVED ARTICLES VIDEOS PRODUCT/SERVICES DIRECTORY PRODUCT NEWS ABOUT US SUBSCRIPTION SERVICES MEDIA KIT HOW TO FORUM CONTACT US YELLOW PAGES HOME


© Copyright    All Rights Reserved
Privacy  Sitemap  FTC Disclosure