

Rust, it’s the bane of anyone doing restoration work. Concern about the destructive effects of corrosion to iron-based materials has been around as long as man has worked with iron and steel. Amazingly, this extremely tough and versatile material can be brought down with the simple combination of water and oxygen. The concept of rust prevention can be as simple and as challenging as a coating that seals the metal from environmental exposure. Such a coating calls for a product that sticks readily and is both tough and flexible. That’s what we were searching for during a frame-up rebuild of a long-term pickup project and came across a cool product called “Chassis Saver.” To use Chassis Saver, make sure everything you plan to coat is ready to go before opening the can. This means removing most of the rust and undercoat from the frame (see Side Note on “Soda Blasting” below). After preparing the surface for coating, you’ll need to mask the parts you don’t want coated. Since our frame was a salvage job, we weren’t concerned about brake and suspension components that were slated for replacement. But you may need to cover up some parts.
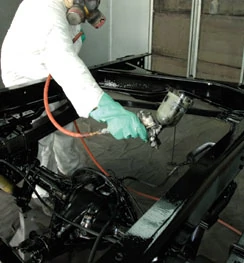
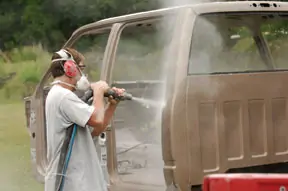
The same goes for your body—you’ll need to cover up some parts. A full respirator, hood, face shield and coveralls are highly recommended. This stuff sticks really well, if you get my drift.
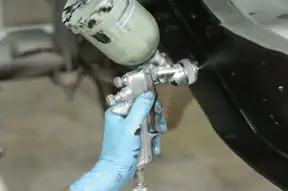
You will also need to give consideration to the tip on the gun. Because Chassis Saver is very heavy-bodied for an automotive coating, it requires a large tip opening on the gun. We used a No. 1.7 tip but we had to thin the coating quite a bit. A No. 2 tip is better. Next, make sure you have your cleaning plan ready to employ.
“If you don’t know how to take the gun apart and clean it, don’t even start,” says Warren Spears of Spears Auto Repair in Long Beach, Mississippi. “I’ve seen many good paint guns ruined because they weren’t cleaned properly right after use.” For this project “right after use” means immediately. Even the 10 to 15 minutes the manufacturer suggests between coats is too long to let the gun sit. “Unless you are continuously running the fluid through it, it’s going to set in the needles and inside the spray gun and you’re never going to get it all out,” says Spears who uses lacquer thinner and a Scotch Brite pad to clean his equipment. Plan to use a disposable bucket to mix the product and thinner. Characteristics that make a product like Chassis Saver work so well also make the clean-up process difficult. So anything you can throw away when you are done would reflect good planning, especially if you are using a brush or roller to apply the product. Anytime you are using a heavy (thick) product like this, there is a possibility that the vent hole of the gun cup will get plugged, and the product won’t flow because it’s not getting enough air. So if you have product in the cup but nothing is coming out, it may not be a plugged tip. Take the lid off, tap it gently, or use a toothpick to open the vent so it can breathe before proceeding. After you have everything ready to go, “cut” (thin) the product as recommended (using Magnet Multi-Temperature Reducer), load the gun and go. Typical spray patterns are recommended (8 to 10 inches away, constant movement, etc.), but this product is quite forgiving to apply, as you can imagine when the application process calls for brush-and-roller when applicable. Plus, it’s the truck frame (under the vehicle) and not a door panel, which needs to be perfect. So have fun with it. Be prepared to view and spray the frame from several different angles to cover all of the surfaces. The idea here is to stop rust. So be thorough in the application. One coat may be all you need. But if time and product allow, hit it a second time after the first coat flashes. Remember, clean the gun immediately after spraying each coat. The end result will be a slick finish that instantly wins the ongoing battle against corrosion.
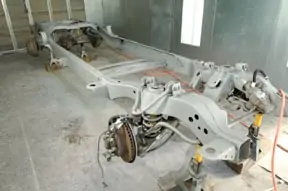
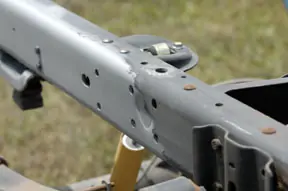
Step 1: For those who don’t recognize it, this frame belongs to a 2000 Chevy 3/4-ton short bed crew cab, rescued from a salvage yard.
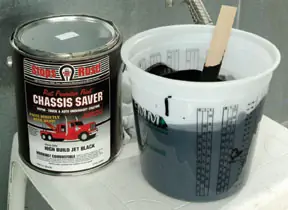
Step 2: Although not a two-part product, Chassis Saver acts like one in some ways. You need to have everything ready before opening the can and thinning, or it can get away from you.
Step 3: Once you start spraying, work systematically to cover the frame from all angles in one area before moving on to the next.
Step 4: As with all spray applications, start sweeping the gun before pulling the trigger and keep the gun moving until after you let go.
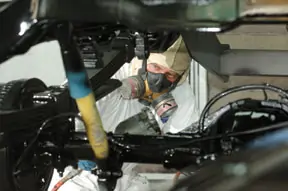
Step 5: The same characteristics that make a product good protection in harsh conditions also requires that you use good protection when applying it. A minimum of full respirator, head sock and coveralls should be used. It would not be a bad idea to use a full face shield for eye and face protection as well.
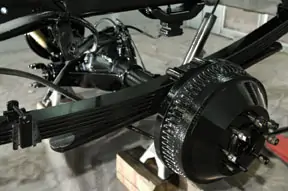
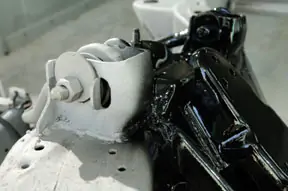
Step 6: Chassis Saver looks quite glossy for hours after application but the next day it will have less sheen and be a little more satin.
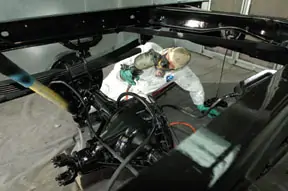
Step 7: Move around and look at the frame from many different angles to ensure full coverage.
Soda Blasting
Like most paint jobs, painting a vehicle frame is mostly prep work. In this case, most of the prep work is in getting the rust and thick moss-like under coat off before you paint. The maker of Chassis Saver says you can paint “directly over tightly adhered rust,” but it also says, “optimum results can be achieved by sandblasting.” We’d like to suggest an alternative: soda blasting–same concept, a little less aggressive.
Most of us are familiar with sandblasting. However, silica sand, aluminum oxide, glass bead, silicon carbide, corn husk and walnut shells are a few of the many abrasives that can be used for blasting.
The use of bicarbonate of soda is growing in popularity because it tends to be less damaging than more aggressive abrasives, which can also generate enough heat to warp automotive panels. Soda is also inert and water-soluble, making it a bit friendlier to the environment. Soda blasting tends to leave a residue, which must be neutralized before you can apply paint. However, this residue can be an advantage if there will be a time gap between the blasting and the painting, because this light coating can help slow down oxidization. While many recommend a simple water rinse, Spears says to plan a more thorough cleaning using Dawn dish soap, vinegar and some elbow grease. Then rinse it with water.
