Visit Extreme How-to for thousands more articles.
  Link to http://www.extremehowto.com
Google


For
related articles

click here
Click here for a printer-friendly
version of this article!

Click here to email
this article to a friend!

DIY Outdoor Lawn Furniture
By Matt Weber


I live in the rural outskirts of Birmingham, Alabama, in a sleepy country town where most of our Sunday afternoons are spent sitting outside, visiting with friends and family. And we're multiplying. Our family is growing with new additions, so our available seating is in decline. I decided to build a couple of lawn chairs from cedar. These two chairsone a single-seater, the other a benchcan be built in a weekend without specialty tools and using only basic carpentry skills. It's a fun DIY project, and one that you can customize in a variety of ways. I used some old extension service plans I found at my grandfather's house, which I modified slightly. Here's a look at the basics of construction.  


Gather Materials

You can find ready-made chairs in a similar style that are made of vinyl, but I thought that for such a traditional style of furniture, vinyl just looks too plastic. I definitely wanted the classic look of wood for the furniture. Although pressure-treated wood can be used, I opted for western red cedar. CedarOne from Weyerhaueser contains natural preservatives in the wood fiber that help it withstand insects and harsh weather conditions. It's also a beautiful building material with a rustic look that is lightweight, stains well and resists decay, which cuts down on maintenance. I don't expect these chairs to last forever, but the cedar would give it some extra life and character.


Fasteners are another must-have. The project requires strong, waterproof glue and exterior-grade screw and nails. I used galvanized 6d and 8d nails, along with 1-1/4-inch and 3-inch decking screws.


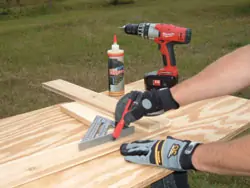
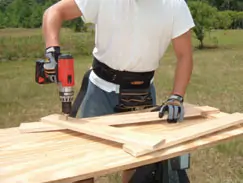
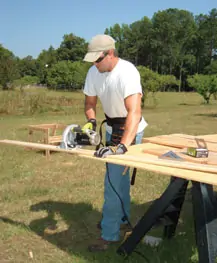
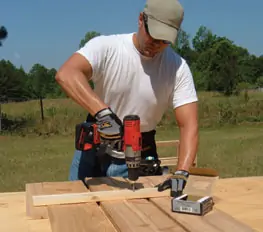
Getting started, a good rule of thumb is to gather all your building materials, tools and fasteners at the work site. Keep everything organized to prevent return trips to the hardware store. A comfortable work site is also important. I was building in my back yard, which afforded plenty of space to work and lots of natural light. I set up some sawhorses and used a couple of plywood sheets as a tabletop.


Building the leg assemblies is the trickiest part of the project. In the photo I am marking where the low support will be set back 3/4" from the edge of the front leg.


Leg Assemblies

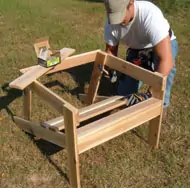
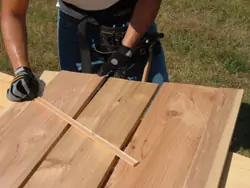
Begin with the leg assemblies. The leg assemblies are built the same way for both the single- and the bench-style chairs. For each leg assembly, use 1-by-4 stock to cut two of each component: 22-inch-long front legs, 24-inch rear legs, 24-3/4-inch upper supports, and 37-1/4-inch lower supports. Mark the pieces so you don't mix them up.


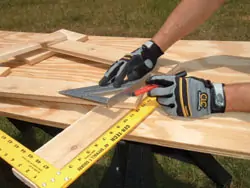
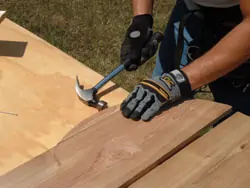
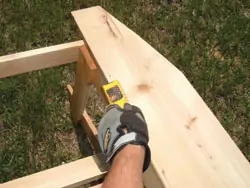
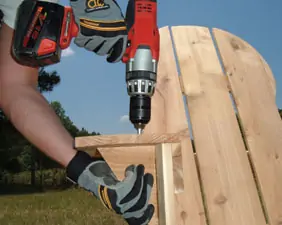
Fasten the front leg to the upper support as shown in Fig. 1. The leg goes on the outside of both the supports, and the outside will swap sides when you build the other leg assemblyremember, one leg assembly should mirror the other one, not duplicate it. Make a simple overlap joint, aligning the two pieces flush at the two foremost edges. Use a square to make sure you're joining at 90 degrees. Apply a quality waterproof glue at the jointa strong polyurethane adhesive like Gorilla Glue works greatand drive three 1-1/14-inch exterior-grade screws to secure the connection.


Fasten all the leg components with 1-1/4" screws and a strong, waterproof glue. A polyurethane adhesive like Gorilla Glue works well, burt remember to dampen the wood surface to activate the bond.


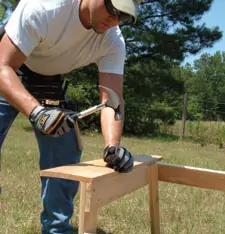
Note: Throughout this project, anywhere you drive screws you should first drill pilot holes and countersink the screws to avoid splitting the wood.


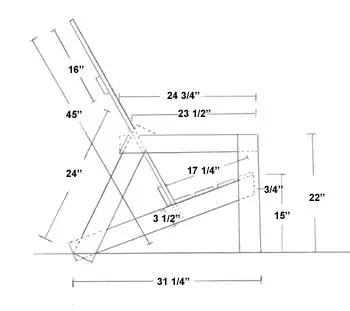
Next, install the lower leg support to the inside of the front leg with screws and glue. Take note of Fig. 2 (see pg. 63); the front end of the lower support is cut at an angle parallel to the edge of the front leg, and set back 3/4 inches to allow for the installation of the front fascia board (cross-member) of the chair.


You can adjust the angle of the seat for a comfortable sitting position, but make sure the angle matches the other leg assembly. I went with 71 degrees.


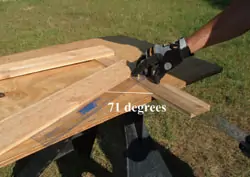
The upper edge of the lower support should be located 15 inches from the bottom of the front leg. In relation to the front leg, this sloped angle of the lower support represents the angle of the chair's seat, laid back for a comfortable sitting position. You can play with the lower support's angle in relation to the front leg, but the angle must match the support's angle on the other leg assembly, or you'll be sitting kind of funny in your poorly constructed chair. I used a 71-degree angle, and found it created a comfortable seat. Make note of your angle with a protractor and transfer the same angle to the other leg assembly.


When you have determined the angles ofthe leg assembly. mark the set-back cutline on the lower support, parallel to the front leg. Cut, replace and fasten securely.


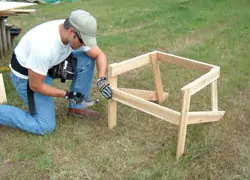
The rear leg is then fastened to the inside of the supports. Construction of the leg assemblies is the trickiest part of this project. After fastening the front leg and upper support, you'll need to initially lay out the other two pieces loosely, sliding them around to adjust their positions and marking their installation locations accordingly. You'll need to mark the angled front cut of the lower support in place, make the cut, then replace the support and fasten securely. Because of the various layers of boards, the leg assembly won't sit flat on a workbench, so use some scrap pieces of 1-by-4 to support it as needed. Fasten with three screws and glue at each joint.


You should also cut off the excess corners at the bottom of the leg assemblies so the chair will sit flat on the ground.


Use a jigsaw or hand saw to trim off the excess corners of the leg assemblies.


Once assembled, use a jigsaw or hand saw to trim off the excess corners. Then use a T-square along the bottom of the front legwhere the chair will meet the groundand make a flush line along the bottom of the rear leg and lower support. Trim off this excess wood so the chair will sit evenly on the ground. Use the first leg assembly as a pattern for the second, remembering to build a mirror image, not a duplicate of the first. Note: The leg assemblies for the chair and the bench are built exactly the same; the only difference is the construction of the seat back and length of the seat boards.


Finishing the Seat

Next, it's back to the saw to cut the remaining chair components. For the single-seater chair, use 1-by-4 stock to cut eight 25-inch-long boards. These will be the four seat boards, the two seat cross-members, and the two seat-back cleats. From the 1-by-4, also cut two 20-inch pieces to serve as the seat-back wings.


Next, use 1-by-8 to cut three 45-inch boards for the seat back. For armrests, cut two 29-inch boards from 1-by-8. Also, cut two 4-1/2-inch pieces of 1-by-8 to use as braces for the armrests.


On top of the lower leg support, make a mark 17 inches from the front upper corner of the support. Do this for both leg assemblies. That mark indicates the back side of the last seat board.


Then, following the plans in Fig. 2, fasten the front cross-member to the leg assemblies with 8d nails and waterproof glue.


Fasten the legs together with the 1x4 cross-members. The front cross-member is attached with 8d anils and glue. The rear cross-member is fastened with 3" screws and glue.


The rear cross-member will support much of the weight of the seat-back and should be fastened with 3-inch screws and plenty of waterproof glue. Drill pilot holes and then drive the screws through the 1-by-4 into the rear leg at a slightly offset angle.


Fasten the seat boards with 6d nails and glue.


Next, using 6d nails and glue, fasten the four seat boards, spacing them evenly. The front edge of the first seat board should project slightly past the front leg with the distance from front to rear at the 17-inch mark.


Use 8d nails and glue to attach the armrest over the upper leg support. Use a nail set to countersink the heads.


You can complete the seat of the chair by installing the armrests over the upper supports as shown in Fig. 1. Shape the armrests by cutting off one rear corner from each on opposite sides (remembermirror, don't duplicate). Glue and nail along the edge of the armrest, fastening its inner edge flush over the inside edge of the upper leg support with glue and 8d nails. Cut the 4-1/2-inch pieces of 1-by-8 diagonally, using them as triangular braces to support the armrests from the front legs. Fasten the braces with 3-inch screws and glue.
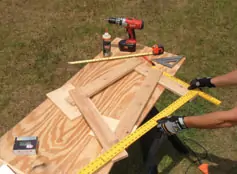
 

Once the seat portion og the chair was complete, I cut all the pieces needed to build the back.


Attach the back cleats to the 1x8 seat-back boards with glue and screws.


Building the Back

On a flat work surface, lay out the three 1-by-8 seat back boards parallel with 1/2-inch gaps between them. The tops and bottoms should be even. Fasten the lower 25-inch cleat across the boards 3-1/2 inches above the bottom end using screws and waterproof glue. Attach the top cleat in the same way, positioning it 12-1/2 inches below the top of the seat-back boards. Then temporarily tack the wings in place so you can scribe the rounded shape of the chair back all at once. (After scribing, you will remove the wings, cut to shape and refasten them to the seat back.)


Place the top cleat 12-1/2" down from the top of the seat-back boards.


I scribed the rounded back of the chairs with a homemade scribing tool (two nails in a scrap of wood).


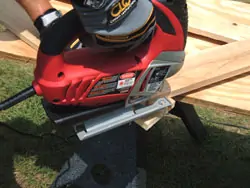
Now, scribe the rounded back of the chairs. To do so, turn the back over with cleats facing down. In the center of the middle 1-by-8, mark 12-1/2 inches down from the top. This is the pivot point of the scribing tool. My makeshift scribing tool was a simple wood scrapa thin piece of 1-by about 14 inches long. I drove two nails through each end, spaced 12-1/2 inches apart. I then positioned one of the nails (now stuck in the wood strip) over the 12-1/2-inch center mark on the middle seat-back board and tacked it in place. Swing the other end in an arc just like the hands of a clock, using the nail at the opposite end to scribe a circular line on the seat back. Scribe this cut line all the way to the outside edges of the two outer seat-back boards.


Remove the seat-back wings, and cut the back of the seat to shape.


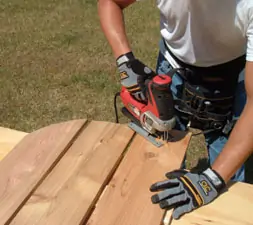
Remove the scribing tool and cut along the scribed line with a jigsaw. Remove the wings and cut them separately. When cut, fasten the wings with 8d nails and glue, nailing through the edge and into the edge of the seat-back boards. The narrow width of the wings allows the nails to reach through their top and bottom.


Cut the wings to shape separately and then reattach the wings with rails.


Once assembled, the back simply slips into the seat assembly. The lower back cleat rests on the lower leg support, and the back boards rest against the seat's cross-member. The back can be fastened in place, but I left mine loose so it can be disassembled for easy portability.
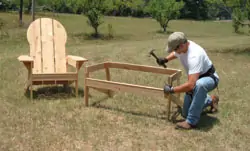
 

Use a Surform tool or block plane to round off the inside edges of the armrest.


Attach the armrest braces with screws and glue.


Bench Construction

As mentioned, for the bench, the leg assemblies are built exactly the same. However, all the bench seat's cross-members and seat boards are 45 inches long.


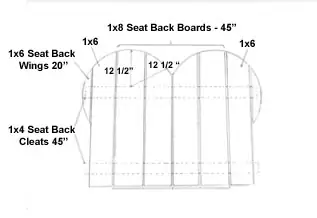
As shown in Fig. 3, I built the back of the bench from four, 1-by-8's flanked by two, 1-by-6's, plus two short wings cut from 1-by-6. The bench back is fastened together just like the chair back, except the two 1-by-4 cleats are 45 inches long. Mark the double rounded back by positioning the scribing tool at the 12-1/2-inch center mark on both the second and fifth seat-back boards. Once scribed, remove the wings, cut the wings and back to shape, then reattach the wings. That completes the backjust slip it into the bench seat.


The legs of the seat and bench are built the same, but the seat boards and cross-members are each 45" long.


Note: After completing the bench, I noticed that the 45-inch seat boards of the bench had some sag when I sat on themparticularly on the second to last board. I went back a couple of days later and installed a 1-by-4 brace fastened beneath that third seat board. I installed this brace flush between the two lower supports, positioned perpendicular to and along the entire length of the seat board. This brace added a lot more rigidity and stability to the bench seat.


Finishing Up

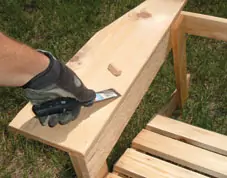
After building the chairs, I took a few additional steps for a completed look.  I puttied the fastener holes and sanded the putty after it dried. I also sanded all the sitting surfaces (armrests, top of seat boards, etc.) to prevent splinters. I then ran a Surform tool on the inside edges of the armrests. The Surform (you can also use a rasp or block plane) shaved the sharp inner edge of the armrest to a more comfortable rounded shape.


Fill all the fastener holes with wood filler for a finished appearance.


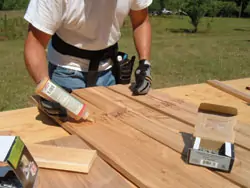
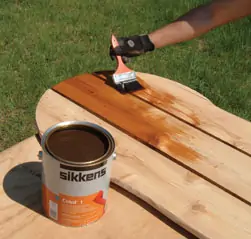
I also added a stain. Although cedar is durable and will eventually weather to a silvery gray, a finish coat will stretch its life and achieve a handsome, healthy appearance. I brushed on two coats of Cetol 1 in Cedar Tone from Sikkens. The Cetol 1 is a translucent, satin stain designed to enhance the look of wood and protect it from UV rays and water damage.


Brush on a quality finish to enhance the look of the cedar and help protect against the elements.


After the stain cured, I was really pleased with the look of the furniture. And I had a few more seats for those Sunday afternoon get-togethers.


Editor's Note: Special thanks to Weyerhaueser for supporting this project. For more information, visit www.CedarOne.com.


Other Related Articles


Prevent Home Electrical Fires
Everything Auto: DIY Wheel Alignment
Install a Rock Floor Inside Your Home
Prevent Home Electrical Fires
A Guide to Pressure Washers
A Lesson in Lathes
Fix Common Clog Problems
Remodel Your Attic Space
DIY Closet Shelves
A Radiant Restoration
A Smart Way to Frame a Corner
A Solid Choice: DIY Solid Surface Countertop
A Tunnel for the Sun
Adding Style with Wainscoting
All About Sanders
All Fenced In
All Hands on Deck
Alternative Trim: The Power of Plastics
Everything Auto: Aluminum Wheel Repair
Everything Auto: Alternator Check and Replacement
Everything Auto: Automatic Transmission Service
Backyard Gardening
Backyard Gazebos
Backyard Planters: Big & Small
Backyard Ponds Get A Makeover
Basement Dweller: Remodeling Tips
Up Close with Tankless Water Heaters
Big Storage Below the Deck
Block by Block: Segmental Retaining Walls
Fighting Allergic Asthma in the Home
Brick Picks
Bringing in the Light: Install a Skylight
Build a Garden Tool Shed
Build an Air-Station Assembly Table
Build Your Own Patio
Building a Drive-Thru Backyard Shed
Building a Red Cedar Pergola
Building a Swing Arbor
How to Build Stairs
Building with Glue-Laminated Beams
Cabinet Building Basics for DIY'ers
Everything Auto: Car Care Tips
How to Light Kitchens and Baths
Building a Fireplace Mantel
Chainsaws 101
Chalk it up to Caulk
Choosing a Tiller
Choosing Lumber for Your Deck
Everything Auto: Clutch Play
Common Framing Errors with Engineered Wood
Concrete Creations
Cooling Off with Fresh Air - Whole House Fans
Counter Culture: DIY Plastic Laminate Countertop
Covering Your Ground: Carpet Installation
Creative Concrete Stamping
Crown Molding ABC's
Curb Appeal 101: Cedar Siding Upgrade
Everything Auto: Dash Painting
Deck Helpers: Innovations and Accessories
Deck Building Basics
Design with Flexibility -- Ceramic Tile Installation
Designing a Sprinkler System
Diggin' Peace: Create a Water Garden
Everything Auto: Distributor Cap Replacement
DIY Acoustic Ceiling Tile
DIY Garden Benches
DIY Container Water Garden
DIY Crown Molding & Trim
Do-It-Yourself: Joining Wood Made Simple
Don't Forget the Deck When Winterizing the Yard
Dovetail Joints for Quality Construction
Drills and Drivers Unplugged
Drywall Tips from the Pros
12-Step Toilet Installation
13 Pro Tips for Crown Molding and Trim
A Closer Look at Composite Decking
A Good Look at Greenhouses
How to Use Hand Planes
Inside HOUSE RULES
Everything Auto: Install a Precision Sport Shifter
Install a Whole House Fan
Installing a Floating Subfloor
Installing Doorknobs and Locks
Build a Roll-around Tool Cabinet
Keeping the Water at Bay: Build a Sea Wall
Lawn Aeration
Lawn Care Tips from a Pro
Lawn Edgers Are Put to the Test
Make a Statement with Brick Pavers
Make New Cabinets Old
Matchmaking for Windows
Material Market
Material Market: Counter Culture
Material Market: New Floor Materials
Material Market: Siding Selections
Mortise and Tenon Joints
New Options in Concrete Decor
Build an Office Desk
Open Sesame! Install a Garage Door
Organize This: Build Storage Shelves
Organizing the Home Workshop
Out with Old Grout
Plate Compactor Basics for the DIY'er
Paint it Beautiful
Build a Bar Pass-Through
Everything Auto: Turbocharger Basics
Prep Steps for Outdoor Painting
Everything Auto - Windshield Chip Repair
Everything Auto: Adding Tubular Sidesteps
Everything Auto: CV-Joint Rehab
Everything Auto: Getting Greased
Everything Auto: Replacing Ball Joints
Everything Auto: Replacing Rotors, when your discs have seen better days
Exterior Finishes For Wood
Extreme Woodwork: From Trees to Lumber
Fast and True Deck Framing
Faux-to Finish
Fight Wood Rot
Finishing Moves: Repairing Hardwood Floors
Fire Up the Brick Barbecue
Flooring in a Snap: Installing Laminates
Flushing Upward
From Slicing to Sliding: Adding a Deck Door
From Window to Wall
Getting Jiggy
Everything Auto: Getting Rid of Motor Muck
Getting Wired
Girl Power
Give Wood Furniture a Great Look
Giving Walls a Drywall Update
Goodbye to Water Worries - Install a Shower Pan & Liner
Grasscycling: Waste Not, Want Not
Gutter Repair, Installation and Upgrade
Home Wiring for the Information Age
Professional Tile Layout
Putting Up Knockdown Texture
Recip Saw Roundup
Wood Refinishing 101
Renewing Plaster Walls
Everything Auto: Replacing a Water Pump
Everything Auto: Replacing Brake Shoes
Everything Auto: Replacing Disc Brake Pads
Everything Auto: Replacing Tie-Rod Ends
Everything Auto: Replacing Window Door Glass
Restoring Tile Grout
Righting the Wrongs with IN A FIX
Roof Flashing Done Right
Roof of Steel
Roofing Done the Right Way
Roofing Revisited
Save Money: Rent Lawn and Garden Equipment
Scouting Out Routers
Selecting a Hardwood Entry
Selecting Engineered Wood
Serenity Now! Build a Gazebo
Sinks with Style
Skill Savvy
Soldering Copper Tube
Spring Into Action
Prevent Mold in the Home
Stone Age: Simple Stone Projects
Everything Auto: Build an Auto Storage Box
The Beauty of Bamboo Flooring
Everything Auto: Buying a Diesel
The Bright Outdoors: Landscape Lighting
The Grass is Always Greener
The Ins and Outs of Gutters and Downspouts
Screened Porch
The Latest in Kitchen Cabinets
The Lowdown on Cork Flooring
The New Face of Bamboo
The New Face of Vinyl Siding
Enhance a Room with Skylights
The Wonders of Wood Siding
Tips From a Scroll Saw Pro
To Build a Better Home
Tool School: Circular Saws
Exploring Lithium-Ion Power Tools
Tool School: Choosing Air Compressors and Air Tools
Tool School: Hammer Drills and Masonry Bits
Tool School: Radial Arm Saws
Top Tips for Installing Vinyl Siding
Up Close with Table Saws
Upward Thinking: Overhead Storage Space
Wall Tile Tips from a Pro
Waves of Warmth: Radiant Heat Flooring
Welding 101
Close Look at Drill Bits
Windows of Opportunity: DIY Window Replacement
Winterize Your Home
Working with Concrete
Working with Copper Pipe
Working with Steel Pipe
Working with Wood Filler
Working with Wood Stains: Inside and Out
Everything Auto: Wrangle More Power
Spray-in-Place Concrete Fencing
Trimming Out a Room
Revitalize a Dormant Lawn
Build a Locking Tool Cabinet
Up Close with Circular Saws
Easy Garage Storage
Everything Auto: DIY U-Joint Replacement
Build a Basic Case of Shelves
Installing a PVC Deck Rail
DIY Shop and Garage Heating
Pro Tips For Tongue & Groove Flooring
Build a Playground Slide
Brighten Up with Landscape Lighting
Drywall: Handy Tools, Smart Techniques
Hammers and Nails
DIY Drywall Repair
Sealing and Waterproofing
Cedar Siding Success
Everything Auto: How to Install a Ram-air Hood
A Close Look at Asphalt Roofs
A World of Uses for the RotoZip
Creating Super Wood Joints
All About Band Saws
Hot Alternatives to Home Heating
Patching & Repairing Concrete
Strong, Sturdy Retaining Walls
Guard Your Home from Electrical Fires
Everything Auto: Automotive Radiator Repair
How to Select a Wood-Burning Stove
How to Install Wainscoting
The Low Down on Low Decks
Crown Molding Basics: Tips and Tricks
How to Finish Pine Furniture
Choosing a Metal Roof
Everything Auto: Install a Throttle Body Spacer
Making Magic with Your Router
New Garage Floor Lifts Spirits of Injured Auto Enthusiast
Painting Kitchen Cabinets
EHT's New Digital Magazine
One-Day Garage Makeover
Skil's Octo Sander
Dressing Up Windows and Doors
Simply Radiant
Air Power
Decked Out with Accessories
Deck Makeover
Window Trim Basics
How to Use a Layout Square
Detailing your Deck
11 Keys to Stain Your Deck like a Pro
DIY Deck Remodeling
High-Pressure Cleaning
Build an Attached Carport
Outfitting a Kitchen
How to Sand and Finish Wood Floors
Everything Auto: Install an Alarm
Under Floor Heating
How to Install Skylights
How to Cope Base Molding
Five Garden Projects You Can Build
Deck Basics for DIY'ers
Troubleshooting Toilets
Installing Slate Tile
Build a Butcher Block Countertop
DIY Gluing Tips
Installing Integrated Deck Handrails
Radical Re-deck
Install an Ornamental Metal Fence
Soffits Up Close
Build a Deck Sunroof
Build a Home Library
Making Frame and Panel Doors
Pinning Down Nailers and Staplers
Congratulations to EHT's Sweepstakes Winner!
Build a Classic Workbench
Build a Retaining Wall
Re-Laminate Your Countertops
Build a Gun/Trophy Case
The Latest Ladders & Ladder Accessories
Drill Bit Update
Install an Exterior Door
Build a Classic Workbench
Molding Magic
Decking Done Right with David Billings
Everything Auto: Performance Coilover Suspension System
Woodworking Helpers
Install Deck Lighting & Accessories
Install Snap-Together Garage Tile
Everything Auto: Battery Basics
How to Replace a Window
Do-it-Yourself Cedar Siding
New Cordless Drill/Drivers
Make a Mantel Shelf
Everything Auto: Paint the Chassis for Rust Resistance
DIY Laminate Floor Installation
Spray Foam Saves Energy
Warming Up with Radiant Heat
How To Clean Brick Stains
How Long Should Concrete Cure?
Pro Tips on Built-up Crown Molding
Fix a Door Hinge
Grout Stuck in a Tub
Paint Aluminum Siding
Oven Burner: Fix or Replace?
Repair Loose Siding
Repair a Vinyl Floor Seam
Fix a Bouncy Deck
DIY Fountain Kits
Don't Cover Turbine Vents
Easy-to-Build Workbench
Refinishing Hardwood Floors for the DIY'er
Cutting Costs by Building Smart
Fix a Metal Handrail
Repair a Crack in Drywall
Repair a Stone Patio
Drippy Heat Pump
How to Cut Cement Board
Add Eave Vents
DIY Wallpaper tip
Build a Porch Swing
Pro Tips for Paint Brushes and Rollers
Installing a Front-Mount Receiver for a Winch or Trailer Hitch
How to Apply Primer Like a Pro
Remove Paint from Concrete
Can a DIY'er Re-shingle a Roof?
Deodorize your Air Conditioner
Should I Insulate my Crawlspace?
How Do I Prevent Puddling on my Deck?
How to Clean Hardwoods
How Can I Solve a Serious Toilet Clog (Bar of Soap)?
How Do I Install Quarter-Round Trim?
What's the Best Drill Bit for the Job?
How Do I Stop a Chimney Backdraft?
The Grout Gun: Reader Tip for Grout Application
How Do I Hang Drywall?
Should I Use Textured Paint?
How Do I Become a Professional Contractor?
Should I Use PT Lumber for a Shed?
How to Install Roof Sheathing
How to Remove a Stripped Screw
Stucco a Foundation
Should I Tile a Tub?
Installing Crown Molding Solo
Reduce Wood Warping
How to Calculate Concrete Required
Re-Laminate over Existing Laminate Countertops
Paint Vinyl Siding
Taping Inside Corners of Drywall
What's the Difference in Granite Countertops?
Can I Match Roof Shingles?
Stop Pipes from Banging
Installing Base Molding
PVC as a Backsplash?
A Good Start-up Toolbox
Caulk a Tub with the Right Stuff
Five Lathe Projects You Can Build
Building Basic Closet Shelving
Install Column Wraps for a Stylish Front Porch
DIY Thermostat Upgrade
Build a Brick Garden Wall
Outdoor Living Spaces
Security Solution
Repair a Run in Carpet
Clean your Gutters the Easy Way (Reader Tip)
Repair a Shower Head
Upgrade Your Truck's Exhaust System
Clean Oil Stains from the Driveway
Repair Damaged Plaster
DIY Block Windows (Glass vs. Acrylic)
Refinish a Tub
Which Flooring Over Concrete?
Checking Your Tire Pressure is as Easy as Pumping Gas
Video: Deck Recovery
Chainsaw Rx
Next-Gen Decks
Installing a Tile Pattern Laminate Floor
Pour a Concrete Floor
How to Install Vinyl Siding like the Pros
Build a Carpenter's Box
Home Stretch
Congratulations to June's Skil Sweepstakes Winner!
Kit-Built Log Homes
Build a Squeak-Free Floor
Everything Auto: Anti-Sway Bar Install
Installing Granite Countertops
Converting a Closet to Cabinets
Wiring a Garden Shed
Build Your Outdoor Living Room
Understanding House Framing
Replace an Old Deck with Composite Decking
Tighter Miters
Adjustable Pliers & Wrenches
Think Green with Cordless Lawn Tools
Building Shop Shelves
How to Choose Lumber for Outdoor Projects
Demolition Devices
Circular Saw Blades Up Close
Best New Products for Your Deck
Replace an Old Mower Deck
Router Essentials
Fireplace Safety: Avoiding the Dangers of Creosote Buildup
Building a Cooking Table for Your Ceramic Grill
The Kitchen Facelift
Roof Framing 101
Fix a Squeaky Floor from Above
Why Choose a Tankless Water Heater?
Remove Candle Wax from Carpet
Quick Fix for Squeaky Hinge
Pressure Problem with Faucet
Flatten Plywood Subfloor for New Flooring
Prep Floor for Peel & Stick Tile
Replace an Interior Door
The Summer Digital Issue is Now Live!!
Do-it-Yourself Brick Patio & Walk
Crown Molding in Review
Making Outdoor Log Furniture is Quick and Easy
Install a Patio Door
How To Build a Bar Stool
13 Pro Tips for Crown Molding
Bathroom Design Guide, by Sunset Books
Master Suite Masterpiece
Wood Handle Replacement for Striking Tools
Heated Tile in a Snap
Bathroom Redo
Hot Water Options
Christmas Presents You Can Build
Gasket Replacement for Ceramic Grills
Organize Your Kitchen with Rev-a Shelf
Save Energy with Insulated Siding
Working for the Clampdown
How to Remove Wallpaper
Holiday Digital Issue is Now Live
What are Architectural Shingles?
How to Apply Stucco to Concrete Block
Is this Old Paint Oil- or Latex-based?
Is the Plumbing Clog in the Drain or Septic Tank?
Fix a Noisy Ceiling Fan
Adjust an Automatic Garage Door
How to Paint a Steel Door
Can I Install a Toilet where there is No Drain?
How to Shim a Granite Countertop
Use UV light to Clean HVAC System
How Do I Match Old Brick?
Troubleshoot Automatic Garage Door Opener
Prevent Mold on Bathroom Caulk
Keep Mice Away from the House
How to Install Outlet Extensions
Installing a Brick Accent Wall
Down on the Farm, Up Goes a Wall
How to Bend Drywall
Use House Wrap on a Shed
DIY Faux Finish: Stippling
Creating Concrete Sculptures
How to Eliminate Floor Pops
Can New Tile Go Over Old Tile?
Keep Ceiling Joists Level when Installing
Adding a Camo Wrap
Replace an Old Roof With New Shingles
DIY Storage Helpers
Extreme Outdoor Cooking Center
Repair a Kitchen Cabinet
Woodworking Tools 2008
Solving Common Household Drain Problems
Sealing Interior Brick
How to Remove a Popcorn Ceiling
Extra-Mile Hero Contest
Install Mosaic Floor Tile
Stock Parts, Custom Door
Cordless Fastening in Tight Spots
Heating Homes with Hot Water
Just Getting Started
Build a Temporary Closet
Hardwoods in a Heartbeat
Fold Away Hide Away
Installing a Synthetic Railing System
Build a Shadowbox Privacy Fence
Today's Handsaws
How to Make a Knife
The Fun and Fascination of Wallpaper
Do-it-yourself Mirror Frames
Window Re-View
Remodel with Prefinished Stair Treads
Build an Oak and Walnut Nightstand
Five Portable Workstations Reviewed
Tiling Over Concrete
Replace a Ceiling Fixture
Exterior Wood Coatings
How Do I Lay Sod on a Lawn?
Should I Use Faced Insulation?
Deck Demolition Made Easy
Easy Homemade Wood Jigs
Build a Kid's Cubby
Siding Maintenance & Repairs
Choosing a Pool Location
A Home with a Personal Stamp
Adding a PVC Jamb Extension
Bathroom on a Budget
Everything Auto: Upward Thinking with Overhead Consoles
How to Preserve the Look of Copper
How Soon to Paint Concrete?
How to Repair Worn Hardwoods
How Do I Add a Dimmer Switch?
How Do I Connect an Ice Maker Supply Line?
What is an Incinerating Toilet?
How Do I Remove a Mirror from a Wall?
How to Fix a Bi-fold Door that Sticks
How Do I Build a Fence Gate?
How to Remove a Water Stain from Hardwoods
How to Repair a Sagging Floor
Hot Products April 2009
Energy Efficiency in the Home
Expert Advice on Planning a Kitchen
DIY Tile Countertop
Trim Tips for Doors and Windows
Adding a Cased Opening for Windows and Doors
Working with Crown Molding
Base Molding, Learning to Cope
Installing Toilets, the 12 Step Method
How-To Wire Split Receptacles
Install Landscape Lighting
Interior Rock Floor Installation
Refinishing Cabinets to Look Old
Refinishing Kitchen Cabinets for the D-I-Y
Installing Rods and Hardware
Installing Window Treatments
Extreme How-To's Guide to Painting
Bookshelves You Can Build Yourself
Build a Patio or Walkway from Pavers
Build a Patio Using Pavers
Build a Firepit
How to Repair/Replace a faucet
Replacing a Faucet
Build a Stone Firepit
Install Utility Sink
Adding Wire Shelving to Your Closet
Deck Lighting
Installing Laminate Tiles
Countertop Pros and Cons
How to Repair a Cracked Porch
Clipped-Head or Round-Head Nailer?
Invisible Cold Air Return (Reader Tip)
How Do I Build a Header?
Reinventing a 100-Year-Old Bedroom
Surviving Extreme Winds
An Overview of Today's Powered Hand Sanders
Replacing Drawer Slides
Handy Drywall Tools
How to Make Cope Joints in Molding
Paint with Success
How to Build Deck Stairs
Brand New Tune
Tips on Cleaning and Staining Your Deck
Island Workspace for The Kitchen
How to Build a Bar Pass-through
Deck Framing Gone Wild
New Tools for the Green Season
Bright Ideas for Deck Lights
Grid Guidelines for a Great Look
Building a Pergola
Concrete Patio Stamped with Style
Cordless Tool Update
Installing a New Tub or Shower
Test Page for Iframe link
Artificial Stone up Close
Paint a Countertop to Look Like Granite
DIY Countertops with Solid Surface Material
Build a Spiral Staircase
Easy Steps to Replacing a Bay Window
Deck Product Roundup
Waterproofing Basement Walls
Open to Change
All About Insulation
How-To Stain or Paint a Deck
Adding a Kitchen Island
Bathroom Vanity Installation
Level-headed
DIY Shock & Strut Installation
Your House is a System
Coat of Armor for Outdoor Wood
Install Plywood Underlayment for Vinyl Flooring
When to Install New Shingles
Can I Paint Asphalt Roof Shingles?
How to Paint Baseboard Heaters
What is the Best Firewood?
How Does a Heat Pump Work?
How to Refinish a Clawfoot Tub
How to Paint Window Shutters
Installing Wainscoting Adds Style
Installing a Shower Pan Liner
Installing a Laminate Floor
Installing Granite Countertops
Installing a Ceiling Fan
Ceiling Fan Installation
Selecting Energy-Efficient Replacement Windows
Comment construire l'escalier French Version of How To Build Stairs
Extreme How-To leert Trap bouwen "How To Build Stairs, Dutch Version"
ɊK'ig\'z邽߂̎菇ł How To Build Stairs Japanese Version
Happiness is a Warm Shower
Q&A
Tool Transport
How to Stop Water Intrusion on Foundation Block
Repair a Metal Chair
Wallpaper Installation
"Extreme How-To" Uč Jak se stav schody.
Subfloors and Underlayments
The Laminate Flooring Boom
Sidewalk Repair for the Do It Yourselfer
Creating a Workshop
Inexpensive Kitchen Makeover Using Tile as a Countertop Material
Adding a deck canopy/pergola
Tips for Building a Retaining Wall
Adding Lighting to Your House Interior
Fantastic, Fun, Furniture Finishes
Gutters & Downspouts for the DIY'er
Build a Basic Set of Shelves
Replacing Old Aluminum Windows
Build a Deck
Upgrade Your Garage or Workshop
Cmo Construir Escaleras
"Extreme How-To" Wird Erlutert, Wie Treppen Stellen.
" How-To "
Extreme How-To lr ut hur man bygger Trappor. How To Build Stairs
Building Stairs Hindi Version
Building Stairs Chinese 建筑楼梯的说明


CORK FLOORING ARCHIVED ARTICLES VIDEOS PRODUCT/SERVICES DIRECTORY PRODUCT NEWS ABOUT US SUBSCRIPTION SERVICES MEDIA KIT HOW TO FORUM CONTACT US YELLOW PAGES HOME


© Copyright    All Rights Reserved
Privacy  Sitemap  FTC Disclosure