Visit Extreme How-to for thousands more articles.
  Link to http://www.extremehowto.com
Google


For
related articles

click here
Click here for a printer-friendly
version of this article!

Click here to email
this article to a friend!

A Close Look at Asphalt Roofs
By Matt Weber


Roofing installation is a big job, and not just in the size of the project. As the number one weather barrier of the home, the roof is one area where you do not want any mistakes. A first-time roof installation is best left to an experienced professional. The pros are trained how to properly construct the roof deck, how to install underlayment, drip edges and flashings and how to correctly apply the shingles. Roofing is also hazardous work, leading most manufacturers to specify that their product only be installed by a trained professional.


However, do-it-yourselfers who aren't afraid of heights or hard work have been known to tackle a re-roofing project first-hand. While asphalt shingles are designed for decades of low-maintenance performance, after about 20 years the roof should be inspected annually, and eventually it will need to be re-shingled. When that time comes, a DIY re-roofing project can save about 50 percent on the cost of the job.


Assessing the Roof

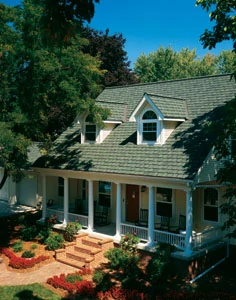
Asphalt shingles are the most widely used roofing material in residential construction, accounting for roughly 80 percent of the market. Today's asphalt roofing greatly outperforms the shingles available 30 years ago. Season after season, asphalt roofing will protect you and your family, and provide a terrific value for your roofing investment. Asphalt costs significantly less than higher-priced rivals (including tile, wood, cedar, slate and metal) and requires very little maintenance over the years. And shingles come in a wide range of colors that allow you to choose a tone that complements the exterior colors of your house.


After a couple of decades you'll need to inspect your roof for signs of deterioration. The most obvious perpetrator is a roof leak, indicated by water stains or wet areas in the attic. In some cases these can be patched, but in the case of a serious leak, it's time to re-roof. Also, excessive mineral granules or bare spots on the shingles are evidence that the asphalt is deteriorating and should be replaced. Shingles also tend to crack or curl from sun exposure, and wind can blow them off the roofa sure sign that a repair is in order.


In some cases you can shingle right over a pre-shingled roof (see Side Note at bottom). However, you have to consider weight, smoothness of the existing roof, local codes and the capability for fasteners to hold the shingles securely. Fasteners must be long enough to completely penetrate at least 3/4 inch into the solid roof deck when hammered flush with the shingle. So if the roof has already been re-shingled in the past, then there will likely be too many layers for the fasteners to hold properly. In many cases, two layers of shingles is the maximum.


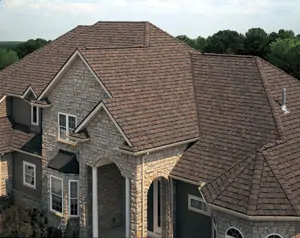
If the roof is in bad shape or too many shingle layers are in place, then the roof requires a tear-off. A hammer and pry bar are used to loosen the nails, and the shingles are removed with a flat shovel. Tearing off roof shingles is hard work, but it does provide the opportunity to thoroughly repair the roof and update your material from standard three-tab shingles to attractive asphalt architectural shingles that can raise the overall value of the home. Architectural shingles last longer and look a little different. Instead of slots in the shingle, the architectural types get their texture from tabs that are laminated onto the shingle. This provides extra thickness and, in turn, more durability. For the most part, architectural shingles install similarly to the three-tab type, but always check your manufacturer's instructions for any recommended variations in the installation method.


Getting Started

The first step in a roof project is to check the weather report. Ideally, you don't want any showers heading your way for the next three days. However, as Mother Nature is known to be unpredictable, have a couple of tarps on hand in case of rain.


If you're re-roofing, first nail down all loose shingles and replace any that are missing. Or, with a tear-off, make all the necessary repairs to the roof sheathing, underlayment, wood trim and flashing. The roof surface must be dry, cleaned and properly prepared before roofing. For more information on proper sheathing and flashing techniques, check out the variety of online roofing articles at www.extremehowto.com and www.apawood.org. 


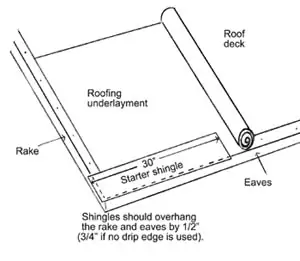
Appropriately enough, shingling a roof starts at the roof edge with what is called a starter strip. At the lower end of a standard shingle are three tabs separated by slots about 3/8-inch wide. The starter strip prevents rainwater from flowing through these slots and onto the roofing underlayment. To create the starter strip, first cut off the tabs of the first shingle and discard them. Cut from the back side of the shingle when possible to avoid dulling the knife blade. Then cut 6 inches off the first starter-course shingle and apply the rest of it on the lower corner of the roof, with the cut edge overlapping the eaves and gutter apron. The shingle should overlap rakes and eaves by 1/2 inch if using a drip edge. If not using a drip edge, make the overhang 3/4 inch. Continue applying full-length starter-course shingles along the eaves.


Shingle All the Way

With the starter strip complete, you're ready for the first course. Apply a full shingle at the lower roof corner on top of the starter course. The tabs of the shingle should be flush with the edges of the starter course. This method seals the lower edge of the roof to help prevent the edge shingles from lifting in high winds.


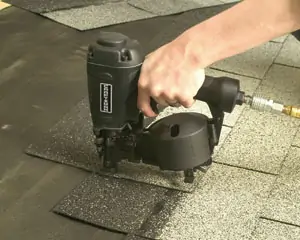
To fasten the shingles, apply four nails through the tabs just below the sealant line, 1 inch from each edge and just above each slot. In areas exposed to high winds, six nails can be used (two nails flanking the top of each slot). Use 11- or 12-guage corrosion-resistant roofing nails at least 1-inch long with at least 3/8-inch heads. Make sure the nails are driven straight, not overdriven or under-driven. Check your manufacturer's instructions for specific nailing requirements.


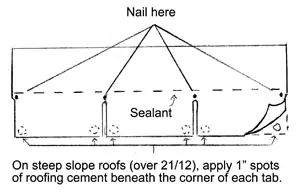
In steep slope applications (over 21/12), asphalt roofing cement should be used in conjunction with nails. One inch of roofing cement should be applied beneath each corner of the tabs. However, working on a steep slope can be very dangerous and require special scaffolding; such projects are best left to the professionals. 


Once the first shingle is in place, snap a chalk line from the top of the shingle to the opposite edge of the roof. Then move to the first shingle of the second course. This helps align the shingles, and moving up rather than out means you don't have to journey across the roof with each successive shingle. Cut 6 inches off the first second-course shingle. Align the bottom edge of the shingle with the top of the tabs of the first shingle. Nail it in place.


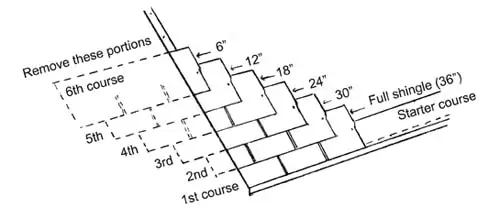
With those shingles in place, move to the third course. Cut 12 inches off the first third-course shingle. Align the bottom edge with the top of the slots in the second-course shingle, and nail it home. Continue progressing up the roof, nailing the first shingle of each course 6 inches narrower than the one beneath it (see diagram). After the sixth course, you will begin with another full shingle aligned with the edge of the roof.


After you've worked up to the roof ridge, return to the lower edge of the roof. Butt a full-length shingle next to the first-course shingle and nail in place. Continue back up the roof, nailing a full-length shingle against each of the starting shingles that are already in place. Follow this shingling procedure to complete the field of the roof. All the shingles are full-length except the ones at the edge of the roof.


At the edge of the roof, use a straight edge to cut the shingles to overlap the rake by no more than 3/4 inch. On hips and ridges, trim the shingles flush with the centerline.


 Hips, Ridges and Valleys

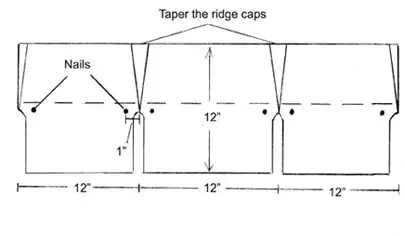
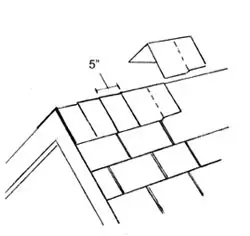
Hips and ridges must be covered by 12-inch ridge caps. Some companies offer special ridge cap shingles. Check to see if they're available for the shingles you're installing. If not, then make the caps from regular 36-inch shingles cut into thirds, separated at the tabs. Cut the sealant ends of the tabs so they taper to about 10 inches. To install, snap a chalk line on each side of the ridge or hip, 6 inches from the center line. Start with the first cap at the end of the ridge opposite from the prevailing wind direction. Bend the cap over the ridge along the center line. Fasten with two nails on each cap, just above the sealing tab and 1 inch from each edge. Overlap the caps by 1 inch, leaving a 5-inch tab exposed. Do not expose the fasteners.


As for valleys, in some cases a non-corrosive prefabricated metal flashing is installed, and the shingles are cut back to allow drainage. This is called an open valley.


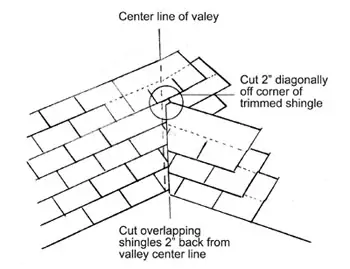
A closed cut valley is installed over a heavy-duty valley liner or metal roll flashing. Shingles are then overlapped. (Do not nail shingles within 6 inches of the centerline.) Then a straight line is cut through the top layer of shingles 2 inches away from the centerline of the valley. The 2-inch offset prevents the majority of the water runoff from flowing directly over the seam. When cutting, use flashing beneath the top layer to prevent cutting the layer below.


For more information on asphalt roofing, visit the Asphalt Roofing Manufacturers Association online at www.asphaltroofing.org or call (202) 207-0917.


Photos courtesy of Certainteed


Side Note #1

Shingling Over an Existing Roof

The process of re-shingling or re-roofing is only slightly different from installing a new roof. On a new roof the underlayment is smooth, lying flat on the roof sheathing. On an existing roof, the surface is not smooth because of the shingles, which are installed in stair-like layers. Since asphalt is a plastic material, the shingles will conform to the surface of whatever is beneath them. To compensate for the lack of flatness, simply fill in the first step of the shingles. Cut off the top of the shingles lengthwise to fit perfectly over the bottom row of tabs on the existing roof and nail them in place. Start with a shingle cut 6 inches short, so the ends won't align with the ends of the existing shingles. Complete the bottom row in this manner using full-length filler shingles. Each new row of shingles fills in the gap for the row to follow. From here onward, shingle as you would a normal roof, covering the first course with full-width shingles.

Side Note #2  

Ten Tips for Successful Roofing

     1.  Proper flashing around chimneys, vent pipes, dormers and other obstructions is critically important to avoid leaks. If you're unsure how to do this, then leave it to a professional. 

     2.  In roofing, properly installed underlayment is also critical for a good roof. It comes in 15- or 30-pound roofing felt that's soaked in asphalt. Use felt specified by the shingle manufacturer. It is installed beginning at the bottom of the roof. Each strip overlays the strip below by a few inches, so flowing water is directed over the seam and not into it.

     3.  When cutting shingles, it's easiest to use a roofing knife with a hooked blade.

     4.  Don't attempt to shingle in extremely cold or hot weather. In cold weather, shingles can become brittle and break. In hot weather you can scar the shingles with your feet.

     5.  The sealing of the shingles may be delayed by cooler weather or by the presence of airborne dust. If the shingles don't seal, it may be necessary to hand seal.

     6.  Installation of laminated architectural shingles may vary from the 6-inch layout discrepancy shown in this article. They may need to be stepped off 7 or 8 inches. Check the manufacturer's instructions for recommended installation methods.

     7.  Save the trimmed pieces of stepped-off shingles to fill in at rakes and valleys.

     8.  Use all shingles from one bundle before moving to the next bundle. This will help the colors blend on a finished roof.

     9.  If possible, have the roofing supplier place the shingle bundles on the roof so you don't have to carry all the shingles up a ladder.

     10.  Always check with local building codes that may specify the rating of shingles and other construction requirements that may apply to your area.


Side Note #3

Shingle Safely

The right gear is essential for safe roofing. The roof surface is sloped and it can be slick. Walk on the roof as little as possible and wear soft, rubber-soled shoes with ankle supports to resist slips. A wet roof can be treacherous, so stay off it. And steep slopes are best left to the pros. Never work on the roof during the threat of lightning. Stay away from power lines and keep the roof clean of debris or other obstacles.


It is recommended to use a safety harness with a fall-arrest rope. Special roof scaffolds can provide a flat surface to support you and your materials. Use a metal ladder bracket to hook your ladder to the roof. Make sure your ladder is strong, sturdy and free from cracks or other weaknesses. Keep the base on firm, level ground. Keep your hips between the ladder rails, and never reach out to work; move the ladder instead. Only one person should ever be on a ladder at once. Never stand on the top two rungs of the ladder. For roof work, at least two rungs should extend above the eaves. Rather than carrying tools and materials up a ladder, pull them up in a bucket.


Other Related Articles


Prevent Home Electrical Fires
Everything Auto: DIY Wheel Alignment
Install a Rock Floor Inside Your Home
Prevent Home Electrical Fires
A Guide to Pressure Washers
A Lesson in Lathes
Fix Common Clog Problems
Remodel Your Attic Space
DIY Closet Shelves
A Radiant Restoration
A Smart Way to Frame a Corner
A Solid Choice: DIY Solid Surface Countertop
A Tunnel for the Sun
Adding Style with Wainscoting
All About Sanders
All Fenced In
All Hands on Deck
Alternative Trim: The Power of Plastics
Everything Auto: Aluminum Wheel Repair
Everything Auto: Alternator Check and Replacement
Everything Auto: Automatic Transmission Service
Backyard Gardening
Backyard Gazebos
Backyard Planters: Big & Small
Backyard Ponds Get A Makeover
Basement Dweller: Remodeling Tips
Up Close with Tankless Water Heaters
Big Storage Below the Deck
Block by Block: Segmental Retaining Walls
Fighting Allergic Asthma in the Home
Brick Picks
Bringing in the Light: Install a Skylight
Build a Garden Tool Shed
Build an Air-Station Assembly Table
Build Your Own Patio
Building a Drive-Thru Backyard Shed
Building a Red Cedar Pergola
Building a Swing Arbor
How to Build Stairs
Building with Glue-Laminated Beams
Cabinet Building Basics for DIY'ers
Everything Auto: Car Care Tips
How to Light Kitchens and Baths
Building a Fireplace Mantel
Chainsaws 101
Chalk it up to Caulk
Choosing a Tiller
Choosing Lumber for Your Deck
Everything Auto: Clutch Play
Common Framing Errors with Engineered Wood
Concrete Creations
Cooling Off with Fresh Air - Whole House Fans
Counter Culture: DIY Plastic Laminate Countertop
Covering Your Ground: Carpet Installation
Creative Concrete Stamping
Crown Molding ABC's
Curb Appeal 101: Cedar Siding Upgrade
Everything Auto: Dash Painting
Deck Helpers: Innovations and Accessories
Deck Building Basics
Design with Flexibility -- Ceramic Tile Installation
Designing a Sprinkler System
Diggin' Peace: Create a Water Garden
Everything Auto: Distributor Cap Replacement
DIY Acoustic Ceiling Tile
DIY Garden Benches
DIY Container Water Garden
DIY Crown Molding & Trim
Do-It-Yourself: Joining Wood Made Simple
Don't Forget the Deck When Winterizing the Yard
Dovetail Joints for Quality Construction
Drills and Drivers Unplugged
Drywall Tips from the Pros
12-Step Toilet Installation
13 Pro Tips for Crown Molding and Trim
A Closer Look at Composite Decking
A Good Look at Greenhouses
How to Use Hand Planes
Inside HOUSE RULES
Everything Auto: Install a Precision Sport Shifter
Install a Whole House Fan
Installing a Floating Subfloor
Installing Doorknobs and Locks
Build a Roll-around Tool Cabinet
Keeping the Water at Bay: Build a Sea Wall
Lawn Aeration
Lawn Care Tips from a Pro
Lawn Edgers Are Put to the Test
Make a Statement with Brick Pavers
Make New Cabinets Old
Matchmaking for Windows
Material Market
Material Market: Counter Culture
Material Market: New Floor Materials
Material Market: Siding Selections
Mortise and Tenon Joints
New Options in Concrete Decor
Build an Office Desk
Open Sesame! Install a Garage Door
Organize This: Build Storage Shelves
Organizing the Home Workshop
Out with Old Grout
Plate Compactor Basics for the DIY'er
Paint it Beautiful
Build a Bar Pass-Through
Everything Auto: Turbocharger Basics
Prep Steps for Outdoor Painting
Everything Auto - Windshield Chip Repair
Everything Auto: Adding Tubular Sidesteps
Everything Auto: CV-Joint Rehab
Everything Auto: Getting Greased
Everything Auto: Replacing Ball Joints
Everything Auto: Replacing Rotors, when your discs have seen better days
Exterior Finishes For Wood
Extreme Woodwork: From Trees to Lumber
Fast and True Deck Framing
Faux-to Finish
Fight Wood Rot
Finishing Moves: Repairing Hardwood Floors
Fire Up the Brick Barbecue
Flooring in a Snap: Installing Laminates
Flushing Upward
From Slicing to Sliding: Adding a Deck Door
From Window to Wall
Getting Jiggy
Everything Auto: Getting Rid of Motor Muck
Getting Wired
Girl Power
Give Wood Furniture a Great Look
Giving Walls a Drywall Update
Goodbye to Water Worries - Install a Shower Pan & Liner
Grasscycling: Waste Not, Want Not
Gutter Repair, Installation and Upgrade
Home Wiring for the Information Age
Professional Tile Layout
Putting Up Knockdown Texture
Recip Saw Roundup
Wood Refinishing 101
Renewing Plaster Walls
Everything Auto: Replacing a Water Pump
Everything Auto: Replacing Brake Shoes
Everything Auto: Replacing Disc Brake Pads
Everything Auto: Replacing Tie-Rod Ends
Everything Auto: Replacing Window Door Glass
Restoring Tile Grout
Righting the Wrongs with IN A FIX
Roof Flashing Done Right
Roof of Steel
Roofing Done the Right Way
Roofing Revisited
Save Money: Rent Lawn and Garden Equipment
Scouting Out Routers
Selecting a Hardwood Entry
Selecting Engineered Wood
Serenity Now! Build a Gazebo
Sinks with Style
Skill Savvy
Soldering Copper Tube
Spring Into Action
Prevent Mold in the Home
Stone Age: Simple Stone Projects
Everything Auto: Build an Auto Storage Box
The Beauty of Bamboo Flooring
Everything Auto: Buying a Diesel
The Bright Outdoors: Landscape Lighting
The Grass is Always Greener
The Ins and Outs of Gutters and Downspouts
Screened Porch
The Latest in Kitchen Cabinets
The Lowdown on Cork Flooring
The New Face of Bamboo
The New Face of Vinyl Siding
Enhance a Room with Skylights
The Wonders of Wood Siding
Tips From a Scroll Saw Pro
To Build a Better Home
Tool School: Circular Saws
Exploring Lithium-Ion Power Tools
Tool School: Choosing Air Compressors and Air Tools
Tool School: Hammer Drills and Masonry Bits
Tool School: Radial Arm Saws
Top Tips for Installing Vinyl Siding
Up Close with Table Saws
Upward Thinking: Overhead Storage Space
Wall Tile Tips from a Pro
Waves of Warmth: Radiant Heat Flooring
Welding 101
Close Look at Drill Bits
Windows of Opportunity: DIY Window Replacement
Winterize Your Home
Working with Concrete
Working with Copper Pipe
Working with Steel Pipe
Working with Wood Filler
Working with Wood Stains: Inside and Out
Everything Auto: Wrangle More Power
Spray-in-Place Concrete Fencing
Trimming Out a Room
Revitalize a Dormant Lawn
Build a Locking Tool Cabinet
Up Close with Circular Saws
Easy Garage Storage
Everything Auto: DIY U-Joint Replacement
Build a Basic Case of Shelves
Installing a PVC Deck Rail
DIY Shop and Garage Heating
Pro Tips For Tongue & Groove Flooring
Build a Playground Slide
Brighten Up with Landscape Lighting
Drywall: Handy Tools, Smart Techniques
Hammers and Nails
DIY Drywall Repair
Sealing and Waterproofing
Cedar Siding Success
Everything Auto: How to Install a Ram-air Hood
A World of Uses for the RotoZip
Creating Super Wood Joints
All About Band Saws
Hot Alternatives to Home Heating
Patching & Repairing Concrete
Strong, Sturdy Retaining Walls
Guard Your Home from Electrical Fires
Everything Auto: Automotive Radiator Repair
How to Select a Wood-Burning Stove
How to Install Wainscoting
The Low Down on Low Decks
Crown Molding Basics: Tips and Tricks
How to Finish Pine Furniture
Choosing a Metal Roof
Everything Auto: Install a Throttle Body Spacer
Making Magic with Your Router
New Garage Floor Lifts Spirits of Injured Auto Enthusiast
Painting Kitchen Cabinets
EHT's New Digital Magazine
One-Day Garage Makeover
Skil's Octo Sander
Dressing Up Windows and Doors
Simply Radiant
Air Power
Decked Out with Accessories
Deck Makeover
Window Trim Basics
How to Use a Layout Square
Detailing your Deck
11 Keys to Stain Your Deck like a Pro
DIY Deck Remodeling
High-Pressure Cleaning
Build an Attached Carport
Outfitting a Kitchen
How to Sand and Finish Wood Floors
Everything Auto: Install an Alarm
Under Floor Heating
How to Install Skylights
How to Cope Base Molding
Five Garden Projects You Can Build
Deck Basics for DIY'ers
Troubleshooting Toilets
Installing Slate Tile
Build a Butcher Block Countertop
DIY Gluing Tips
Installing Integrated Deck Handrails
Radical Re-deck
DIY Outdoor Lawn Furniture
Install an Ornamental Metal Fence
Soffits Up Close
Build a Deck Sunroof
Build a Home Library
Making Frame and Panel Doors
Pinning Down Nailers and Staplers
Congratulations to EHT's Sweepstakes Winner!
Build a Classic Workbench
Build a Retaining Wall
Re-Laminate Your Countertops
Build a Gun/Trophy Case
The Latest Ladders & Ladder Accessories
Drill Bit Update
Install an Exterior Door
Build a Classic Workbench
Molding Magic
Decking Done Right with David Billings
Everything Auto: Performance Coilover Suspension System
Woodworking Helpers
Install Deck Lighting & Accessories
Install Snap-Together Garage Tile
Everything Auto: Battery Basics
How to Replace a Window
Do-it-Yourself Cedar Siding
New Cordless Drill/Drivers
Make a Mantel Shelf
Everything Auto: Paint the Chassis for Rust Resistance
DIY Laminate Floor Installation
Spray Foam Saves Energy
Warming Up with Radiant Heat
How To Clean Brick Stains
How Long Should Concrete Cure?
Pro Tips on Built-up Crown Molding
Fix a Door Hinge
Grout Stuck in a Tub
Paint Aluminum Siding
Oven Burner: Fix or Replace?
Repair Loose Siding
Repair a Vinyl Floor Seam
Fix a Bouncy Deck
DIY Fountain Kits
Don't Cover Turbine Vents
Easy-to-Build Workbench
Refinishing Hardwood Floors for the DIY'er
Cutting Costs by Building Smart
Fix a Metal Handrail
Repair a Crack in Drywall
Repair a Stone Patio
Drippy Heat Pump
How to Cut Cement Board
Add Eave Vents
DIY Wallpaper tip
Build a Porch Swing
Pro Tips for Paint Brushes and Rollers
Installing a Front-Mount Receiver for a Winch or Trailer Hitch
How to Apply Primer Like a Pro
Remove Paint from Concrete
Can a DIY'er Re-shingle a Roof?
Deodorize your Air Conditioner
Should I Insulate my Crawlspace?
How Do I Prevent Puddling on my Deck?
How to Clean Hardwoods
How Can I Solve a Serious Toilet Clog (Bar of Soap)?
How Do I Install Quarter-Round Trim?
What's the Best Drill Bit for the Job?
How Do I Stop a Chimney Backdraft?
The Grout Gun: Reader Tip for Grout Application
How Do I Hang Drywall?
Should I Use Textured Paint?
How Do I Become a Professional Contractor?
Should I Use PT Lumber for a Shed?
How to Install Roof Sheathing
How to Remove a Stripped Screw
Stucco a Foundation
Should I Tile a Tub?
Installing Crown Molding Solo
Reduce Wood Warping
How to Calculate Concrete Required
Re-Laminate over Existing Laminate Countertops
Paint Vinyl Siding
Taping Inside Corners of Drywall
What's the Difference in Granite Countertops?
Can I Match Roof Shingles?
Stop Pipes from Banging
Installing Base Molding
PVC as a Backsplash?
A Good Start-up Toolbox
Caulk a Tub with the Right Stuff
Five Lathe Projects You Can Build
Building Basic Closet Shelving
Install Column Wraps for a Stylish Front Porch
DIY Thermostat Upgrade
Build a Brick Garden Wall
Outdoor Living Spaces
Security Solution
Repair a Run in Carpet
Clean your Gutters the Easy Way (Reader Tip)
Repair a Shower Head
Upgrade Your Truck's Exhaust System
Clean Oil Stains from the Driveway
Repair Damaged Plaster
DIY Block Windows (Glass vs. Acrylic)
Refinish a Tub
Which Flooring Over Concrete?
Checking Your Tire Pressure is as Easy as Pumping Gas
Video: Deck Recovery
Chainsaw Rx
Next-Gen Decks
Installing a Tile Pattern Laminate Floor
Pour a Concrete Floor
How to Install Vinyl Siding like the Pros
Build a Carpenter's Box
Home Stretch
Congratulations to June's Skil Sweepstakes Winner!
Kit-Built Log Homes
Build a Squeak-Free Floor
Everything Auto: Anti-Sway Bar Install
Installing Granite Countertops
Converting a Closet to Cabinets
Wiring a Garden Shed
Build Your Outdoor Living Room
Understanding House Framing
Replace an Old Deck with Composite Decking
Tighter Miters
Adjustable Pliers & Wrenches
Think Green with Cordless Lawn Tools
Building Shop Shelves
How to Choose Lumber for Outdoor Projects
Demolition Devices
Circular Saw Blades Up Close
Best New Products for Your Deck
Replace an Old Mower Deck
Router Essentials
Fireplace Safety: Avoiding the Dangers of Creosote Buildup
Building a Cooking Table for Your Ceramic Grill
The Kitchen Facelift
Roof Framing 101
Fix a Squeaky Floor from Above
Why Choose a Tankless Water Heater?
Remove Candle Wax from Carpet
Quick Fix for Squeaky Hinge
Pressure Problem with Faucet
Flatten Plywood Subfloor for New Flooring
Prep Floor for Peel & Stick Tile
Replace an Interior Door
The Summer Digital Issue is Now Live!!
Do-it-Yourself Brick Patio & Walk
Crown Molding in Review
Making Outdoor Log Furniture is Quick and Easy
Install a Patio Door
How To Build a Bar Stool
13 Pro Tips for Crown Molding
Bathroom Design Guide, by Sunset Books
Master Suite Masterpiece
Wood Handle Replacement for Striking Tools
Heated Tile in a Snap
Bathroom Redo
Hot Water Options
Christmas Presents You Can Build
Gasket Replacement for Ceramic Grills
Organize Your Kitchen with Rev-a Shelf
Save Energy with Insulated Siding
Working for the Clampdown
How to Remove Wallpaper
Holiday Digital Issue is Now Live
What are Architectural Shingles?
How to Apply Stucco to Concrete Block
Is this Old Paint Oil- or Latex-based?
Is the Plumbing Clog in the Drain or Septic Tank?
Fix a Noisy Ceiling Fan
Adjust an Automatic Garage Door
How to Paint a Steel Door
Can I Install a Toilet where there is No Drain?
How to Shim a Granite Countertop
Use UV light to Clean HVAC System
How Do I Match Old Brick?
Troubleshoot Automatic Garage Door Opener
Prevent Mold on Bathroom Caulk
Keep Mice Away from the House
How to Install Outlet Extensions
Installing a Brick Accent Wall
Down on the Farm, Up Goes a Wall
How to Bend Drywall
Use House Wrap on a Shed
DIY Faux Finish: Stippling
Creating Concrete Sculptures
How to Eliminate Floor Pops
Can New Tile Go Over Old Tile?
Keep Ceiling Joists Level when Installing
Adding a Camo Wrap
Replace an Old Roof With New Shingles
DIY Storage Helpers
Extreme Outdoor Cooking Center
Repair a Kitchen Cabinet
Woodworking Tools 2008
Solving Common Household Drain Problems
Sealing Interior Brick
How to Remove a Popcorn Ceiling
Extra-Mile Hero Contest
Install Mosaic Floor Tile
Stock Parts, Custom Door
Cordless Fastening in Tight Spots
Heating Homes with Hot Water
Just Getting Started
Build a Temporary Closet
Hardwoods in a Heartbeat
Fold Away Hide Away
Installing a Synthetic Railing System
Build a Shadowbox Privacy Fence
Today's Handsaws
How to Make a Knife
The Fun and Fascination of Wallpaper
Do-it-yourself Mirror Frames
Window Re-View
Remodel with Prefinished Stair Treads
Build an Oak and Walnut Nightstand
Five Portable Workstations Reviewed
Tiling Over Concrete
Replace a Ceiling Fixture
Exterior Wood Coatings
How Do I Lay Sod on a Lawn?
Should I Use Faced Insulation?
Deck Demolition Made Easy
Easy Homemade Wood Jigs
Build a Kid's Cubby
Siding Maintenance & Repairs
Choosing a Pool Location
A Home with a Personal Stamp
Adding a PVC Jamb Extension
Bathroom on a Budget
Everything Auto: Upward Thinking with Overhead Consoles
How to Preserve the Look of Copper
How Soon to Paint Concrete?
How to Repair Worn Hardwoods
How Do I Add a Dimmer Switch?
How Do I Connect an Ice Maker Supply Line?
What is an Incinerating Toilet?
How Do I Remove a Mirror from a Wall?
How to Fix a Bi-fold Door that Sticks
How Do I Build a Fence Gate?
How to Remove a Water Stain from Hardwoods
How to Repair a Sagging Floor
Hot Products April 2009
Energy Efficiency in the Home
Expert Advice on Planning a Kitchen
DIY Tile Countertop
Trim Tips for Doors and Windows
Adding a Cased Opening for Windows and Doors
Working with Crown Molding
Base Molding, Learning to Cope
Installing Toilets, the 12 Step Method
How-To Wire Split Receptacles
Install Landscape Lighting
Interior Rock Floor Installation
Refinishing Cabinets to Look Old
Refinishing Kitchen Cabinets for the D-I-Y
Installing Rods and Hardware
Installing Window Treatments
Extreme How-To's Guide to Painting
Bookshelves You Can Build Yourself
Build a Patio or Walkway from Pavers
Build a Patio Using Pavers
Build a Firepit
How to Repair/Replace a faucet
Replacing a Faucet
Build a Stone Firepit
Install Utility Sink
Adding Wire Shelving to Your Closet
Deck Lighting
Installing Laminate Tiles
Countertop Pros and Cons
How to Repair a Cracked Porch
Clipped-Head or Round-Head Nailer?
Invisible Cold Air Return (Reader Tip)
How Do I Build a Header?
Reinventing a 100-Year-Old Bedroom
Surviving Extreme Winds
An Overview of Today's Powered Hand Sanders
Replacing Drawer Slides
Handy Drywall Tools
How to Make Cope Joints in Molding
Paint with Success
How to Build Deck Stairs
Brand New Tune
Tips on Cleaning and Staining Your Deck
Island Workspace for The Kitchen
How to Build a Bar Pass-through
Deck Framing Gone Wild
New Tools for the Green Season
Bright Ideas for Deck Lights
Grid Guidelines for a Great Look
Building a Pergola
Concrete Patio Stamped with Style
Cordless Tool Update
Installing a New Tub or Shower
Test Page for Iframe link
Artificial Stone up Close
Paint a Countertop to Look Like Granite
DIY Countertops with Solid Surface Material
Build a Spiral Staircase
Easy Steps to Replacing a Bay Window
Deck Product Roundup
Waterproofing Basement Walls
Open to Change
All About Insulation
How-To Stain or Paint a Deck
Adding a Kitchen Island
Bathroom Vanity Installation
Level-headed
DIY Shock & Strut Installation
Your House is a System
Coat of Armor for Outdoor Wood
Install Plywood Underlayment for Vinyl Flooring
When to Install New Shingles
Can I Paint Asphalt Roof Shingles?
How to Paint Baseboard Heaters
What is the Best Firewood?
How Does a Heat Pump Work?
How to Refinish a Clawfoot Tub
How to Paint Window Shutters
Installing Wainscoting Adds Style
Installing a Shower Pan Liner
Installing a Laminate Floor
Installing Granite Countertops
Installing a Ceiling Fan
Ceiling Fan Installation
Selecting Energy-Efficient Replacement Windows
Comment construire l'escalier French Version of How To Build Stairs
Extreme How-To leert Trap bouwen "How To Build Stairs, Dutch Version"
ɊK'ig\'z邽߂̎菇ł How To Build Stairs Japanese Version
Happiness is a Warm Shower
Q&A
Tool Transport
How to Stop Water Intrusion on Foundation Block
Repair a Metal Chair
Wallpaper Installation
"Extreme How-To" Uč Jak se stav schody.
Subfloors and Underlayments
The Laminate Flooring Boom
Sidewalk Repair for the Do It Yourselfer
Creating a Workshop
Inexpensive Kitchen Makeover Using Tile as a Countertop Material
Adding a deck canopy/pergola
Tips for Building a Retaining Wall
Adding Lighting to Your House Interior
Fantastic, Fun, Furniture Finishes
Gutters & Downspouts for the DIY'er
Build a Basic Set of Shelves
Replacing Old Aluminum Windows
Build a Deck
Upgrade Your Garage or Workshop
Cmo Construir Escaleras
"Extreme How-To" Wird Erlutert, Wie Treppen Stellen.
" How-To "
Extreme How-To lr ut hur man bygger Trappor. How To Build Stairs
Building Stairs Hindi Version
Building Stairs Chinese 建筑楼梯的说明


CORK FLOORING ARCHIVED ARTICLES VIDEOS PRODUCT/SERVICES DIRECTORY PRODUCT NEWS ABOUT US SUBSCRIPTION SERVICES MEDIA KIT HOW TO FORUM CONTACT US YELLOW PAGES HOME


© Copyright    All Rights Reserved
Privacy  Sitemap  FTC Disclosure