Visit Extreme How-to for thousands more articles.
  Link to http://www.extremehowto.com
Google


For
related articles

click here
Click here for a printer-friendly
version of this article!

Click here to email
this article to a friend!

A Solid Choice: DIY Solid Surface Countertop
Monte Burch


Most solid surface countertop materials can only be installed by installers licensed by the manufacturer or distributor. One of the main reasons is traditional solid surface countertops are fabricated by building up 1/2-inch-thick materials with underlayment to create the appearance of thicker materials, then cutting and gluing-up a front edge, much in the same manner as a plastic laminate top over a plywood subsurface. Both procedures are labor intensive.

Love the look of Corian, but don't love the cost?  Well DIY solid surface countertops can be an extremely affordable and elegant option with material from SolidSurface.com.  Using basic woodworking skills and tools, you too can install your own custom solid surface countertop, desktop, bathroom vanity, laundry prep areas, shower walls, or other surface of your choosing. Click here for more information.

EOS countertop materials, available from EOS distributors, are available in thicker sheets, 2-centimeter (.79-inch) and 3-centimeter (1.20-inch) thick, solid countertop materials. With the 3-cm thickness, first cut the shape of the countertop. Then simply form the edge profile with a router and you're finished.


The 3-cm top provides a finished solid surface countertop without any complicated build-up procedures. The company also sells sinks, adhesives and tools. The materials are shipped by common carrier, and you'll need help in unloading as well as a pair of snips to cut the banding material. The 3-cm solid countertop is heavy. In the project shown, it took four people to lift and handle one 30-inchby- 10-foot section, which weighed around 250 pounds. You will need a hammer, tape measure, level, scriber, scratch awl, utility knife, portable circular saw, straight edge, portable electric drill, jig saw, hole saw, a power sander preferably a random orbit sander, sandpaper and a router. The router and appropriate bits are the most important tools needed. The router should be a heavy-duty model. A 1/2-inch collet router is the best choice. You will also need a guide bushing for the router, a pattern bit with a top bearing guide, and a round-over bit. If you intend to install a solid-surface sink joined to the countertop, you'll also need a specialized sink-hole cutting bit. A circular saw blade designed for cutting solid surface materials is also needed. A laser level can be a great help in establishing a level line, especially for L- or U-shaped countertops. You will need ear, eye and especially dust protection. The materials create a very fine dust that goes everywhere. You will also need a pair of sturdy sawhorses, or a large flat surface at easy working height to build the support platform on.


Creating and installing a large, complicated countertop like the one shown does take some skill, especially in using a router, but serious do-it-yourselfers, such as Extreme How-To readers, should be able to tackle the chore. It's important to take your time and make sure of all measurements and cuts. The materials are fairly expensive, and a wrong cut can be disastrous. It is also important to have help when lifting the materials. The project shown includes removing an old plastic laminate top with stainless steel sink and creating a top with a solid surface sink.


Solidsurface.com is a supplier of discount and premium solid surface sheet material, sinks, pre-made vanities, adhesives, and other supplies related to working with solid surface materials.


In addition to the countertop materials, you'll need adhesive and corrugated plastic to create a lay-out pattern or job-site template. The plastic is included with the solid surface materials from Solid Surface Countertops. Other materials include 2-by-6 and 1-by-4 framing materials to create a form to hold the countertop material during fabrication. One-quarter-inch hardboard is also necessary to create a cutting pattern and router template.


First Steps

If the countertop is to replace an old existing top, the first step is to remove everything from the interior of the cabinets and then carefully remove the old top. It may be fastened in place with screws up through cleats into the top, with nails down through the top into cleats or dividers, or it may even be glued in place. Remove as carefully as possible in order not to damage the cabinet framework.


With the top removed, lay a sheet of template plastic over the cabinet. This is used to create an exact shape of the countertop. It's much easier to change this template than the actual countertop. This allows you to establish the fit of the walls and the overhang at the front edge. The material is semi-transparent so you can mark the location of all your cabinet sides, dividers and corner bracing. If the countertop back edge is adjacent to a straight wall, and any small gaps can be covered with a backsplash, mark the cut line with a straight edge. If the walls are crooked, measure the widest gap from the wall. Then use dividers, a pencil compass or even a wood block of the same measurement to scribe the back edge to the wall. Using a utility knife, cut the template on the scribed line to fit the wall. Slide the cut template against the back wall and make sure it fits properly. Then mark the front overhang and shape of the countertop. In this case, one leg of the L had a narrower, rounded shape.


Build a fabrication platform such as that shown in the drawing to support the solid surface during fabrication. The fabrication platform should match your countertop. The platform should be as level as possible, well supported and at a good working height. Place the jobsite plastic template on the sheets of hardboard and mark the scribed back wall pattern on the hardboard. Cut the hardboard, following the scribed line, using a jig saw. Then place the hardboard template against the back wall to make sure it fits. Adjust as needed.


The countertop must be installed on an absolutely level surface, and very few cabinets are level. Use a 4-foot carpenter's level to determine level. A laser level makes this chore easy. Add wooden shims to the cabinet base top edges to create the level support surface needed.


Cutting the Top

Place the countertop material on the fabrication platform. Place the hardboard router template on the countertop material and mark the shape. Rough cut the solid material a bit larger than the router template. Use a straight edge clamped securely in place and circular saw with a blade for cutting solid surface materials.


Note: During construction of this top we tested Eurekazone's EZ Smart Guide System with the portable circular saw (eurekazone.com). The system utilizes an extruded aluminum guide strip that can be clamped to the work surface with special clamps that fit in the bottom ends of the guide strips. A special guide shoe is attached to the saw, and perfectly straight and smooth cuts are made quite easily. 


If the countertop is L- or U-shaped, or longer than 10 feet, a matched joint must be created. Place the two pieces on the fabrication platform so the two edges that are to be matched are 1/2 inch apart. Make sure the pieces are level with each other and then clamp both pieces in place. Use a router with a 3/4-inch straight-cutting router bit. Clamp a straight edge in place so when you rout through the joint. You will be cutting a little off each side of the gap as you follow the straight edge with your router. The gap created after the cut should be 3/4-inch wide, and when the two pieces are pushed together the seam should match perfectly.


On L-shaped countertops the inside corner must have at least a 1-inch radius. If it is cut square, a stress joint is created that can lead to breakage. The matched joint must also be at least 3 inches from the inside corner, the main reason the sheets are 30-inches wide. Use a hardboard template and a router with a guide bushing and straight cutting bit or top bearing bit to cut this radius. Note, the countertop should not be joined over a dishwasher or around the sink.


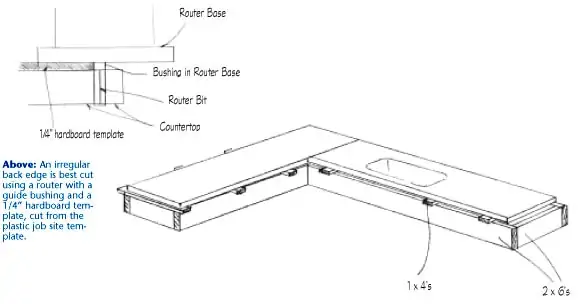
The next step is to cut the back edge to match the wall. Again use a hardboard pattern and either a guide bushing in your router and a straight cutting bit or top bearing bit. In either case the hardboard template is clamped securely in place and the router bit or guide bushing guided along the template edge to make the cut.


Next, rout the front and, if desired, the end profiles. Use your choice of profile bit to achieve the edge profile you desire. The top shown was profiled using a roundover bit with a bottom bearing, riding the bearing against the bottom edge of the cut. If you have a matched joint, stop the edge profile about 1-1/2 inches from the joint. You will finish cutting after you have seamed the pieces together. Also, stop the edge profile on the ends or face 1-1/2 inches from where a back splash is to go.


Placing the Sink

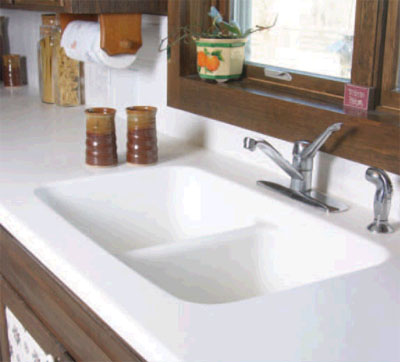
The next step is the sink. A stainless steel or other material sink can be installed in the traditional manner. A solid surface sink, however, creates continuity and adds to the beauty of the countertop. It is, however, heavier than stainless steel and more difficult to install. It requires attention to details in installation. To install a solid surface sink, turn the top upside down on your fabrication platform. Make a template of the sink rim and then place the template on the countertop in the proper location. Be sure the sink's outer rim will clear the inside of the cabinet top edges by at least 1/2 inch, and leave space at the back for faucet installation. This spacing can easily be checked by placing the original template over the sink template. The original template should have the location of all cabinet edges, inside and out and the location of any corner bracing in the sink base marked.


When you are sure of the sink location, place it in position, upside down on the top. Do not mark the sink outline with a pencil or pen. The adhesive will pick up the color and spread it as much as 2 inches in your seam. Place small wooden glue blocks around the outside edges of the sink, using hot-melt glue to hold them in place. Lift the sink in and out a couple of times to make sure the glue blocks don't move. Once you're satisfied you can position the sink without moving any blocks, lightly sand the top of the sink and the bottom of the top with 80-grit sandpaper. Vacuum off all dust and clean both surfaces with denatured alcohol.


Apply adhesive to the sink rim: one bead to the outside top edge, one to the inside edge and one between the two. Place the sink down between the glue blocks and weigh it down with two bags of sand or other heavy materials that won't shift and move the sink. Allow the adhesive to set at least a half hour and then remove the glue blocks and turn the top and sink assembly back over .


Note: Your fabrication platform must have an open area for the sink. The top and sink lip edge is then cut using a router and special bit. First a starting hole is bored using a 1-3/8-inch hole saw. Very carefully locate this starting hole, making sure it is inside the sink and away from the edge and center divider. A mistake here can be very costly. Then use the router and a straight router bit with a 1/8-inch oversized bottom bearing to create the sink cut-out. To prevent the cut-out from dropping down and breaking away with the last of the cut, use a couple of support strips fastened to the cut-out with hot-melt glue and stretching across the countertop to support the cut-out. With the cut-out removed, use a 1/2-inch round-over and 10-degree combination bit with bottom bearing to finish the cut.


Then place the countertop on top of the cabinets and glue any seams. To glue the seams, place the top on the cabinets as level as possible and push the pieces together to check for fit. Place two wood blocks on each piece about 2 inches from the seam using hot-melt glue. Separate the two pieces, and using a sanding block with 80-grit sandpaper, slide the sandpaper block from front to back one time on the ends to be seamed. Vacuum off all dust and clean with denatured alcohol. Apply adhesive to both pieces and push back together making sure they are in line. Place clamps across the wooden blocks to pull the seam shut. Don't over-tighten the clamps; it takes less than 10 pounds of pressure to make a good seam. Test the seam with your fingernail. If your nail can make a depression in the seam, the glue is not dry. After the seam is dry, sand the excess adhesive off, and finish cutting the profile edge on the seam joint.


Raise the countertop and place small dots of pure silicone adhesive on the top of the cabinets about every 6 inches. Do not use a continual bead of caulk. Using a random orbit sander, and progressively finer sand paper, sand to the desired finish. Start sanding with 120-grit, finish with 220-grit, then use purple and then gray Scotch Brite pads that are available from auto body repair shops. Locate and bore the holes for the faucet, install sink baskets and connect the plumbing and drain.


Solidsurface.com is a supplier of discount and premium solid surface sheet material, sinks, pre-made vanities, adhesives, and other supplies related to working with solid surface materials. 888-715-3007


Other Related Articles


Prevent Home Electrical Fires
Everything Auto: DIY Wheel Alignment
Install a Rock Floor Inside Your Home
Prevent Home Electrical Fires
A Guide to Pressure Washers
A Lesson in Lathes
Fix Common Clog Problems
Remodel Your Attic Space
DIY Closet Shelves
A Radiant Restoration
A Smart Way to Frame a Corner
A Tunnel for the Sun
Adding Style with Wainscoting
All About Sanders
All Fenced In
All Hands on Deck
Alternative Trim: The Power of Plastics
Everything Auto: Aluminum Wheel Repair
Everything Auto: Alternator Check and Replacement
Everything Auto: Automatic Transmission Service
Backyard Gardening
Backyard Gazebos
Backyard Planters: Big & Small
Backyard Ponds Get A Makeover
Basement Dweller: Remodeling Tips
Up Close with Tankless Water Heaters
Big Storage Below the Deck
Block by Block: Segmental Retaining Walls
Fighting Allergic Asthma in the Home
Brick Picks
Bringing in the Light: Install a Skylight
Build a Garden Tool Shed
Build an Air-Station Assembly Table
Build Your Own Patio
Building a Drive-Thru Backyard Shed
Building a Red Cedar Pergola
Building a Swing Arbor
How to Build Stairs
Building with Glue-Laminated Beams
Cabinet Building Basics for DIY'ers
Everything Auto: Car Care Tips
How to Light Kitchens and Baths
Building a Fireplace Mantel
Chainsaws 101
Chalk it up to Caulk
Choosing a Tiller
Choosing Lumber for Your Deck
Everything Auto: Clutch Play
Common Framing Errors with Engineered Wood
Concrete Creations
Cooling Off with Fresh Air - Whole House Fans
Counter Culture: DIY Plastic Laminate Countertop
Covering Your Ground: Carpet Installation
Creative Concrete Stamping
Crown Molding ABC's
Curb Appeal 101: Cedar Siding Upgrade
Everything Auto: Dash Painting
Deck Helpers: Innovations and Accessories
Deck Building Basics
Design with Flexibility -- Ceramic Tile Installation
Designing a Sprinkler System
Diggin' Peace: Create a Water Garden
Everything Auto: Distributor Cap Replacement
DIY Acoustic Ceiling Tile
DIY Garden Benches
DIY Container Water Garden
DIY Crown Molding & Trim
Do-It-Yourself: Joining Wood Made Simple
Don't Forget the Deck When Winterizing the Yard
Dovetail Joints for Quality Construction
Drills and Drivers Unplugged
Drywall Tips from the Pros
12-Step Toilet Installation
13 Pro Tips for Crown Molding and Trim
A Closer Look at Composite Decking
A Good Look at Greenhouses
How to Use Hand Planes
Inside HOUSE RULES
Everything Auto: Install a Precision Sport Shifter
Install a Whole House Fan
Installing a Floating Subfloor
Installing Doorknobs and Locks
Build a Roll-around Tool Cabinet
Keeping the Water at Bay: Build a Sea Wall
Lawn Aeration
Lawn Care Tips from a Pro
Lawn Edgers Are Put to the Test
Make a Statement with Brick Pavers
Make New Cabinets Old
Matchmaking for Windows
Material Market
Material Market: Counter Culture
Material Market: New Floor Materials
Material Market: Siding Selections
Mortise and Tenon Joints
New Options in Concrete Decor
Build an Office Desk
Open Sesame! Install a Garage Door
Organize This: Build Storage Shelves
Organizing the Home Workshop
Out with Old Grout
Plate Compactor Basics for the DIY'er
Paint it Beautiful
Build a Bar Pass-Through
Everything Auto: Turbocharger Basics
Prep Steps for Outdoor Painting
Everything Auto - Windshield Chip Repair
Everything Auto: Adding Tubular Sidesteps
Everything Auto: CV-Joint Rehab
Everything Auto: Getting Greased
Everything Auto: Replacing Ball Joints
Everything Auto: Replacing Rotors, when your discs have seen better days
Exterior Finishes For Wood
Extreme Woodwork: From Trees to Lumber
Fast and True Deck Framing
Faux-to Finish
Fight Wood Rot
Finishing Moves: Repairing Hardwood Floors
Fire Up the Brick Barbecue
Flooring in a Snap: Installing Laminates
Flushing Upward
From Slicing to Sliding: Adding a Deck Door
From Window to Wall
Getting Jiggy
Everything Auto: Getting Rid of Motor Muck
Getting Wired
Girl Power
Give Wood Furniture a Great Look
Giving Walls a Drywall Update
Goodbye to Water Worries - Install a Shower Pan & Liner
Grasscycling: Waste Not, Want Not
Gutter Repair, Installation and Upgrade
Home Wiring for the Information Age
Professional Tile Layout
Putting Up Knockdown Texture
Recip Saw Roundup
Wood Refinishing 101
Renewing Plaster Walls
Everything Auto: Replacing a Water Pump
Everything Auto: Replacing Brake Shoes
Everything Auto: Replacing Disc Brake Pads
Everything Auto: Replacing Tie-Rod Ends
Everything Auto: Replacing Window Door Glass
Restoring Tile Grout
Righting the Wrongs with IN A FIX
Roof Flashing Done Right
Roof of Steel
Roofing Done the Right Way
Roofing Revisited
Save Money: Rent Lawn and Garden Equipment
Scouting Out Routers
Selecting a Hardwood Entry
Selecting Engineered Wood
Serenity Now! Build a Gazebo
Sinks with Style
Skill Savvy
Soldering Copper Tube
Spring Into Action
Prevent Mold in the Home
Stone Age: Simple Stone Projects
Everything Auto: Build an Auto Storage Box
The Beauty of Bamboo Flooring
Everything Auto: Buying a Diesel
The Bright Outdoors: Landscape Lighting
The Grass is Always Greener
The Ins and Outs of Gutters and Downspouts
Screened Porch
The Latest in Kitchen Cabinets
The Lowdown on Cork Flooring
The New Face of Bamboo
The New Face of Vinyl Siding
Enhance a Room with Skylights
The Wonders of Wood Siding
Tips From a Scroll Saw Pro
To Build a Better Home
Tool School: Circular Saws
Exploring Lithium-Ion Power Tools
Tool School: Choosing Air Compressors and Air Tools
Tool School: Hammer Drills and Masonry Bits
Tool School: Radial Arm Saws
Top Tips for Installing Vinyl Siding
Up Close with Table Saws
Upward Thinking: Overhead Storage Space
Wall Tile Tips from a Pro
Waves of Warmth: Radiant Heat Flooring
Welding 101
Close Look at Drill Bits
Windows of Opportunity: DIY Window Replacement
Winterize Your Home
Working with Concrete
Working with Copper Pipe
Working with Steel Pipe
Working with Wood Filler
Working with Wood Stains: Inside and Out
Everything Auto: Wrangle More Power
Spray-in-Place Concrete Fencing
Trimming Out a Room
Revitalize a Dormant Lawn
Build a Locking Tool Cabinet
Up Close with Circular Saws
Easy Garage Storage
Everything Auto: DIY U-Joint Replacement
Build a Basic Case of Shelves
Installing a PVC Deck Rail
DIY Shop and Garage Heating
Pro Tips For Tongue & Groove Flooring
Build a Playground Slide
Brighten Up with Landscape Lighting
Drywall: Handy Tools, Smart Techniques
Hammers and Nails
DIY Drywall Repair
Sealing and Waterproofing
Cedar Siding Success
Everything Auto: How to Install a Ram-air Hood
A Close Look at Asphalt Roofs
A World of Uses for the RotoZip
Creating Super Wood Joints
All About Band Saws
Hot Alternatives to Home Heating
Patching & Repairing Concrete
Strong, Sturdy Retaining Walls
Guard Your Home from Electrical Fires
Everything Auto: Automotive Radiator Repair
How to Select a Wood-Burning Stove
How to Install Wainscoting
The Low Down on Low Decks
Crown Molding Basics: Tips and Tricks
How to Finish Pine Furniture
Choosing a Metal Roof
Everything Auto: Install a Throttle Body Spacer
Making Magic with Your Router
New Garage Floor Lifts Spirits of Injured Auto Enthusiast
Painting Kitchen Cabinets
EHT's New Digital Magazine
One-Day Garage Makeover
Skil's Octo Sander
Dressing Up Windows and Doors
Simply Radiant
Air Power
Decked Out with Accessories
Deck Makeover
Window Trim Basics
How to Use a Layout Square
Detailing your Deck
11 Keys to Stain Your Deck like a Pro
DIY Deck Remodeling
High-Pressure Cleaning
Build an Attached Carport
Outfitting a Kitchen
How to Sand and Finish Wood Floors
Everything Auto: Install an Alarm
Under Floor Heating
How to Install Skylights
How to Cope Base Molding
Five Garden Projects You Can Build
Deck Basics for DIY'ers
Troubleshooting Toilets
Installing Slate Tile
Build a Butcher Block Countertop
DIY Gluing Tips
Installing Integrated Deck Handrails
Radical Re-deck
DIY Outdoor Lawn Furniture
Install an Ornamental Metal Fence
Soffits Up Close
Build a Deck Sunroof
Build a Home Library
Making Frame and Panel Doors
Pinning Down Nailers and Staplers
Congratulations to EHT's Sweepstakes Winner!
Build a Classic Workbench
Build a Retaining Wall
Re-Laminate Your Countertops
Build a Gun/Trophy Case
The Latest Ladders & Ladder Accessories
Drill Bit Update
Install an Exterior Door
Build a Classic Workbench
Molding Magic
Decking Done Right with David Billings
Everything Auto: Performance Coilover Suspension System
Woodworking Helpers
Install Deck Lighting & Accessories
Install Snap-Together Garage Tile
Everything Auto: Battery Basics
How to Replace a Window
Do-it-Yourself Cedar Siding
New Cordless Drill/Drivers
Make a Mantel Shelf
Everything Auto: Paint the Chassis for Rust Resistance
DIY Laminate Floor Installation
Spray Foam Saves Energy
Warming Up with Radiant Heat
How To Clean Brick Stains
How Long Should Concrete Cure?
Pro Tips on Built-up Crown Molding
Fix a Door Hinge
Grout Stuck in a Tub
Paint Aluminum Siding
Oven Burner: Fix or Replace?
Repair Loose Siding
Repair a Vinyl Floor Seam
Fix a Bouncy Deck
DIY Fountain Kits
Don't Cover Turbine Vents
Easy-to-Build Workbench
Refinishing Hardwood Floors for the DIY'er
Cutting Costs by Building Smart
Fix a Metal Handrail
Repair a Crack in Drywall
Repair a Stone Patio
Drippy Heat Pump
How to Cut Cement Board
Add Eave Vents
DIY Wallpaper tip
Build a Porch Swing
Pro Tips for Paint Brushes and Rollers
Installing a Front-Mount Receiver for a Winch or Trailer Hitch
How to Apply Primer Like a Pro
Remove Paint from Concrete
Can a DIY'er Re-shingle a Roof?
Deodorize your Air Conditioner
Should I Insulate my Crawlspace?
How Do I Prevent Puddling on my Deck?
How to Clean Hardwoods
How Can I Solve a Serious Toilet Clog (Bar of Soap)?
How Do I Install Quarter-Round Trim?
What's the Best Drill Bit for the Job?
How Do I Stop a Chimney Backdraft?
The Grout Gun: Reader Tip for Grout Application
How Do I Hang Drywall?
Should I Use Textured Paint?
How Do I Become a Professional Contractor?
Should I Use PT Lumber for a Shed?
How to Install Roof Sheathing
How to Remove a Stripped Screw
Stucco a Foundation
Should I Tile a Tub?
Installing Crown Molding Solo
Reduce Wood Warping
How to Calculate Concrete Required
Re-Laminate over Existing Laminate Countertops
Paint Vinyl Siding
Taping Inside Corners of Drywall
What's the Difference in Granite Countertops?
Can I Match Roof Shingles?
Stop Pipes from Banging
Installing Base Molding
PVC as a Backsplash?
A Good Start-up Toolbox
Caulk a Tub with the Right Stuff
Five Lathe Projects You Can Build
Building Basic Closet Shelving
Install Column Wraps for a Stylish Front Porch
DIY Thermostat Upgrade
Build a Brick Garden Wall
Outdoor Living Spaces
Security Solution
Repair a Run in Carpet
Clean your Gutters the Easy Way (Reader Tip)
Repair a Shower Head
Upgrade Your Truck's Exhaust System
Clean Oil Stains from the Driveway
Repair Damaged Plaster
DIY Block Windows (Glass vs. Acrylic)
Refinish a Tub
Which Flooring Over Concrete?
Checking Your Tire Pressure is as Easy as Pumping Gas
Video: Deck Recovery
Chainsaw Rx
Next-Gen Decks
Installing a Tile Pattern Laminate Floor
Pour a Concrete Floor
How to Install Vinyl Siding like the Pros
Build a Carpenter's Box
Home Stretch
Congratulations to June's Skil Sweepstakes Winner!
Kit-Built Log Homes
Build a Squeak-Free Floor
Everything Auto: Anti-Sway Bar Install
Installing Granite Countertops
Converting a Closet to Cabinets
Wiring a Garden Shed
Build Your Outdoor Living Room
Understanding House Framing
Replace an Old Deck with Composite Decking
Tighter Miters
Adjustable Pliers & Wrenches
Think Green with Cordless Lawn Tools
Building Shop Shelves
How to Choose Lumber for Outdoor Projects
Demolition Devices
Circular Saw Blades Up Close
Best New Products for Your Deck
Replace an Old Mower Deck
Router Essentials
Fireplace Safety: Avoiding the Dangers of Creosote Buildup
Building a Cooking Table for Your Ceramic Grill
The Kitchen Facelift
Roof Framing 101
Fix a Squeaky Floor from Above
Why Choose a Tankless Water Heater?
Remove Candle Wax from Carpet
Quick Fix for Squeaky Hinge
Pressure Problem with Faucet
Flatten Plywood Subfloor for New Flooring
Prep Floor for Peel & Stick Tile
Replace an Interior Door
The Summer Digital Issue is Now Live!!
Do-it-Yourself Brick Patio & Walk
Crown Molding in Review
Making Outdoor Log Furniture is Quick and Easy
Install a Patio Door
How To Build a Bar Stool
13 Pro Tips for Crown Molding
Bathroom Design Guide, by Sunset Books
Master Suite Masterpiece
Wood Handle Replacement for Striking Tools
Heated Tile in a Snap
Bathroom Redo
Hot Water Options
Christmas Presents You Can Build
Gasket Replacement for Ceramic Grills
Organize Your Kitchen with Rev-a Shelf
Save Energy with Insulated Siding
Working for the Clampdown
How to Remove Wallpaper
Holiday Digital Issue is Now Live
What are Architectural Shingles?
How to Apply Stucco to Concrete Block
Is this Old Paint Oil- or Latex-based?
Is the Plumbing Clog in the Drain or Septic Tank?
Fix a Noisy Ceiling Fan
Adjust an Automatic Garage Door
How to Paint a Steel Door
Can I Install a Toilet where there is No Drain?
How to Shim a Granite Countertop
Use UV light to Clean HVAC System
How Do I Match Old Brick?
Troubleshoot Automatic Garage Door Opener
Prevent Mold on Bathroom Caulk
Keep Mice Away from the House
How to Install Outlet Extensions
Installing a Brick Accent Wall
Down on the Farm, Up Goes a Wall
How to Bend Drywall
Use House Wrap on a Shed
DIY Faux Finish: Stippling
Creating Concrete Sculptures
How to Eliminate Floor Pops
Can New Tile Go Over Old Tile?
Keep Ceiling Joists Level when Installing
Adding a Camo Wrap
Replace an Old Roof With New Shingles
DIY Storage Helpers
Extreme Outdoor Cooking Center
Repair a Kitchen Cabinet
Woodworking Tools 2008
Solving Common Household Drain Problems
Sealing Interior Brick
How to Remove a Popcorn Ceiling
Extra-Mile Hero Contest
Install Mosaic Floor Tile
Stock Parts, Custom Door
Cordless Fastening in Tight Spots
Heating Homes with Hot Water
Just Getting Started
Build a Temporary Closet
Hardwoods in a Heartbeat
Fold Away Hide Away
Installing a Synthetic Railing System
Build a Shadowbox Privacy Fence
Today's Handsaws
How to Make a Knife
The Fun and Fascination of Wallpaper
Do-it-yourself Mirror Frames
Window Re-View
Remodel with Prefinished Stair Treads
Build an Oak and Walnut Nightstand
Five Portable Workstations Reviewed
Tiling Over Concrete
Replace a Ceiling Fixture
Exterior Wood Coatings
How Do I Lay Sod on a Lawn?
Should I Use Faced Insulation?
Deck Demolition Made Easy
Easy Homemade Wood Jigs
Build a Kid's Cubby
Siding Maintenance & Repairs
Choosing a Pool Location
A Home with a Personal Stamp
Adding a PVC Jamb Extension
Bathroom on a Budget
Everything Auto: Upward Thinking with Overhead Consoles
How to Preserve the Look of Copper
How Soon to Paint Concrete?
How to Repair Worn Hardwoods
How Do I Add a Dimmer Switch?
How Do I Connect an Ice Maker Supply Line?
What is an Incinerating Toilet?
How Do I Remove a Mirror from a Wall?
How to Fix a Bi-fold Door that Sticks
How Do I Build a Fence Gate?
How to Remove a Water Stain from Hardwoods
How to Repair a Sagging Floor
Hot Products April 2009
Energy Efficiency in the Home
Expert Advice on Planning a Kitchen
DIY Tile Countertop
Trim Tips for Doors and Windows
Adding a Cased Opening for Windows and Doors
Working with Crown Molding
Base Molding, Learning to Cope
Installing Toilets, the 12 Step Method
How-To Wire Split Receptacles
Install Landscape Lighting
Interior Rock Floor Installation
Refinishing Cabinets to Look Old
Refinishing Kitchen Cabinets for the D-I-Y
Installing Rods and Hardware
Installing Window Treatments
Extreme How-To's Guide to Painting
Bookshelves You Can Build Yourself
Build a Patio or Walkway from Pavers
Build a Patio Using Pavers
Build a Firepit
How to Repair/Replace a faucet
Replacing a Faucet
Build a Stone Firepit
Install Utility Sink
Adding Wire Shelving to Your Closet
Deck Lighting
Installing Laminate Tiles
Countertop Pros and Cons
How to Repair a Cracked Porch
Clipped-Head or Round-Head Nailer?
Invisible Cold Air Return (Reader Tip)
How Do I Build a Header?
Reinventing a 100-Year-Old Bedroom
Surviving Extreme Winds
An Overview of Today's Powered Hand Sanders
Replacing Drawer Slides
Handy Drywall Tools
How to Make Cope Joints in Molding
Paint with Success
How to Build Deck Stairs
Brand New Tune
Tips on Cleaning and Staining Your Deck
Island Workspace for The Kitchen
How to Build a Bar Pass-through
Deck Framing Gone Wild
New Tools for the Green Season
Bright Ideas for Deck Lights
Grid Guidelines for a Great Look
Building a Pergola
Concrete Patio Stamped with Style
Cordless Tool Update
Installing a New Tub or Shower
Test Page for Iframe link
Artificial Stone up Close
Paint a Countertop to Look Like Granite
DIY Countertops with Solid Surface Material
Build a Spiral Staircase
Easy Steps to Replacing a Bay Window
Deck Product Roundup
Waterproofing Basement Walls
Open to Change
All About Insulation
How-To Stain or Paint a Deck
Adding a Kitchen Island
Bathroom Vanity Installation
Level-headed
DIY Shock & Strut Installation
Your House is a System
Coat of Armor for Outdoor Wood
Install Plywood Underlayment for Vinyl Flooring
When to Install New Shingles
Can I Paint Asphalt Roof Shingles?
How to Paint Baseboard Heaters
What is the Best Firewood?
How Does a Heat Pump Work?
How to Refinish a Clawfoot Tub
How to Paint Window Shutters
Installing Wainscoting Adds Style
Installing a Shower Pan Liner
Installing a Laminate Floor
Installing Granite Countertops
Installing a Ceiling Fan
Ceiling Fan Installation
Selecting Energy-Efficient Replacement Windows
Comment construire l'escalier French Version of How To Build Stairs
Extreme How-To leert Trap bouwen "How To Build Stairs, Dutch Version"
ɊK'ig\'z邽߂̎菇ł How To Build Stairs Japanese Version
Happiness is a Warm Shower
Q&A
Tool Transport
How to Stop Water Intrusion on Foundation Block
Repair a Metal Chair
Wallpaper Installation
"Extreme How-To" Uč Jak se stav schody.
Subfloors and Underlayments
The Laminate Flooring Boom
Sidewalk Repair for the Do It Yourselfer
Creating a Workshop
Inexpensive Kitchen Makeover Using Tile as a Countertop Material
Adding a deck canopy/pergola
Tips for Building a Retaining Wall
Adding Lighting to Your House Interior
Fantastic, Fun, Furniture Finishes
Gutters & Downspouts for the DIY'er
Build a Basic Set of Shelves
Replacing Old Aluminum Windows
Build a Deck
Upgrade Your Garage or Workshop
Cmo Construir Escaleras
"Extreme How-To" Wird Erlutert, Wie Treppen Stellen.
" How-To "
Extreme How-To lr ut hur man bygger Trappor. How To Build Stairs
Building Stairs Hindi Version
Building Stairs Chinese 建筑楼梯的说明


CORK FLOORING ARCHIVED ARTICLES VIDEOS PRODUCT/SERVICES DIRECTORY PRODUCT NEWS ABOUT US SUBSCRIPTION SERVICES MEDIA KIT HOW TO FORUM CONTACT US YELLOW PAGES HOME


© Copyright    All Rights Reserved
Privacy  Sitemap  FTC Disclosure