Visit Extreme How-to for thousands more articles.
  Link to http://www.extremehowto.com
Google


For
related articles

click here
Click here for a printer-friendly
version of this article!

Click here to email
this article to a friend!

Build Your Own Patio
Matt Weber


My mom wanted a patio. She wanted a nice, shady place beside her house to relax, read, sip lemonade and host the occasional barbecue. This meant Dad and I had a new project on our hands.


The ground next to the housethe proposed patio locationsloped toward the rear of the yard. A sloped patio meant spilt drinks, toppling chairs and potential lawsuits, so we opted to build it with a flat surface. This meant we would have to build up the rear end of the patio to match the higher ground elevation at the front of the house.


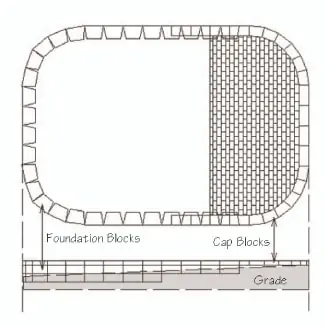
To support the patio, we used a segmental retaining wall system. To compensate for the slope, our design required two courses of wall blocks topped with a single course of cap blocks at the rear end of the patio. At the front, we only needed a single course of cap blocks, which were solid, flat and 4 inches thick. The single course of cap blocks in the front placed the patio surface just a couple of inches above the ground to prevent mud and rainwater from collecting on top. The number of block courses between the rear and front of the patio decreased as the wall progressed uphill.


Once complete, the retaining wall gave us a sturdy, flat perimeter for the patio. We then filled it with dirt and finished the surface with brick pavers. Sounds simple enough, right? Well, as we learned, there's a bit more to it than that. Here's what happened.


Laying it Out

The first step is to determine the location of your patio. Keep in mind the orientation of other buildings and landscape features in relation to the patio, as well as accessibility to shade, sunlight, etc. We made sure to keep our layout square with the side of the house, with the front of the patio aligned with the front of the house.


As you can see in the diagram of the retaining wall (above), you then figure out how many courses you need, based on the size of the blocks in relation to the height of the slope you need to overcome.


The wall blocks we used were 8 inches tall, plus an additional 4 inches for each cap unit. As you calculate the height, there are two additional factors to keep in mind: First, take into account the 6-inch foundation bed of crushed rock beneath the blocks. Also account for the first course of blocks to be buried 4 inches below grade. These measurements will figure into your digging depth and overall wall height.


When calculating your patio dimensions, first determine the finished top surface of the patio and plan in reverse. We wanted the front edge of the patio flush with the front wall of the house, which gave us our starting point. We also wanted the surface of the patio (i.e. the surface of the front cap block) to be just a couple of inches above the ground, which gave us our starting elevation. So, at a spot that was even with the house, we dug a trench, added enough crushed-rock base for a single cap unit to sit onwith the top just above groundand used that cap unit as our reference point. We then used a Craftsman laser level positioned on that cap unit to shoot a level line to the opposite end of the proposed patio location (the rear of the yard with the deep slope). From the laser line, we measured downward to determine the height of the wall, and in turn, how many blocks we would need to achieve that height.


A cap block at the front of our patio served as our starting point for the layout.


To determine the height of the patio's rear wall, we used a sheet of paper to read the laser line that originated at the front cap block, and measured down from that point.


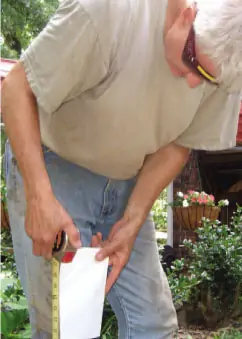
We committed these measurements to paper and made a sketch of our patio design, based on the width and depth we wanted, and how many blocks we would need to achieve it. Next, we used a measuring tape to translate our patio dimensions to the yard, marking off our layout with stakes and strings. We measured the diagonals between corners to make sure they were the same distance apart, ensuring our layout was square.


We then marked off the patio layout with stakes and strings.


Getting Dirty

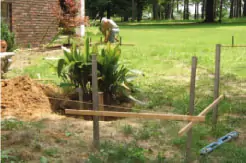
Erosion and frost heave have the bad habit of moving stones, concrete and retaining wall blocks that do not have a strong anchor into the earth. So, to ensure we had a strong foundation, we dug a trench foundation for the wall, filled it with crushed-rock base and used hefty 75-pound blocks to build the wall.


There is a wide variety of retaining wall blocks to choose from, but we opted for the Mesa system from the Tensar Corporation. The Mesa blocks had enough weight to ensure a strong foundation and featured a nice cleft face. The Mesa blocks also featured beveled edges at the rear of the block, which allowed us to butt the blocks together for the rounded corners we wanted for the patio. Plus, the blocks featured a hollow core. The hollow core was designed so that once the courses sit on top of one another, you can fill the cores with gravel, which provides an interlocking effect between the courses a little extra insurance that the wall will stay in place.


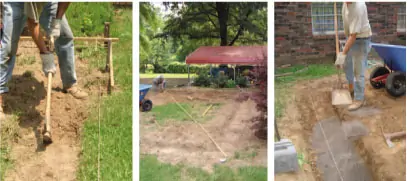
Tensar recommends that the first course of blocks rests on a 6-inch leveling pad of crushed rock. This required a lot of digging. The outside dimensions of our patio were about 24 feet long and 16 feet across. We had to dig a rectangular trench to the same dimensions, and the trench had to be about 23 inches wide to give us some room to work with the blocks, which were 11 inches deep. (Tensar suggests the leveling pad be about 12 inches wider than the width of the blocks.) We used a pick axe to loosen the packed earth and then shoveled it into a pile inside the patio perimeter.


We measured an equal distance from each diagonal corner to ensure the layout was square. We then dug a perimeter trench for the retaining wall and filled the trench with 6 inches of crushed rock.


Block by Block

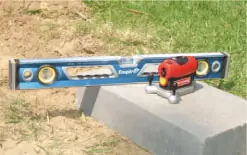
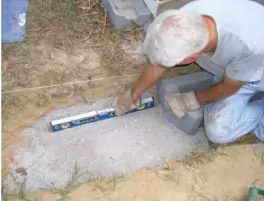
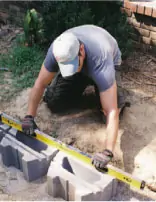
The next stage of wall construction is to fill the trench with the crushed rock. Compact the base aggregate to a 6-inch depth. The blocks must sit evenly on this base, level from front to back and side to side. Any tilting of the blocks in the first course will telegraph upward onto your final wall surface, so careful block placement is absolutely critical. We found it easiest to fill the trench with base, pack it down and then use a hand level to actually screed the crushed rock to a level surface. Adjusting the base beneath the blocks is easier if you begin with a level base in the first place. The blocks are very heavy, and fine-tuning the base beneath them can be quite a chore. Note: We built a temporary sandbox to contain our crushed rock and keep it close to the work site.


We leveled the rock base and placed the blocks on top, following our string lines.


Begin with the block at the opposite end of the patio from the first cap block that you used as a reference point. Once it is in place, you can stack the other courses on top to use it as a test course. Use a laser level (or string level) to check that the rear wall of your patio is even with the front wall. Adjust your digging depth and base fill to make sure this is true. When the opposite cap blocks are level, you can then proceed around the trench, placing and carefully leveling each starting-course block flush and even with the preceding block. Follow your string lines closely to make sure the walls stay straight. Knee pads, work gloves, a hand truck, and an easy-to-read level will come in handy during this phase of construction.


We used hand levels to make sure the blocks stayed level and flush. The bevels on the backs of the wall blocks allowed us to build rounded corners.


As we progressed uphill, the first course we laid at the rear of the patio eventually became completely buried below grade.


Whenever the topsoil was deep enough to cover 4 inches of the second course, we stopped laying the underlying course and moved from a three-course wall to a two-course wall. When doing so, remember to stagger the joints between upper and lower courses to give your wall plenty of stability. By the time we progressed to the front end of the patio, our second course was completely below grade. At that point we moved to a single course of cap blocks to finish our perimeter wall.


The hollow cores of the wall blocks can be filled with gravel for an interlocking effect.


Naturally, your ground slope and desired patio elevation will factor into the number of block courses that will best suit your patio. Because this was a very short retaining wall, we filled the hollow cores of the blocks with gravel to interlock them, and then fastened all the cap blocks in place with Mapei's concrete adhesive. However, if your retaining wall requires more than two courses of wall blocks, Tensar recommends using reinforcement grid between each course of blocks. The grid fastens between the blocks using pegs that fit grooves in the wall blocks, and it stretches through the dirt being retained by the wall. For taller walls, you may also need to set the courses back 5/8 inch as you proceed from course to course.


Rounded Corners

Want to make your patio project move along more smoothly than ours? Then build a rectangular patio. This means using special corner blocks to form right angles between the straight lines of your block courses. We, however, undertook a patio with rounded corners, and it was pretty tough.


When the beveled sides of the wall blocks are butted together flush, they will comprise a 90-degree corner with a 55-inch radius. However, if the blocks are just slightly out of alignment, that rounded corner can become non-circular in other words, out of whack. So attention to detail is crucial.


Compounding the difficulty of ensuring uniform, rounded corners at each wall intersection was the fact that our local distributor did not have beveled cap blocks available. We had beveled wall blocks and rectangular cap blocks. Of course, we didn't want wide, gaping joints in our top course of cap units. This meant we had to cut bevels in the cap blocks, so when they're butted against each other, they form a matching, rounded corner of 55-inch radius with flush joints between each block.


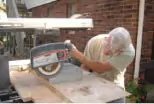
Unfortunately, a masonry/brick saw was not available at our local rental outlet when we needed one. And, while a 14-inch radial arm saw would have made cutting the blocks a lot easier, we didn't have one of those at our disposal either. We had a 10-inch radial arm saw with a diamond blade. But the cutting capacity of the 10-inch blade wouldn't cut completely through the block. This meant we had to cut half way through the block, turn it upside-down, then cut through the other half so the cuts meet exactly. This was extremely difficult and time-consuming. If you're doing this at home, learn from our mistakefind a brick saw.


We cut the rectangular cap blocks to match the beveled wall blocks.


Shown is our ill-advised method of cutting the cap units. You'll have better luck with a masonry saw.


As I mentioned, if the block alignment is off just a hair, it can throw off the layout and result in ugly, gapped joints. This especially holds true for the cap course, which has the most visible joints on the entire wall. At the round corners, we usually had to lay out all but one of the cap blocks, and then cut a slightly odd-sized final block to fit the remaining space. The difference wasn't noticeable. After many trials (and even more errors), we finally succeeded.


Then we glued the cap blocks in place with concrete adhesive. We used Mapei's Granirapid flexible mortar system. The Granirapid system is a fast-curing, polymer-modified mortar. To use, you blend the liquid and powder components of the system into a smooth consistency and apply it to the underside of the blocks. Position the cap blocks, and the mortar will harden to hold the blocks securely in place. Quickly wipe off any excess adhesive, because this stuff sets up pretty fast.


We used Mapei's Granirapid mortar system to glue down the cap units.


Making the Bed

Once the patio wall was complete, we completed the field with brick-shaped concrete pavers in a flexible basemeaning the pavers were not mortared in place. The bed of the flexible base system consists of a combination of gravel and coarse sand. Keep in mind that you can only use mortarless pavers with this system. The flexible base gives the patio floor a more pliable, comfortable underfoot feel than a mortared floor, plus, if a repair is needed, just pop up a paver and replace it. We used charcoal-colored interlocking pavers from Block USA, which feature ridges along the edges to provide a 1/16-inch joint between the bricks.


To begin your flexible base, first determine what will be the dimensions of the project's finished surface, and then plan in reverse to account for the excavation that will be necessary to place the patio. Knowing the height of your finished patio surface, and accounting for all the material layers to be included, allows you to calculate the dirt removal needed before you place the gravel.


We rented a plate compactor to compact the soil, and then poured the gravel bed.


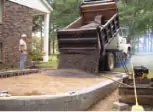
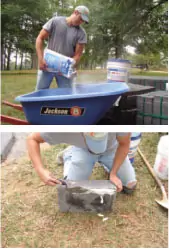
A flexible-base system requires a minimum of 4 inches of gravel as the base. Once this has been placed in the excavated bed, smooth it and compact it. Then top the gravel with 1-1/2 inch of coarse sand. Smooth the sand to the exact profile and slope you wish the final patio to be.


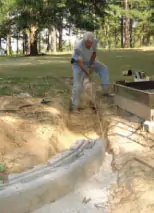
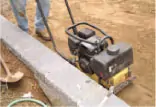
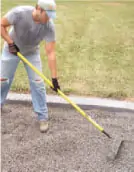
We began construction of the flexible base by landscaping the small mountain of dirt we had accumulated inside the perimeter. We wanted our finished paver surface to be flush with the surface of the wall. With shovels and rakes and picks, we managed to flatten the dirt pile into an even bed of earth, about 8 inches below the surface of the wall to allow for the gravel, sand and brick. We used any excess dirt to landscape the yard surrounding the patio. And we rented a plate compactor to compact the earth inside the wall. (We later used the compactor on the gravel bed beneath the sand, and finally on our finished surface of pavers.)


Spread the gravel to a 4-inch depth and then compact it.


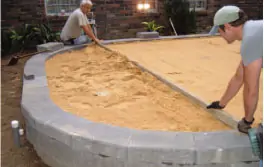
To level the bed of sand, we cut notches in the ends of a long, flat board. These notches would ride along the edges of the retaining wall as we inched it over the sand. This allowed the bottom edge of the board to screed the sand flat and level. Note: If you have a pet, keep them away from the sand. Our family dog walked all over our smooth bed of sand.


We then spread a bed of sand and screeded it level with a long, straight board.


Laying the Bricks

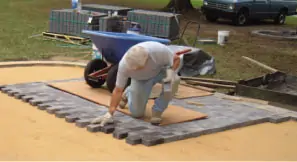
After prepping the gravel base and sand bed, we simply set the concrete brick onto the sand. Don't press or hammer them into place. They should fit snugly, with about a 1/16- to 1/8-inch gap between each brick.


For our patio we chose to stagger the brick joints, which led to partial bricks where the field met the surrounding retaining wall. Plus, with rounded patio corners and square bricks, we had to cut a lot of the corner pavers diagonally.


A Bosch cut-off saw helped greatly with cutting the irregular pavers to size.


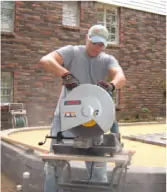
We measured the vacant areas and marked the cut lines on each brick. We then used a Bosch cut-off machine to cut the bricks. This stationary saw is fitted with a vise to secure materials and features a 14-inch blade. It comes equipped with an abrasive cutting wheel, but outfit one of these saws with a diamond blade, and you'll cut through the bricks like hot butter. The cut-off saw really sped up the process of cutting the pavers to fit the odd-sized spaces at the edge of the patio.


The field was completed with brick-shaped concrete pavers.


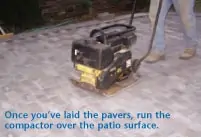
Once the pavers are in place, run the plate compactor over their surface to set them firmly in the sand. When they're all tamped down, spread sand over the patio and use a broom to work the sand into the paver joints. Once that's done, your patio is complete.


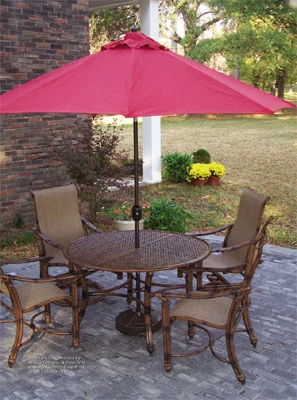
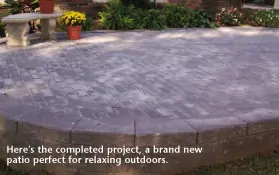
Give the surrounding area a little lawn and landscape attention, and you're ready to kick back and enjoy your new outdoor retreat.


 Tools and Materials provided by:


Block USA

www.specblockusa.com


Bosch Power Tools

www.boschtools.com


Johnson Level and Tool

www.johnsonlevel.com


Mapei

www.mapei.com


Sears/Craftsman

www.craftsman.com


Tensar Earth Technologies

www.tensarcorp.com


ABSCO Fireplace & Patio

www.ABSCOFireplaceandPatio.com


Other Related Articles


Prevent Home Electrical Fires
Everything Auto: DIY Wheel Alignment
Install a Rock Floor Inside Your Home
Prevent Home Electrical Fires
A Guide to Pressure Washers
A Lesson in Lathes
Fix Common Clog Problems
Remodel Your Attic Space
DIY Closet Shelves
A Radiant Restoration
A Smart Way to Frame a Corner
A Solid Choice: DIY Solid Surface Countertop
A Tunnel for the Sun
Adding Style with Wainscoting
All About Sanders
All Fenced In
All Hands on Deck
Alternative Trim: The Power of Plastics
Everything Auto: Aluminum Wheel Repair
Everything Auto: Alternator Check and Replacement
Everything Auto: Automatic Transmission Service
Backyard Gardening
Backyard Gazebos
Backyard Planters: Big & Small
Backyard Ponds Get A Makeover
Basement Dweller: Remodeling Tips
Up Close with Tankless Water Heaters
Big Storage Below the Deck
Block by Block: Segmental Retaining Walls
Fighting Allergic Asthma in the Home
Brick Picks
Bringing in the Light: Install a Skylight
Build a Garden Tool Shed
Build an Air-Station Assembly Table
Building a Drive-Thru Backyard Shed
Building a Red Cedar Pergola
Building a Swing Arbor
How to Build Stairs
Building with Glue-Laminated Beams
Cabinet Building Basics for DIY'ers
Everything Auto: Car Care Tips
How to Light Kitchens and Baths
Building a Fireplace Mantel
Chainsaws 101
Chalk it up to Caulk
Choosing a Tiller
Choosing Lumber for Your Deck
Everything Auto: Clutch Play
Common Framing Errors with Engineered Wood
Concrete Creations
Cooling Off with Fresh Air - Whole House Fans
Counter Culture: DIY Plastic Laminate Countertop
Covering Your Ground: Carpet Installation
Creative Concrete Stamping
Crown Molding ABC's
Curb Appeal 101: Cedar Siding Upgrade
Everything Auto: Dash Painting
Deck Helpers: Innovations and Accessories
Deck Building Basics
Design with Flexibility -- Ceramic Tile Installation
Designing a Sprinkler System
Diggin' Peace: Create a Water Garden
Everything Auto: Distributor Cap Replacement
DIY Acoustic Ceiling Tile
DIY Garden Benches
DIY Container Water Garden
DIY Crown Molding & Trim
Do-It-Yourself: Joining Wood Made Simple
Don't Forget the Deck When Winterizing the Yard
Dovetail Joints for Quality Construction
Drills and Drivers Unplugged
Drywall Tips from the Pros
12-Step Toilet Installation
13 Pro Tips for Crown Molding and Trim
A Closer Look at Composite Decking
A Good Look at Greenhouses
How to Use Hand Planes
Inside HOUSE RULES
Everything Auto: Install a Precision Sport Shifter
Install a Whole House Fan
Installing a Floating Subfloor
Installing Doorknobs and Locks
Build a Roll-around Tool Cabinet
Keeping the Water at Bay: Build a Sea Wall
Lawn Aeration
Lawn Care Tips from a Pro
Lawn Edgers Are Put to the Test
Make a Statement with Brick Pavers
Make New Cabinets Old
Matchmaking for Windows
Material Market
Material Market: Counter Culture
Material Market: New Floor Materials
Material Market: Siding Selections
Mortise and Tenon Joints
New Options in Concrete Decor
Build an Office Desk
Open Sesame! Install a Garage Door
Organize This: Build Storage Shelves
Organizing the Home Workshop
Out with Old Grout
Plate Compactor Basics for the DIY'er
Paint it Beautiful
Build a Bar Pass-Through
Everything Auto: Turbocharger Basics
Prep Steps for Outdoor Painting
Everything Auto - Windshield Chip Repair
Everything Auto: Adding Tubular Sidesteps
Everything Auto: CV-Joint Rehab
Everything Auto: Getting Greased
Everything Auto: Replacing Ball Joints
Everything Auto: Replacing Rotors, when your discs have seen better days
Exterior Finishes For Wood
Extreme Woodwork: From Trees to Lumber
Fast and True Deck Framing
Faux-to Finish
Fight Wood Rot
Finishing Moves: Repairing Hardwood Floors
Fire Up the Brick Barbecue
Flooring in a Snap: Installing Laminates
Flushing Upward
From Slicing to Sliding: Adding a Deck Door
From Window to Wall
Getting Jiggy
Everything Auto: Getting Rid of Motor Muck
Getting Wired
Girl Power
Give Wood Furniture a Great Look
Giving Walls a Drywall Update
Goodbye to Water Worries - Install a Shower Pan & Liner
Grasscycling: Waste Not, Want Not
Gutter Repair, Installation and Upgrade
Home Wiring for the Information Age
Professional Tile Layout
Putting Up Knockdown Texture
Recip Saw Roundup
Wood Refinishing 101
Renewing Plaster Walls
Everything Auto: Replacing a Water Pump
Everything Auto: Replacing Brake Shoes
Everything Auto: Replacing Disc Brake Pads
Everything Auto: Replacing Tie-Rod Ends
Everything Auto: Replacing Window Door Glass
Restoring Tile Grout
Righting the Wrongs with IN A FIX
Roof Flashing Done Right
Roof of Steel
Roofing Done the Right Way
Roofing Revisited
Save Money: Rent Lawn and Garden Equipment
Scouting Out Routers
Selecting a Hardwood Entry
Selecting Engineered Wood
Serenity Now! Build a Gazebo
Sinks with Style
Skill Savvy
Soldering Copper Tube
Spring Into Action
Prevent Mold in the Home
Stone Age: Simple Stone Projects
Everything Auto: Build an Auto Storage Box
The Beauty of Bamboo Flooring
Everything Auto: Buying a Diesel
The Bright Outdoors: Landscape Lighting
The Grass is Always Greener
The Ins and Outs of Gutters and Downspouts
Screened Porch
The Latest in Kitchen Cabinets
The Lowdown on Cork Flooring
The New Face of Bamboo
The New Face of Vinyl Siding
Enhance a Room with Skylights
The Wonders of Wood Siding
Tips From a Scroll Saw Pro
To Build a Better Home
Tool School: Circular Saws
Exploring Lithium-Ion Power Tools
Tool School: Choosing Air Compressors and Air Tools
Tool School: Hammer Drills and Masonry Bits
Tool School: Radial Arm Saws
Top Tips for Installing Vinyl Siding
Up Close with Table Saws
Upward Thinking: Overhead Storage Space
Wall Tile Tips from a Pro
Waves of Warmth: Radiant Heat Flooring
Welding 101
Close Look at Drill Bits
Windows of Opportunity: DIY Window Replacement
Winterize Your Home
Working with Concrete
Working with Copper Pipe
Working with Steel Pipe
Working with Wood Filler
Working with Wood Stains: Inside and Out
Everything Auto: Wrangle More Power
Spray-in-Place Concrete Fencing
Trimming Out a Room
Revitalize a Dormant Lawn
Build a Locking Tool Cabinet
Up Close with Circular Saws
Easy Garage Storage
Everything Auto: DIY U-Joint Replacement
Build a Basic Case of Shelves
Installing a PVC Deck Rail
DIY Shop and Garage Heating
Pro Tips For Tongue & Groove Flooring
Build a Playground Slide
Brighten Up with Landscape Lighting
Drywall: Handy Tools, Smart Techniques
Hammers and Nails
DIY Drywall Repair
Sealing and Waterproofing
Cedar Siding Success
Everything Auto: How to Install a Ram-air Hood
A Close Look at Asphalt Roofs
A World of Uses for the RotoZip
Creating Super Wood Joints
All About Band Saws
Hot Alternatives to Home Heating
Patching & Repairing Concrete
Strong, Sturdy Retaining Walls
Guard Your Home from Electrical Fires
Everything Auto: Automotive Radiator Repair
How to Select a Wood-Burning Stove
How to Install Wainscoting
The Low Down on Low Decks
Crown Molding Basics: Tips and Tricks
How to Finish Pine Furniture
Choosing a Metal Roof
Everything Auto: Install a Throttle Body Spacer
Making Magic with Your Router
New Garage Floor Lifts Spirits of Injured Auto Enthusiast
Painting Kitchen Cabinets
EHT's New Digital Magazine
One-Day Garage Makeover
Skil's Octo Sander
Dressing Up Windows and Doors
Simply Radiant
Air Power
Decked Out with Accessories
Deck Makeover
Window Trim Basics
How to Use a Layout Square
Detailing your Deck
11 Keys to Stain Your Deck like a Pro
DIY Deck Remodeling
High-Pressure Cleaning
Build an Attached Carport
Outfitting a Kitchen
How to Sand and Finish Wood Floors
Everything Auto: Install an Alarm
Under Floor Heating
How to Install Skylights
How to Cope Base Molding
Five Garden Projects You Can Build
Deck Basics for DIY'ers
Troubleshooting Toilets
Installing Slate Tile
Build a Butcher Block Countertop
DIY Gluing Tips
Installing Integrated Deck Handrails
Radical Re-deck
DIY Outdoor Lawn Furniture
Install an Ornamental Metal Fence
Soffits Up Close
Build a Deck Sunroof
Build a Home Library
Making Frame and Panel Doors
Pinning Down Nailers and Staplers
Congratulations to EHT's Sweepstakes Winner!
Build a Classic Workbench
Build a Retaining Wall
Re-Laminate Your Countertops
Build a Gun/Trophy Case
The Latest Ladders & Ladder Accessories
Drill Bit Update
Install an Exterior Door
Build a Classic Workbench
Molding Magic
Decking Done Right with David Billings
Everything Auto: Performance Coilover Suspension System
Woodworking Helpers
Install Deck Lighting & Accessories
Install Snap-Together Garage Tile
Everything Auto: Battery Basics
How to Replace a Window
Do-it-Yourself Cedar Siding
New Cordless Drill/Drivers
Make a Mantel Shelf
Everything Auto: Paint the Chassis for Rust Resistance
DIY Laminate Floor Installation
Spray Foam Saves Energy
Warming Up with Radiant Heat
How To Clean Brick Stains
How Long Should Concrete Cure?
Pro Tips on Built-up Crown Molding
Fix a Door Hinge
Grout Stuck in a Tub
Paint Aluminum Siding
Oven Burner: Fix or Replace?
Repair Loose Siding
Repair a Vinyl Floor Seam
Fix a Bouncy Deck
DIY Fountain Kits
Don't Cover Turbine Vents
Easy-to-Build Workbench
Refinishing Hardwood Floors for the DIY'er
Cutting Costs by Building Smart
Fix a Metal Handrail
Repair a Crack in Drywall
Repair a Stone Patio
Drippy Heat Pump
How to Cut Cement Board
Add Eave Vents
DIY Wallpaper tip
Build a Porch Swing
Pro Tips for Paint Brushes and Rollers
Installing a Front-Mount Receiver for a Winch or Trailer Hitch
How to Apply Primer Like a Pro
Remove Paint from Concrete
Can a DIY'er Re-shingle a Roof?
Deodorize your Air Conditioner
Should I Insulate my Crawlspace?
How Do I Prevent Puddling on my Deck?
How to Clean Hardwoods
How Can I Solve a Serious Toilet Clog (Bar of Soap)?
How Do I Install Quarter-Round Trim?
What's the Best Drill Bit for the Job?
How Do I Stop a Chimney Backdraft?
The Grout Gun: Reader Tip for Grout Application
How Do I Hang Drywall?
Should I Use Textured Paint?
How Do I Become a Professional Contractor?
Should I Use PT Lumber for a Shed?
How to Install Roof Sheathing
How to Remove a Stripped Screw
Stucco a Foundation
Should I Tile a Tub?
Installing Crown Molding Solo
Reduce Wood Warping
How to Calculate Concrete Required
Re-Laminate over Existing Laminate Countertops
Paint Vinyl Siding
Taping Inside Corners of Drywall
What's the Difference in Granite Countertops?
Can I Match Roof Shingles?
Stop Pipes from Banging
Installing Base Molding
PVC as a Backsplash?
A Good Start-up Toolbox
Caulk a Tub with the Right Stuff
Five Lathe Projects You Can Build
Building Basic Closet Shelving
Install Column Wraps for a Stylish Front Porch
DIY Thermostat Upgrade
Build a Brick Garden Wall
Outdoor Living Spaces
Security Solution
Repair a Run in Carpet
Clean your Gutters the Easy Way (Reader Tip)
Repair a Shower Head
Upgrade Your Truck's Exhaust System
Clean Oil Stains from the Driveway
Repair Damaged Plaster
DIY Block Windows (Glass vs. Acrylic)
Refinish a Tub
Which Flooring Over Concrete?
Checking Your Tire Pressure is as Easy as Pumping Gas
Video: Deck Recovery
Chainsaw Rx
Next-Gen Decks
Installing a Tile Pattern Laminate Floor
Pour a Concrete Floor
How to Install Vinyl Siding like the Pros
Build a Carpenter's Box
Home Stretch
Congratulations to June's Skil Sweepstakes Winner!
Kit-Built Log Homes
Build a Squeak-Free Floor
Everything Auto: Anti-Sway Bar Install
Installing Granite Countertops
Converting a Closet to Cabinets
Wiring a Garden Shed
Build Your Outdoor Living Room
Understanding House Framing
Replace an Old Deck with Composite Decking
Tighter Miters
Adjustable Pliers & Wrenches
Think Green with Cordless Lawn Tools
Building Shop Shelves
How to Choose Lumber for Outdoor Projects
Demolition Devices
Circular Saw Blades Up Close
Best New Products for Your Deck
Replace an Old Mower Deck
Router Essentials
Fireplace Safety: Avoiding the Dangers of Creosote Buildup
Building a Cooking Table for Your Ceramic Grill
The Kitchen Facelift
Roof Framing 101
Fix a Squeaky Floor from Above
Why Choose a Tankless Water Heater?
Remove Candle Wax from Carpet
Quick Fix for Squeaky Hinge
Pressure Problem with Faucet
Flatten Plywood Subfloor for New Flooring
Prep Floor for Peel & Stick Tile
Replace an Interior Door
The Summer Digital Issue is Now Live!!
Do-it-Yourself Brick Patio & Walk
Crown Molding in Review
Making Outdoor Log Furniture is Quick and Easy
Install a Patio Door
How To Build a Bar Stool
13 Pro Tips for Crown Molding
Bathroom Design Guide, by Sunset Books
Master Suite Masterpiece
Wood Handle Replacement for Striking Tools
Heated Tile in a Snap
Bathroom Redo
Hot Water Options
Christmas Presents You Can Build
Gasket Replacement for Ceramic Grills
Organize Your Kitchen with Rev-a Shelf
Save Energy with Insulated Siding
Working for the Clampdown
How to Remove Wallpaper
Holiday Digital Issue is Now Live
What are Architectural Shingles?
How to Apply Stucco to Concrete Block
Is this Old Paint Oil- or Latex-based?
Is the Plumbing Clog in the Drain or Septic Tank?
Fix a Noisy Ceiling Fan
Adjust an Automatic Garage Door
How to Paint a Steel Door
Can I Install a Toilet where there is No Drain?
How to Shim a Granite Countertop
Use UV light to Clean HVAC System
How Do I Match Old Brick?
Troubleshoot Automatic Garage Door Opener
Prevent Mold on Bathroom Caulk
Keep Mice Away from the House
How to Install Outlet Extensions
Installing a Brick Accent Wall
Down on the Farm, Up Goes a Wall
How to Bend Drywall
Use House Wrap on a Shed
DIY Faux Finish: Stippling
Creating Concrete Sculptures
How to Eliminate Floor Pops
Can New Tile Go Over Old Tile?
Keep Ceiling Joists Level when Installing
Adding a Camo Wrap
Replace an Old Roof With New Shingles
DIY Storage Helpers
Extreme Outdoor Cooking Center
Repair a Kitchen Cabinet
Woodworking Tools 2008
Solving Common Household Drain Problems
Sealing Interior Brick
How to Remove a Popcorn Ceiling
Extra-Mile Hero Contest
Install Mosaic Floor Tile
Stock Parts, Custom Door
Cordless Fastening in Tight Spots
Heating Homes with Hot Water
Just Getting Started
Build a Temporary Closet
Hardwoods in a Heartbeat
Fold Away Hide Away
Installing a Synthetic Railing System
Build a Shadowbox Privacy Fence
Today's Handsaws
How to Make a Knife
The Fun and Fascination of Wallpaper
Do-it-yourself Mirror Frames
Window Re-View
Remodel with Prefinished Stair Treads
Build an Oak and Walnut Nightstand
Five Portable Workstations Reviewed
Tiling Over Concrete
Replace a Ceiling Fixture
Exterior Wood Coatings
How Do I Lay Sod on a Lawn?
Should I Use Faced Insulation?
Deck Demolition Made Easy
Easy Homemade Wood Jigs
Build a Kid's Cubby
Siding Maintenance & Repairs
Choosing a Pool Location
A Home with a Personal Stamp
Adding a PVC Jamb Extension
Bathroom on a Budget
Everything Auto: Upward Thinking with Overhead Consoles
How to Preserve the Look of Copper
How Soon to Paint Concrete?
How to Repair Worn Hardwoods
How Do I Add a Dimmer Switch?
How Do I Connect an Ice Maker Supply Line?
What is an Incinerating Toilet?
How Do I Remove a Mirror from a Wall?
How to Fix a Bi-fold Door that Sticks
How Do I Build a Fence Gate?
How to Remove a Water Stain from Hardwoods
How to Repair a Sagging Floor
Hot Products April 2009
Energy Efficiency in the Home
Expert Advice on Planning a Kitchen
DIY Tile Countertop
Trim Tips for Doors and Windows
Adding a Cased Opening for Windows and Doors
Working with Crown Molding
Base Molding, Learning to Cope
Installing Toilets, the 12 Step Method
How-To Wire Split Receptacles
Install Landscape Lighting
Interior Rock Floor Installation
Refinishing Cabinets to Look Old
Refinishing Kitchen Cabinets for the D-I-Y
Installing Rods and Hardware
Installing Window Treatments
Extreme How-To's Guide to Painting
Bookshelves You Can Build Yourself
Build a Patio or Walkway from Pavers
Build a Patio Using Pavers
Build a Firepit
How to Repair/Replace a faucet
Replacing a Faucet
Build a Stone Firepit
Install Utility Sink
Adding Wire Shelving to Your Closet
Deck Lighting
Installing Laminate Tiles
Countertop Pros and Cons
How to Repair a Cracked Porch
Clipped-Head or Round-Head Nailer?
Invisible Cold Air Return (Reader Tip)
How Do I Build a Header?
Reinventing a 100-Year-Old Bedroom
Surviving Extreme Winds
An Overview of Today's Powered Hand Sanders
Replacing Drawer Slides
Handy Drywall Tools
How to Make Cope Joints in Molding
Paint with Success
How to Build Deck Stairs
Brand New Tune
Tips on Cleaning and Staining Your Deck
Island Workspace for The Kitchen
How to Build a Bar Pass-through
Deck Framing Gone Wild
New Tools for the Green Season
Bright Ideas for Deck Lights
Grid Guidelines for a Great Look
Building a Pergola
Concrete Patio Stamped with Style
Cordless Tool Update
Installing a New Tub or Shower
Test Page for Iframe link
Artificial Stone up Close
Paint a Countertop to Look Like Granite
DIY Countertops with Solid Surface Material
Build a Spiral Staircase
Easy Steps to Replacing a Bay Window
Deck Product Roundup
Waterproofing Basement Walls
Open to Change
All About Insulation
How-To Stain or Paint a Deck
Adding a Kitchen Island
Bathroom Vanity Installation
Level-headed
DIY Shock & Strut Installation
Your House is a System
Coat of Armor for Outdoor Wood
Install Plywood Underlayment for Vinyl Flooring
When to Install New Shingles
Can I Paint Asphalt Roof Shingles?
How to Paint Baseboard Heaters
What is the Best Firewood?
How Does a Heat Pump Work?
How to Refinish a Clawfoot Tub
How to Paint Window Shutters
Installing Wainscoting Adds Style
Installing a Shower Pan Liner
Installing a Laminate Floor
Installing Granite Countertops
Installing a Ceiling Fan
Ceiling Fan Installation
Selecting Energy-Efficient Replacement Windows
Comment construire l'escalier French Version of How To Build Stairs
Extreme How-To leert Trap bouwen "How To Build Stairs, Dutch Version"
ɊK'ig\'z邽߂̎菇ł How To Build Stairs Japanese Version
Happiness is a Warm Shower
Q&A
Tool Transport
How to Stop Water Intrusion on Foundation Block
Repair a Metal Chair
Wallpaper Installation
"Extreme How-To" Uč Jak se stav schody.
Subfloors and Underlayments
The Laminate Flooring Boom
Sidewalk Repair for the Do It Yourselfer
Creating a Workshop
Inexpensive Kitchen Makeover Using Tile as a Countertop Material
Adding a deck canopy/pergola
Tips for Building a Retaining Wall
Adding Lighting to Your House Interior
Fantastic, Fun, Furniture Finishes
Gutters & Downspouts for the DIY'er
Build a Basic Set of Shelves
Replacing Old Aluminum Windows
Build a Deck
Upgrade Your Garage or Workshop
Cmo Construir Escaleras
"Extreme How-To" Wird Erlutert, Wie Treppen Stellen.
" How-To "
Extreme How-To lr ut hur man bygger Trappor. How To Build Stairs
Building Stairs Hindi Version
Building Stairs Chinese 建筑楼梯的说明


CORK FLOORING ARCHIVED ARTICLES VIDEOS PRODUCT/SERVICES DIRECTORY PRODUCT NEWS ABOUT US SUBSCRIPTION SERVICES MEDIA KIT HOW TO FORUM CONTACT US YELLOW PAGES HOME


© Copyright    All Rights Reserved
Privacy  Sitemap  FTC Disclosure