


Have you ever wished that you could have beautifully installed crown molding and trim in your home but you simply cannot afford the cost of hiring a professional? Of course, the best solution would be to do it yourself. Almost every do-it-yourselfer becomes intimidated though, because there is so much confusion about how to cut the perfect-fitting compound miter joint. There are literally hundreds of gadgets and special tools available for cutting crown molding or trim, and they all claim to be the answer. In reality, almost all of these tools have limitations as to their applications. Not knowing these limitations can cause total disaster for the do-it- yourselfer. By using the correct tools and methods, however, you can save thousands of dollars by installing your own crown molding and trim in your spare time.
Once you have decided to install your own crown molding and trim, you should spend some time researching the internet and magazines for ideas that you like and how you would like your room to look. Cathedral or sloped ceilings are not a problem. These are accomplished by making combination horizontal and vertical turns of your crown molding.
I use a miter saw (no blade tilt), prop the crown molding against the fence, and set the miter angle. This technique is commonly referred to as “upside-down and backwards.” You can also use a compound miter saw and lay the crown molding flat on its back (face up) and setting a miter and blade tilt adjustment. I prefer using a compound miter saw. (You can use a compound miter saw as a miter saw by leaving the blade tilt set at zero.)
I am often asked which saw is best for cutting crown molding. Even the least expensive brand name saws will work. It is not necessarily how much the tool costs but knowing how to use it that makes the difference. The size of crown molding and trim that you will be installing will determine the size of saw needed. A 10-inch saw will usually cut 5-inch-wide crown/trim, a 12-inch saw will cut 6 inches, and a 12-inch sliding compound miter saw will cut up to about 10 inches wide. Not all saws are made the same. Some will exceed these guidelines, while others may not.
Crown Molding on Horizontal Ceilings using a Miter Saw
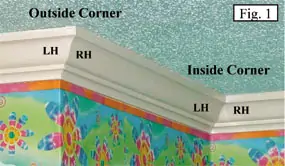
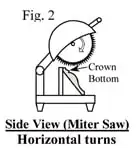
Now let’s focus on cutting and installing your crown molding for horizontal turns. These are the most common cuts and they fall into two categories, inside corners or outside corners (Fig 1). The corner angle is not always 90 or 270 degrees. When using a miter saw to cut crown molding for horizontal ceilings, you must prop the crown molding against the fence as shown in Fig 2. The bottom of the crown must be held firm against the fence and let the top rest on the miter saw table. Crown stops are nice to have in order to help hold the crown while making the cut.
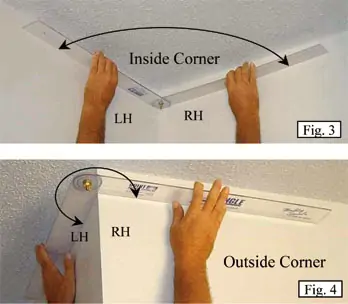
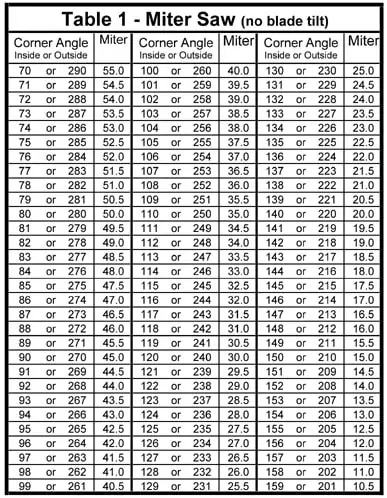
To cut your crown molding to fit the corner, you must know the angle formed by the two walls. The easiest way to do this is by using a 360-degree adjustable protractor such as the Original True Angle tool manufactured by Quint Measuring Systems, Inc. (Fig 3 & 4). The True Angle tools have the angle dial printed on the tools for direct reading and are available for purchase at www.compoundmiter.com .
Once you have the angle of the corner, you are ready to place your crown on your saw and cut the crown for the type of corner you need; outside corner, LH (left-hand) or RH (right-hand) or an inside corner, LH or RH (Fig 5 & 6).
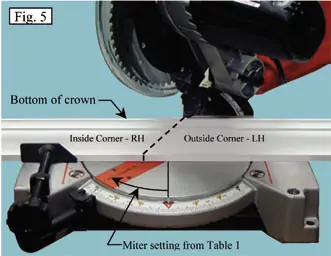
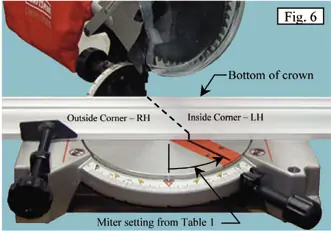
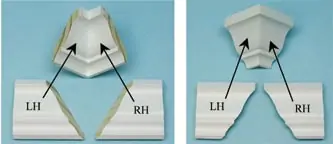
The ends of your crown should look typically like these photos and, if cut using the miter setting from Table 1, will fit your corner perfectly.
Crown Molding on Cathedral/Sloped Ceilings using a Miter Saw
When installing crown on a cathedral/sloped ceiling, you must know the slope of the ceiling. To obtain the ceiling slope, measure the angle between the wall and ceiling at a location where the top of the wall is horizontal. Place your angle measuring tool perpendicular to the wall (Fig. 9).
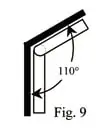
In this example, the ceiling slopes 20 degrees (110-90 = 20). You will now use the ceiling slope to determine the corner angles for turns of the crown molding made in a vertical plane (i.e. upward/downward turns) when installing crown molding on a sloped ceiling.
Figure 10 is a typical installation of crown molding on a cathedral ceiling. The crown is installed with a combination of horizontal and vertical turns. Joints A & E are turns made in a horizontal plane (just like the turns made while installing crown on a horizontal ceiling). Joints B, C & D are turns made in a vertical plane (the wall). Joints B & C are outside corner turns in the vertical plane (upward turn), and joint C is an inside corner turn in the vertical plane (downward turn).
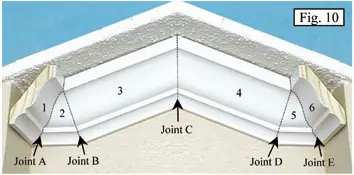
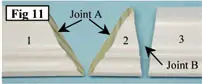
The combination turns (horizontal and vertical) will look like Fig. 11 before they are installed. Notice that crown molding piece No. 2 is cut so that the top of the crown has no length and it forms a point. This is how you will always cut this transition piece when making a horizontal to vertical turn.
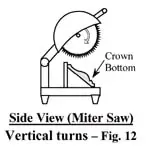
When cutting vertical plane turns with a miter saw, you will position the bottom of the crown molding held firmly on the saw table (Fig. 12). The angle of the crown bottom of your crown determines the crown spring angle. That is why it is so important to hold the bottom firmly against the fence for horizontal turns or firmly against the saw table for vertical turns.
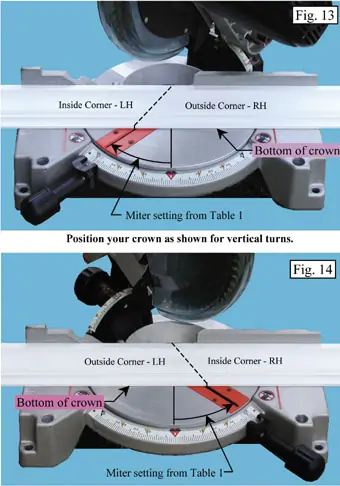
There are four cuts that you can make in the vertical plane just like there are four cuts that you can make in a horizontal plane (i.e., inside and outside corners with each having a LH and RH cut, see Fig. 13 & 14).
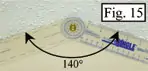
To obtain the corner angle for joints B and D (Fig. 10), you will use your ceiling slope (in this example, the ceiling slope = 20 degrees). Joints B and D have a corner angle of 200 degrees (180 + ceiling slope = 200). Joint C has a corner angle of 140 degrees (180 – twice the ceiling slope = 180 – 40 = 140). You can also measure thecorner angle for joint C directly with your 360-degree protractor (Fig. 15).
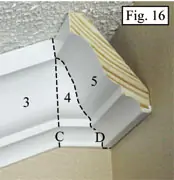
When you have a sloped ceiling where crown piece No. 3 runs into a vertical wall (Fig. 16), joint C would then be an inside corner (160 degrees) turn in the vertical plane and joint D would be and inside corner (90 degrees) turn in the horizontal plane. You would get your miter saw setting from Table 1.
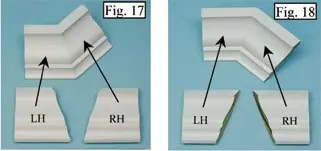
The crown molding cuts for vertical turns (plane of the wall) will look like these templates (Fig. 17 & 18). I highly recommend that you make yourself a full set of eight crown molding templates, label them and use them as a guide to prevent cutting your crown molding backwards. Make the longest edge about 3 inches long. Drill a 3/8-inch hole in each and place them on a string and keep with your saw for quick reference (Fig. 19).

Crown Molding on Horizontal Ceilings using a Compound Miter Saw
The difference between using a compound miter saw (has blade tilt adjustment) versus a miter saw is that you can lay your crown molding flat on its back, face up and set a miter and blade tilt angle. Table 1, of course, will not work because there is no blade tilt angle in Table 1 and the crown molding is not propped up.
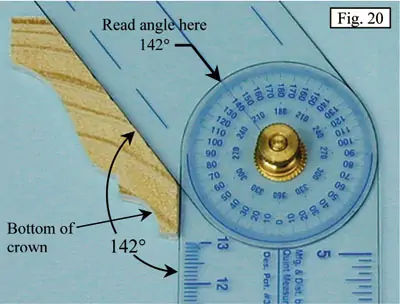
When cutting your crown molding laying flat, you will need to know the crown spring angle. The crown spring angle is the angle between the back of the crown and the wall when the bottom of your crown molding is held firmly on the wall.
To obtain your crown spring angle, measure the bottom of your crown as shown in Fig. 20. This crown molding has a spring angle of 38 degrees (52/38 crown). The other most common crown molding is 45/45 degrees. However, there are many others. Also, quite often the crown molding will be undercut at the mill as much as 2 to 3 degrees. You should measure your crown spring angle accurately to avoid any gaps in your joints. It is much easier to hold your crown molding flat while making your cut, especially for the small pieces of crown molding that are frequently needed.
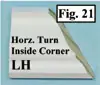
To determine how to position your crown molding flat (face up) on your compound miter saw and which direction to adjust your miter and blade tilt for the cut you want to make, use your crown molding templates that you made in the previous section. You should have eight templates in all (four for horizontal turns and four for vertical turns). Let’s cut a horizontal turn, inside corner, left-hand (LH) piece to show you how to use your crown molding templates. Find the template for the cut you want and place it flat, face up, with either the top or the bottom of the crown molding template next to the fence. (You should label all eight of your templates for the corner each represents as shown in Fig. 21.)
Now move your miter and blade tilt so that your saw blade will match the bevel cut on the crown molding template. If necessary, you may need to switch your template to the other side of the blade and/or place the opposite edge of the template next to the fence.
In this example (Fig. 22), you can see that to align the blade parallel to the bevel cut on the template, the miter should be moved clockwise, the blade should be tilted to the left, the crown molding should be on the left side of the saw blade with the bottom of the crown molding template next to the fence.
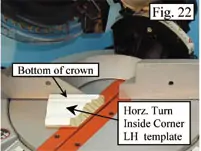
Once you have determined the correct placement and direction of you miter and blade tilt, set you saw using the miter and blade tilt setting obtained from Table 2 for the spring angle crown you have and the corner angle you want to cut. Remove your template and place your crown in the same position and make the perfect cut. For the mating cut, use the template labeled the same (Horiz. Turn, Inside Corner) except it will be the RH side. You will use the other templates in the same manner for all of your remaining cuts.

Crown Molding on Cathedral Ceilings using a Compound Miter Saw
We have previously covered most of the details on installing crown on a sloped ceiling in the section for sloped ceilings using a miter saw (no blade tilt). The only difference here is that you will be cutting your crown molding laying flat on your compound miter saw and using Table 2 to get your saw settings. The best/easiest way to cut your crown is to lay it flat and face up, especially when cutting the small pieces that are often needed. To avoid confusion on how to set up for the type of cut you want to make, use your crown molding templates as a guide.
Trim
We will now address how to cut and install trim which is placed flat on the wall using either a miter saw (no blade tilt) or a compound miter saw. This type of trim includes baseboards, chair rails, quarter and half-round trim, cove molding, corner molding, fireplace trim, and door and window casings. You will use Table 1 to obtain your saw settings and your 360-degree adjustable protractor to measure the corner angle (Fig. 23).

To make a horizontal turn with trim using a miter saw (no blade tilt), you will stand the trim up with the back of the trim against the fence (Fig 24) and adjust the miter to the setting from Table 1.

With the miter rotated clockwise (CW) and the trim to the left of the blade, you get a horizontal turn, inside corner, LH cut. With the same saw setting with the trim to the right of the blade, you get a horizontal turn, outside corner, RH cut. Now move the miter counterclockwise (CCW) to the opposite side of your saw.
The trim to the left of the blade will be a horizontal turn, outside corner, LH cut and the trim to the right of the blade will be a horizontal, inside corner, RH cut.
If you have any trouble visualizing the proper cut, then you should make a set of trim templates for horizontal turns and vertical turns (inside and outside corners) and label them as shown in Fig 25 & 26. To make your trim templates, use a miter setting of 45 degrees.

To make a set of vertical turn trim templates, you will lay the trim flat on the saw table with the top of the trim next to the fence. Adjust the miter CW and CCW, cut and label the vertical turn trim templates as shown in Fig 26.

You can use your trim templates for either a miter saw or a compound miter saw to determine the setup and trim placement. Measure your corner angle and obtain your saw setting from Table 1.
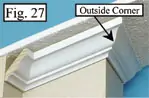
Occasionally, you may run into some conditions that are not covered in the article. For example, when dealing with an outside corner in a room with a sloped ceiling, a combination horizontal and vertical turn will not work. What you will have to do for these corners is turn the crown in the plane of the ceiling as shown in Fig 27.
*molding is also spelled moulding.
For more information, contact Wayne Drake, author of the book, Crown Molding & Trim: Install it Like a PRO!, at [email protected] or call 1-866-544-2016.
Check Out More EHT Crown Moulding Stories:
For a Look at How to Install Basic Crown Molding, click here.
For 13 Pro Tips for Crown Molding and Trim, click here.
For a Look at All Types of Molding, from Crown to Base and even Elaborate Built-up Profiles, click here.
For a step-by-step guide to installing PVC crown, click here.
