

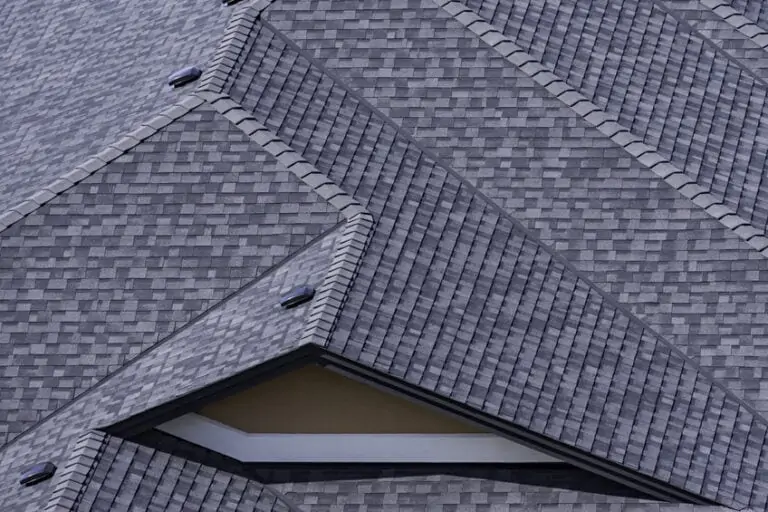
Roofing practices have changed a lot over the past 25 years, mostly due to ever-changing technology and materials. Fiberglass shingles, used often in residential buildings, are thinner and stiffer than asphalt shingles and can telegraph every imperfection. While these materials are often more durable and efficient than previous ones, they require more careful attention to detail during installation.
There are five basic steps for building the best possible roof and avoiding costly callbacks and repairs: 1. Start with a level nailing surface. 2. Provide adequate ventilation. 3. Nail and space panels correctly. 4. Protect sheathing and carefully install felt. 5. Install shingles according to manufacturer’s guidelines.
Start With a Level Nailing Surface Whether you’re using plywood or oriented strand board (OSB), the first step in building a high-quality roof is to make sure you have a level nailing surface. You can check this with a 6- to 10-foot piece of lumber or a long carpenter’s level. If one support is as little as 1/4 inch lower or higher than the one next to it, you might end up with an uneven roof. If needed, shim trusses or rafters to level the nailing surface, and install blocking to straighten any warped or bowed top chords of trusses or rafters.
Provide Adequate Ventilation Attic ventilation began as a moisture-control strategy in cold climates, and many builders came to believe that vented attics could help to extend a shingle’s life through cooling. Research, however, has done little to support this concept. What it does support is the fact that a roof has two main jobs: to prevent outside moisture from getting in, and to allow inside moisture, caused by human activity, to get out.
Although venting requirements are not based on rigorous scientific research, your local building code should have the specific requirements you need to follow to pass inspections. All that said, here are the minimal guidelines for adequate roof ventilation:
• Install 50 percent of vents near peaks or along ridges, and the rest at eaves or soffits. • The total free ventilating area can be 1/300 of the attic space if 50-80 percent of the ventilator area is near peaks or ridges, or if a vapor barrier is installed on the warm side of the ceiling. Otherwise, it must be 1/150 of the attic space. (International Residential Code, Section R806.2) • Vent exhaust air from the kitchen, bath or laundry through the roof to the outside. • Install baffles at the eaves, leaving at least 1 inch of clear space between framing and/or under roof sheathing to ensure that ceiling or roof insulation doesn’t block ventilation paths. For vaulted or cathedral roofs, provide a free ventilation path from eaves to ridges between all rafters.
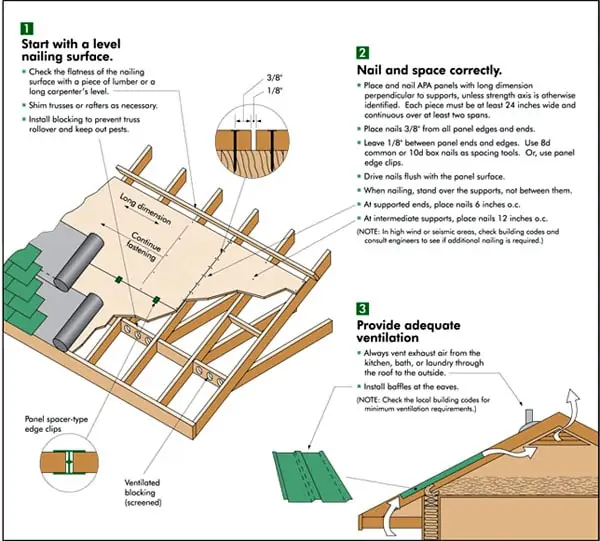
Nail and Space Panels Correctly APA Field Service specialists often encounter incorrect nailing and panel spacing. “Many crews build ‘neat and tight’ instead of ‘neat, tight and spaced right,’” says Roger Roatch, APA’s field services manager for the western region.
Proper spacing is especially important since wood expands and contracts as changes in ambient humidity also change the moisture content in the panels. If panels are butted tightly together, there is no room for expansion. When panels expand, they might bend up or down, or “buckle up” off trusses and rafters. And shingles will move with them, easily causing bulges, ridges and valleys.
Unfortunately, roof problems may not appear for quite some time. For example, when the summer sun is high in the sky, the shadows cast across a roof are very short. As fall approaches, they begin to lengthen, often exposing even the slightest roofline imperfection. Only time will tell the level of skill and care that has gone into the roof installation. To stand the test of time and produce the best possible roof, follow this procedure:
1. Position the first panel and use temporary fasteners at the corners, if needed, to square the panel on the framing. If necessary, trim ends to center panels on the framing. 2. Install fasteners at one panel end. 3. Remove fasteners at corners. 4. Install intermediate fasteners, starting at the panel’s edge. Use a chalk line or straight edge to align fasteners on the framing. Fasten panels in rows across the width, continuing this sequence along the length of the panel. 5. To ensure contact with the framing while fastening the panel, stand over the framing near the fastener location. (Standing between framing while nailing can lock a sag into the roof sheathing.) Drive fasteners flush with the panel’s surface. 6. Leave 1/8 inch of space between adjacent panel ends and edge joints unless a panel manufacturer recommends otherwise. For a spacing tool, use an 8d common or 10d box nail, or panel edge clips. 7. After sheathing is in place, you can easily saw-cut or kerf out any tight joints you might have missed. The saw blade will give you the 1/8-inch spacing you need. Kerfing, however, must be done before any buckling occurs because once buckling has occurred, the panels will retain a “memory” of the buckle and not flatten out completely. 8. For improved performance, use thicker sheathing panels, panel edge clips, or panels with tongue-and-groove edges. Check local building codes before using panel edge clips since requirements depend on the relationship between a panel’s span rating and the actual distance between framing members.
This is the best procedure we’ve found for securely fastening roof panels and minimizing the effects of stress build-up during their expansion.
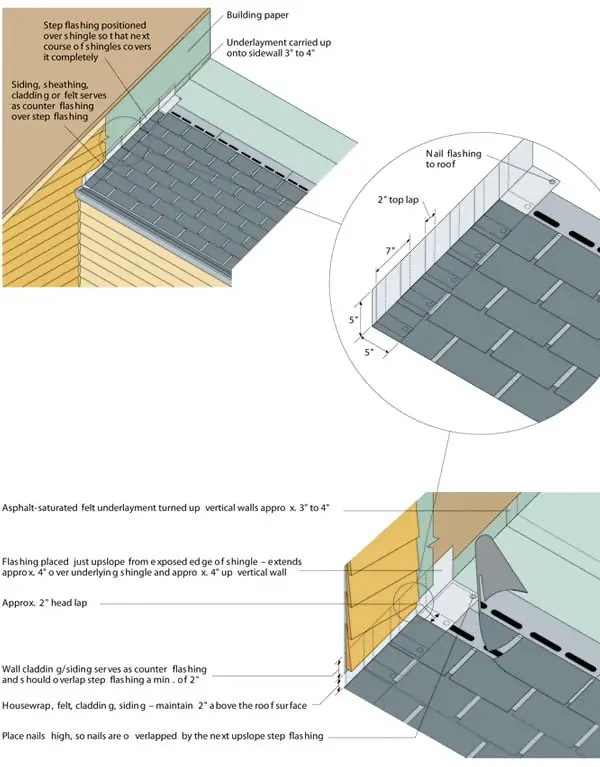
Protect Sheathing and Carefully Install Felt After you’ve installed the roof sheathing, clean the surface thoroughly and then use a shingle underlayment felt conforming to ASTM D 226, Type I or ASTM D 4869, Type I. Do this as soon as possible to help protect the panels from exposure to weather. Besides cleaning the surface, be sure that all nails and staples are driven straight and made flush with shingles; otherwise, the tabs on shingles will poke up and look uneven.
When you install roofing felt, smooth and flatten it as much as possible before fastening the shingles. Any wrinkles or bulges you leave may prevent the shingles from lying flat.
Install Shingles According to Manufacturer’s Guidelines Check the manufacturer’s recommendations for installing shingles. Delay the installation of asphalt or fiberglass shingles as long as possible to give the sheathing time to adjust to humidity and moisture conditions. For the best appearance, use heavier weight, laminated or textured shingles, which will help to mask surface imperfections and reduce the risk of shingle ridging.
For more information on quality roof construction, please refer to the variety of publications offered by APA, The Engineered Wood Association. For more information, visit www.apawood.org or call the APA Help Desk at (253) 620-7400.
