

The practice of building retaining walls has been around for thousands of years. If you want to level a hilly area to enclose a decorative garden or construct a new driveway, you’ll need retaining walls. Retaining walls can be built with virtually any solid material, from concrete and brick to wood timbers used in garden landscaping. The newest retaining wall systems are composed of segmental blocks that interlock, with no need for mortar. Many of these systems enable you to finish a project that will look complicated and professional, while the actual work involved is fairly simple.
Some of the mortarless systems designed specifically for the do-it-yourselfer are more appropriate for shorter walls than tall walls. These systems can add a nice decorative touch to a landscape by creating borders or a system of sloped terraces. Some systems feature blocks that have a lip on the lower edge that locks them together, creating a step effect. When the cavity behind the wall is filled with earth, the pressure pushes the blocks forward, strengthening the joints between the lips and the blocks beneath.
Other systems offer differing interlocking features, such as cast tongue-and-groove connections for additional structural integrity. Also available are systems that feature fiberglass pin systems. The pins insert between the blocks to ensure proper alignment and a strong mechanical connection between the units. With some of the pin systems, you can adjust the setback, or“batter,” of the wall system by inserting the pins into different holes.
While many DIY-tailored mortarless systems are intended for relatively low walls (up to 4 feet tall), taller or more critical walls should be designed prior to installation. For taller walls, much more consideration must be given to reinforcement, drainage and overall stability.

Wall Design
There are two primary areas of concern for any earth-retaining structure: resisting lateral earth pressures; and providing a strong foundation.
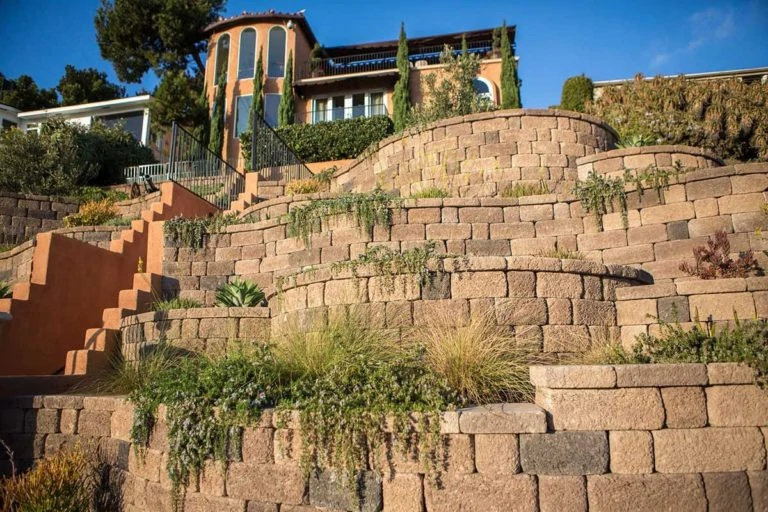
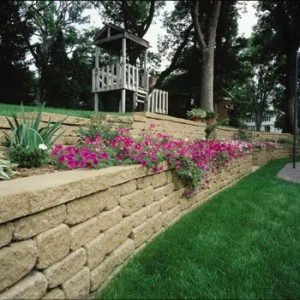
One of the most basic types of retaining walls, the Gravity Wall, uses wall mass and cross-sectional geometry to resist pressure from the earth that is pushing against it. Many of the systems designed for homeowners use a Gravity Wall design. These systems simply use the weight of the blocks to retain the earth. Gravity Walls work best for accent walls around the yard and garden, up to about 3 feet high.
Taller or more critical walls require a Reinforced Wall design. The Reinforced design compensates for the retained earth’s “sliding wedge.” The sliding wedge is the angle at which the soil would normally develop if not retained, due to gravity and water runoff pulling the soil downward. As the height increases, the soil’s mass increases at the top of the slope. This means that the higher the retaining wall, the stronger it must be.
To address the sliding wedge, retaining walls in excess of 3 or 4 feet should be “battered.” The term “batter” refers to a backwards tilt or set back. A retaining wall built plumb maximizes the sliding wedge of the material behind the wall. On the other hand, a wall that is battered tilts backward toward the hillside, reducing the amount of material in the sliding wedge by an amount equal to the degree of tilt.
Battering is one method of strengthening a taller wall. Reinforced Walls may incorporate this approach in conjunction with reinforcement grids, anchors or steel reinforcement. Very tall walls get rather complex when accounting for lateral pressure, as do the reinforcement options. The sliding wedge, for instance, doesn’t function as a one-to-one relationship. A retaining wall 8 feet tall is not just twice as strong as a wall 4-foot tall. The 8-foot wall actually needs to be four times stronger. For walls taller than 4 feet, hiring a licensed engineer to develop a design would be a wise move. Also, keep in mind that big walls usually involve moving truck loads of soil, gravel and heavy block.

Getting Started
After selecting your retaining-wall system, the first step in construction is to measure the wall’s layout, using stakes and string to mark the course. Remove all surface vegetation and debris (this material cannot be used as backfill). Dig the base trench to the designed width and depth of your block system. Retaining-wall systems differ greatly in block size and design, so follow the manufacturer’s installation instructions to the letter. Then level the excavated base pad, starting at its lowest point.

Next, place, level and compact a layer of base rock to support the first course of block. The base rock can be gravel, road base, or crushed rock (1⁄4 to 3⁄4 inch in diameter). Typical base fill is about 6 inches deep. This allows the wall to flex slightly with ground movement. Tamp this down with a hand tamper. If building a long wall, you may opt for a motorized walk-behind compactor available at most equipment-rental outlets.
Laying the Base Course
The key to a successful retaining wall is ensuring a level foundation course of block. The dimensions of the trench will depend on your system, but the first course of block must be below ground level so the surrounding soil will secure it in place. If you’re building into a slope, you may have to dig the foundation in a series of steps equal to the height of the blocks. Then, as you install the blocks, build up the lower sections until the stepped areas are level.

Starting at the lowest point of the trench, place the first layer of blocks on top of the compacted base, according to your system’s design and instructions. (For example, some blocks may feature a front lip that must face up and forward.) Place the blocks closely together, checking the level and alignment of each block. For straight walls, use a string line along the back of the course to ensure the blocks are flush. Use a rubber mallet to “fine-tune” the placement of the blocks.

After the base course is level and in place, create a drainage zone behind the units, inside all voids or between the blocks, using 1⁄2- to 3⁄4-inch clean crushed gravel. Again, check the manufacturer’s guidelines regarding drainage specifications. Some blocks feature rear voids to accept rock to create the drain field. The depth of the drain field will also depend on the size of the intended wall.
Then use the on-site soil to fill the area behind the drain field. Also fill any gaps in front of the base blocks. For backfill soils, avoid using soft clays or spongy organic solids, which won’t properly compact and will settle after construction.
Use a compactor or tamper to compact the wall, the drain field and the area directly behind the drain field. Make the first compaction pass directly over the wall. Then compact parallel to the wall, continuing the process until the soil no longer settles. When finished, sweep off any pebbles or debris so the next course of blocks will rest evenly on the base course.
Additional Courses
Install the next course of blocks with an offset or stagger from the course below. A 3-inch stagger is typical of many systems. This should ensure that the blocks’ vertical seams do not directly line up, adding structural integrity to the wall. You may need to cut the first block of the second course in half to achieve the necessary offset. Level and align this course, adjusting where necessary.

Again fill the drain field with drainage rock, and use on-site soil to fill the area behind the drain zone. Compact the wall; drain field and backfill as with the first course.
Before laying the third course, most tall walls will require reinforcement. Manufacturers often supply a flexible reinforcement grid with the system. A typical wall is reinforced every two courses. After sweeping the surface of the course, roll out the grid behind the wall with the edge of the grid against the front edge, or lip, of the block. Place the third course on top of the grid. Pull the grid tight to remove any slack and stake the grid into place.
Repeat this process, installing additional courses, adding drainage rock and backfill, and compacting appropriately until you’ve reached the desired height of the wall.
Special Considerations
Sharp curves and half units may require cutting the blocks with a masonry cut-off saw to achieve an appropriate angle to form the curve. Cut-off saws are usually available at most equipment-rental outlets.
When placing the reinforcement grid along curved walls, the grid should follow the back of the block. Slit the grid with a utility knife and either feather outward or overlap its edges to follow the curve.
Several systems feature blocks with voids. These hollow blocks are just as strong as solid blocks, but lighter for easier installation. When the voids are filled with drainage rock or gravel, the rock permits water drainage to prevent hydrostatic loads. At the same time, the gravel fill actually helps interlock the blocks.
Optional capstones can also be installed along the top course to give the wall a neat, finished look.
Tools Required
● Safety glasses
● Gloves
● Dust mask
● 4′ level
● Torpedo level
● Tape measure
● String line
● Chisel
● Hand Tamper (or plate compactor)
● Rubber mallet
● Shims
● Broom
● Round and square shovel
● Masonry saw

For More Information on Segmental Retaining Wall Systems:
Allan Block Corporation
952-835-5309
www.allanblock.com
Keystone Retaining Wall Systems
800-747-8971
www.keystonewalls.com
