

Landscape lighting used to be simple. A few recessed fixtures lining the front path, a couple of downlights tucked in the trees, and you were done. Not anymore. When it comes to the great outdoors, homeowners have seen the light.
“Today, the biggest excitement in outdoor lighting is the whole artistic aspect,” says Richard Lentz, president and owner of Lentz Landscape, a lighting company in Dallas. “Think of it as painting a picture of the landscape at night, using lights to achieve the look a homeowner wants.”
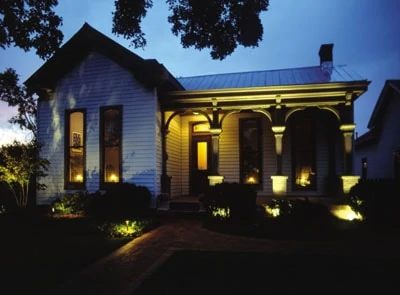
Night-lighting your landscape offers a creative way to showcase your home and property after dark. Properly placed, lights can dramatize trees, highlight favorite shrubs and accent statuary, fountains and flowerbeds. Like any creative work, the options abound.
“The challenge with landscape lighting is that most people don’t immediately see all the possibilities,” says Joe Rey-Barreau, American Lighting Association’s consulting director of education and director of the Lighting and Design Center at the University of Kentucky. “Outdoor lighting can be both functional and aesthetic. It’s an art to understand how much light to place on a house or determine where the focal points are.”
To light correctly, key in on architectural features. Uplight an arbor, archway or facade for a dramatic effect. Wash the side of the house with a splash of light. Graze a textured fence or wall with a focused beam. Illuminate the water in a pool or pond with submersible lights. Silhouette a tree or bush by placing lights below and behind the object. While some lights take a fashionable approach, others focus on function. Low-voltage lights installed under handrails, stairs and bench seating on decks help lighten things up for outdoor entertaining. Stronger beams designed to shine over an outdoor activity area like a basketball court add extra hours of post-dusk fun.
“If you cook out at night, position a spotlight in the eaves of the house to send a beam directly over the BBQ,” says Rey-Barreau.
A well lit home is also safer and more secure. Illuminated steps, paths and driveways prevent after-dark accidents. Motion detectors light up obscure spots when someone passes by. Photocells automatically turn on fixtures at dusk and off at dawn, providing protection even when you’re away from home.
“If your home is not properly lighted, there is a greater chance of someone breaking in,” says Daniel Lecian, ALA lighting specialist for the Hermitage Lighting Gallery in Nashville, Tennessee.
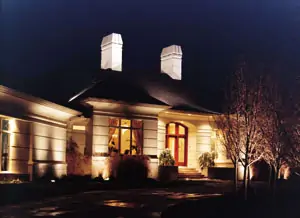
The key to attractive outdoor lighting follows a less-is-more philosophy. Soft, natural light should mimic moonlight on the property. It’s important not to over-light. What you should see is the landscape, not the lights, so that the outdoor lighting tells a visual story at night.
When installing outdoor lights, conceal the light source behind shrubs, tree branches or other foliage — unless the fixture is a decorative element.
“You should see the light effect, not the source,” says Rey-Barreau. “The bulb and fixture should disappear when the lights are turned on. All that should be visible is the glow of light on the flowers, the wall or the path.”
With the onset of summer, lighting showrooms and manufacturers have expanded their stock, resulting in more outdoor options for consumers. “For a long time, landscape lighting revolved around do-it-yourself, low-voltage lights picked up at home centers and installed by the consumer in a line about 2 feet apart,” says Rey-Barreau. “Many of these were not really made to withstand the weather conditions and were not long-term solutions.” But technology has improved.
Today’s styles range from large overhead cylindrical floodlights to minute spot or accent lights used for highlighting specific features. Diffused units are set low to the ground; they line paths, flowerbeds and driveways and cast a broader glow. The latest looks in such path lights depend on fixtures that can be placed further apart to create a more attractive glow. Some lights are patterned like three-leaf clusters or single-leaf containers. Others boast more traditional lantern styles. Still others beam from within floral fixtures installed in flowerbeds.

“There have been new product developments,” says Rey-Barreau. “Weather-resistant products and new plastic technology are both attractive and functional.”
Bulbs have also improved. Newer 65- and 120-watt incandescent bulbs provide up to 25 percent more light. Compact fluorescent bulbs produce soft lighting, the highest energy savings, and last up to 10,000 hours. Mercury vapor bulbs supply a strong, cost-conscious light with a cool color that can last as long as 24,000 hours — or six years burning dusk to dawn.
While most homeowners opt for pure white light, others like the hint of hue. Warm tones like yellow or red introduced properly can make the landscape come alive at night. Green lights can make foliage look even greener.
However — “be careful with colored lights,” says Rey-Barreau. “Unless they are done carefully, they can look garish.”
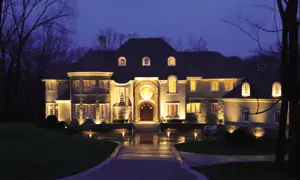
The cost to have outdoor lighting professionally installed is as varied as the landscape designs. According to experts, highlighting a couple of trees in a typical suburban front lawn could run from $800 to $1,200. A one-acre property with an elaborate lighting scheme can cost as much as $10,000.
Editor’s Note: The above portion of this article was contributed by The American Lighting Association, a not-for-profit association of leading manufacturers, retail lighting showrooms and sales representatives in the U.S. and Canada dedicated to expanding public knowledge about lighting. Call 800-BRIGHT-IDEAS (274-4484) for the name of the nearest lighting expert, or visit https://alalighting.com/.
The DIY Approach
Hiring a professional may save you some labor and help to ensure a smart lighting design, but the price can be pretty steep. A consultation with an outdoor lighting specialist, 10 top-quality fixtures and a complete installation can cost more than $2,500.
Of course, the alternative is to do it yourself. The first step is to assess the intended purpose of the lighting and determine the best type of system that will suit your needs. Don’t make the mistake of buying lights based on aesthetics alone. A durably built lighting system will pay off in the long run, so pay attention to the lamps’ construction. Most professionals recommend investing in treated brass, copper or castaluminum fixtures, which tend to withstand weather damage better than some cheaper, plastic alternatives.
Outdoor light systems are wired with either line-voltage or low-voltage power. Heavy-duty line-voltage wiring plugs into standard outdoor outlets, and the wires should be buried in conduit. The more common low-voltage systems plug into a transformer. The wires of a low-voltage system are thin and can be buried discreetly in the soil.
Installation costs vary, depending on the number, style and material of the fixtures and any additional outdoor outlets that have to be installed. Some home stores sell eight-fixture DIY kits for low-voltage systems, with prices beginning around $100 per kit. Or purchase fixtures, wiring and transformer separately and customize a system. Small, plastic fixtures cost as little as $4 each. More durable, metal fixtures start at $15 per fixture and higher.
For low-voltage systems, choose a transformer based on the accumulated wattage of your lighting system. Add the individual bulb wattages of all the fixtures. Choose a transformer, or power pack, that offers a wattage output greater than the total wattage of all the fixtures in the system. For example, let’s say a system includes four 7-watt fixtures, two 11-watt and two 35-watt fixtures:
7 + 7 + 7 + 7 + 11 + 11 + 35 + 35 = 120 watts total
In this case, you would need a transformer that offers a capacity of at least 121 watts. (Some transformers also come equipped with built-in timing and/or photocell devices, which are popular features for many homeowners.)
Next, determine the number and style of fixtures you need by plotting a light plan on your lawn. Walk the perimeter of your home, noting areas you would like to illuminate. Sketch the plan on graph paper, noting key features such as trees, shrubbery, paths, decks and patios. Mark the locations where you want the lighting. (Space path lights a minimum of 10 feet apart. Depending on wattage, flood lamps will cast light 20 to 40 feet).
Then locate a 120-volt outlet for your power pack. Certain manufacturers offer “weatherproof” power packs for outdoor placement. But many professionals still suggest mounting the transformer at an interior location, such as the garage, to avoid the elements and for additional security. This will require you to drill through the wall to run the cable. (Be sure to check for any obstacles before penetrating the wall.) The transformer should be mounted within 3 feet of the outlet and at least 1 foot above the ground.
Determine the length of cable needed by measuring the distance from the outlet to the farthest fixture location. Include the length of cable that branches off the main line. Adding branches of cable is recommended for lights that are not located in a straight line from the transformer to the farthest fixture. And always allow for several feet of extra cable.
Cable for low-voltage systems is available in 8-, 10-, 12- and 16-gauge sizes. The appropriate cable size depends on the maximum length of run from the transformer and the total wattage of the lights in the run. Check the cable manufacturer’s recommendations.
Installation
Start by digging a narrow channel for the cable at least 6 inches deep from the transformer to each fixture location. Use a narrow, flat-nosed shovel to dig for the cable to minimize any damage to the turf. At each fixture location, create a loop of cable (about 2 feet of cable), for the attachment of the fixture. Leave the channel open.
Fixtures require mounting. Place each fixture at its desired location, attaching the fixture to the mounting device. “Surface mounts” are used for placing fixtures on trees or structures. “Ground mounts” are stakes or spikes driven into the ground to support the fixture.
Connect the fixture’s lead wire to the cable run by splicing the wires together. To achieve true copper to copper contact of the wiring, use wire nuts with a sealant, and electrical tape to prevent corrosion. Or, solder the wires to ensure a strong connection. (When stripping the cable jacket, be careful not to strip away any copper strands).
Cable connectors are a quick and easy way of splicing a fixture’s lead wire to the cable run. Some manufacturers supply connectors with the fixtures. Some connectors are better than others, though, so shop around to see what’s available. These should still be reinforced with sealant and electrical tape.
Finally, plug in the transformer, connect all of your cable runs to the transformer terminals and turn on the system. If there’s any trouble, re-check all wiring connections. Once the system is functioning properly, fill in the cable trench and you’re ready to light up the night.
Sidebar:
Cable Runs
A “cable run” is the path of cable from a transformer to a fixture. The four most common layouts include:
• Standard run — a simple line of cable running from the transformer to the fixtures.
• Multiple runs — several standard runs going in two or more directions, attached to the same transformer.
• Loop run — a single cable beginning and ending at the transformer forming a loop.
• T-run — a single run of higher-gauge cable extending from the transformer with lower-gauge cable branching off the end of the larger cable, forming a “T.”
• Many builders now leave PVC conduit under sidewalks for landscape lighting to be added later. Check before you bore under the sidewalk; it could save you time.
Sources:
Outdoor Lighting Perspectives, www.outdoorlights.com
