

How to Build Custom Storage Shelves and Closet Cubbies
My wife can’t stand unused space. If there’s an opening that’s not being used, she’ll figure out a way of making a “cubby” or some type of storage in the area. We’ve placed shelves in a number of out-of-the-way spots. Guaranteed, your home also has unused corners, unorganized closets or simply wasted closet space. You might want to make some “secret” hiding cubbies as well.
In many instances your home’s unused areas can be organized with purchased shelves, racks, cabinetry, even stand-alone storage closets. But you can also make any number of cubbies yourself. Following are some examples of what we’ve done with our old house. Well over 100 years old, it, like many older homes, has its own personality and odd corners. Maybe these will give you some ideas for your own closet cubbies.

One of the first places to consider is an under-stair situation. If it’s not closed off, add a wall and door and you have an excellent place for off-season storage. We use our under-stair area for the Christmas tree and decorations and, because of the sizes of the boxes stored, nothing was done to the inside in the way of shelves. We simply added louvered doors to provide ventilation in the area and also because they matched our decor.
A couple of other cubbies were developed when we installed a whirlpool tub in our bathroom. The tub needed a space for the pump and heater, so we set the tub away from one side wall and boxed-in the enclosure. We finished the top with a lid to provide access to the pump. Guess what? Another cubby was formed and it holds extra bathroom supplies. Then there was another small space on the opposite end of the tub so we added a matching built-in, creating another cubby that holds a bowl brush, plunger and other items out of sight.
My dad ran a custom cabinet shop for many years and many of his customers had their cabinets customized with a variety of cubbies to hold different items. One of his most popular hideaways was a shallow, hinged, tilt-down drawer fitting in front of the kitchen or bathroom sink. This replaced the usually solid panel installed. Dad also often installed storage racks on the backs of closet doors near or in the kitchen. These racks were made just deep enough to hold cans and jars and are simple enough to be tucked away just about anywhere. Dad even installed one such cubby between the studs on one customer’s inside kitchen wall. With a door, they added lots of food storage without taking up any floor space.

Any kitchen or utility room nook or cranny can be made more efficient with narrow shelves. These shelves are just wide enough to hold canned goods.
Sometimes simply adding shelves can create a great cubby storage area. When we remodeled our old home a space was left in the kitchen from the old stairway entrance to a basement. We closed off the area, added a louvered door, and then installed narrow, 6-inch shelves up one wall. We placed an overhead shelf at the back for larger items along with coat hooks on the wall without shelves. These hooks hold the heavy, cast iron skillets that are so cumbersome to have in the cabinet with the other pots and pans. A lower set of hooks holds the indispensable folding step stool.

Look around your home. Is there an out-of-the-way place you can simply add shelves to make an area more effective? These shelves don’t all have to be in enclosed areas either. Adding a set of corner shelves in a kitchen area can add decor as well as useful storage space for cookbooks or collectibles.
Closet Cubbies
Closet built-ins are another way of creating true closet cubbies. Any number of different do-it-yourself projects can be created to match your particular situation. One of the simplest closet make-overs is adding floor to ceiling shelves to one side of the small closets found in so many older homes. Although the closet still won’t hold a lot of hanging clothes, it will now hold a lot of carefully folded clothes, shoe boxes and other storage bins.
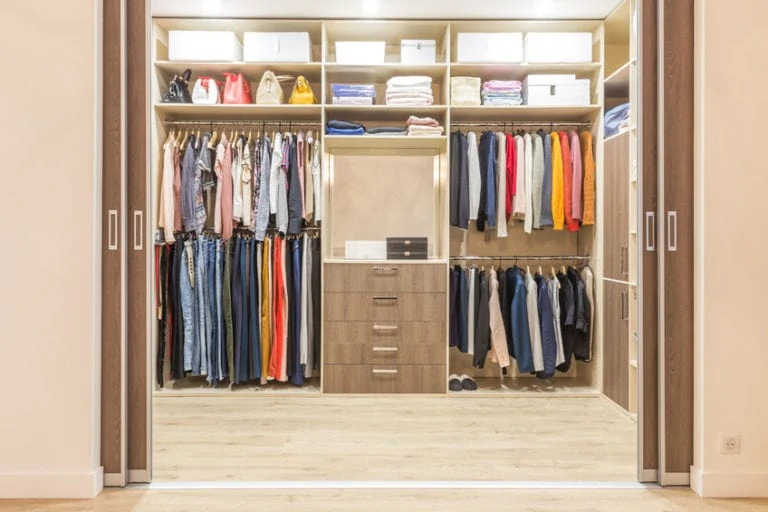
The examples shown in the diagrams below were used to organize a cedar-lined, walk-in closet. One side of the closet has an upright divider wall with an overhead shelf and double closet poles, one high and one low. The opposite side has built-in drawers with one closet rod and an overhead shelf. A third unit is a shoe rack.

The divider wall and shelves were first cut from 3/4-inch plywood. Cedar closet lining materials were then fastened over both sides of the wall divider and on the bottom and top of the shelf. A 3/4-by-2-inch solid cedar stiffener adds to the support of both the divider and shelves.

The opposite-side cubby, or the “hers” cubby, begins with a built-in lower cabinet, using standard cabinet construction. First step is to cut the ends, top and a bottom piece. Rip a 1/4-by-1/4-inch rabbet on one edge of each piece. Fasten the pieces together with glue and self-starting wood screws, countersinking the screws. Or you can assemble with an air-driven finish nailer. Cut a 1/4-inch hardboard back and install it in the rabbets. Use a square to ensure the outer pieces are square, and then fasten the back in place.


Assembly of the basic casework is easy with a finish air nailer.
Turn the carcass over on a pair of low workhorses and install the front facings. The front facings are also made of 3/4-inch solid red cedar. Begin with the side facings. Cut them to width and fasten in place with woodworkers glue and No. 6 finish nails. Predrill the holes on each end to prevent the nails from splitting the wood. Set the nails slightly below the surface using a nail set. Make sure all excess glue is wiped away from all joints. Cut the top and bottom facer pieces. Glue and fasten them in place on the top and bottom. Then drive No 8. finish nails from the end facers into the ends of the top and bottom facers. Predrill the holes in the end pieces before fastening. Cut the center divider for the drawers and install it between the upper and lower facer, again fastening with glue and No. 8 nails from the upper and lower facers into the ends of the divider facer.

When installing the solid-cedar facers, predrill nail holes to prevent splitting the wood.

Then use glue and No. 6 finish nails to install the facers. Set the nails slightly below the wood surface, apply wood filler, and then sand the surface smooth.
Drawer Detail
Carefully measure and locate the drawer facer support pieces. Cut these to fit and fasten in place. Note: I like to precut facer pieces a bit long, then position them in place and precisely mark their lengths to fit each location, then make a final cut. Fasten the outer ends with predrilled finish nails through the side facings. Glue the inner ends in place and install a backing board the same width as the horizontal facings over the back of the upright divider and extending past the ends of the horizontal dividers. Glue and clamp these backer boards, then drive short screws from the back to further anchor the facer ends in place. Once all facers have been installed, fill the nail holes with wood putty. Then use a belt sander to smooth the facers flush. Follow with fine sandpaper to provide a smooth surface.
The drawers are constructed using standard cabinet-drawer construction, with solid cedar for the fronts and 1/2-inch drawer material for the sides. The sides are set in rabbets in the drawer fronts, and the fronts have a rounded, routed edge. The bottoms are 1/4-inch hardboard set in dadoes cut in the bottom edges of the drawer sides. The back is cut shorter than the sides and the bottom fastened to it with cement-coated nails. The upper drawers are installed on purchased drawer slides. The bottom drawers are installed on wood slides, fastened on the bottom of the unit.
Placing the Case
Next, the cabinet case is set in place, leveled and anchored to two walls. Use wooden shingles to shim out any discrepancies in the walls and case sides.
With the case in place, install a short plywood sidewall on the corner of the base, and cover it with cedar lining material. Install a long divider wall on the opposite “open” end and cover both sides with cedar lining material. Add an upper shelf and a closet pole as with the unit on the opposite wall and then add stiffeners to all front edges of the divider, shelf and short end wall.
These drawers were actually the first part of the project, and later a shoe rack was installed. In this case (pun intended) the carcass portion of the rack was constructed of pine shelving materials, the front again faced with solid cedar, then cedar lining materials added to the sides.
Installing Cedar Lining
Super Cedar, from Giles & Kendall, is sold in a bundle that covers 15 square feet. The pieces are in random lengths, 1/4-inch thick and with tongue and grooves cut in both sides and the ends. The pieces can be fastened in place with either 3/4-inch colored paneling nails, or subfloor adhesive. Or you can use a combination of both. A tri-square, handsaw with fine teeth and a miter box, along with a medium weight claw hammer are all that’s necessary for installation.
To maintain the cedar smell and effectiveness, no finish is applied. A cabinet scraper can be used to remove any dirt or smear marks from the construction. The cedar smell can be restored by occasional light sanding or scraping.
Creating your own closet cubby holes can be fun and challenging. Take a look around your own home and see what your imagination can come up with.

Cedar closet lining is fastened to the exposed side of the cabinet.
