Easy-to-install, durable, less expensive … These characteristics are what make today’s exterior trim manufactured from wood alternatives so popular among busy homeowners. Do-it-yourselfers can add style and distinction to an entryway by installing flanking pilasters and a pediment above the door. Make porches, balconies and patios more elegant and inviting with a classical balustrade system. Create elaborate ornamentation throughout the home with richly detailed molding profiles.
And this can all be achieved using low-maintenance alternatives to traditional decorative millwork made of wood, which is subject to rot and weather damage. With a lower installation cost than wood and a raft of available shapes and options, it’s easy to see why new alternatives are giving wood trim a run for its money in the building market.
Plastic-Composite
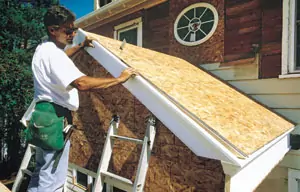
One alternative, plastic-composite trim, is manufactured from a combination of recycled wood fiber and plastic. A variety of plastics can be used, such as high-density polyethylene, polyvinyl chloride (PVC) and styrene. The use of wood fiber reduces the cost of the material while adding rigidity and dimensional stability. Plastic-composite combines the positive features of both wood and polyethylene to produce a material that will not rot, crack, split or absorb moisture, and is not subject to termites. Many composite products are virtually impervious to moisture and require no pressure treatment, chemical dipping, preservative treatments, water sealing or staining.
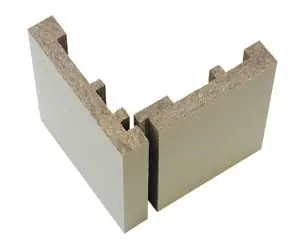
Plastic-composite trim combines the features of both wood and plastic to achieve a low-maintenance alternative to traditional wood trim.
While there are some exceptions, most pieces of alternative exterior trim are installed like wood products. Plastic-composite trim comes in a variety of standard trim-board dimensions and lengths to accommodate a wide variety of needs. It is not brittle and is easy to cut with a circular saw. Plastic-composite trim boards can be ripped, routered or molded to fit custom applications such as 45-degree corners. Some systems are available with tongue-and-groove assembly. Hot-dipped casing nails or stainless-steel nails are recommended for installation. Regular steel fasteners tend to rust and stain the final finish applied to the trim.
Many composite products come with a water-base primer applied at the factory and are ready for either latex or oil-base finish coats. But any unprimed surfaces or resawn edges must be primed with an alkyd oil-base primer before applying the finish coat.
Solid Plastic
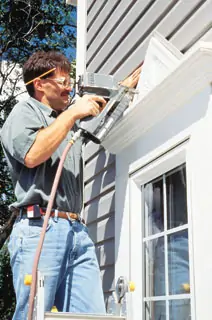
High-density polyurethane is the most popular solid-plastic material used for decorative exterior trim, thanks to its strength and easy use. The strength of solid-plastic exterior trim is determined by its material density, and products vary. Typically, the higher the density, the higher the cost, but the high-density products offer more dimensional stability, strength and dent-resistance. Some manufacturers of urethane products offer more than 4,000 pieces of both interior and exterior trim, including entrance trim, window trim, louvers and eave vents, balustrade systems and other decorative millwork. Another plastic trim material is PVC, which is formed into boards and profiles.
Urethane trim is usually sold primed and ready to paint or stain. PVC trim is less expensive than polyurethane but its surface often requires sanding and painting.

High-density polyurethane is the most popular solid-plastic trim material. It is available in a wide variety of shapes, sizes and installation systems.
The plastics used for exterior trim are not subject to bacterial rot, nor do they shrink or swell from moisture absorption like wood. This is especially useful when constructing openings for garages and elements that are close to the ground. And painted finishes on plastic are more durable than on wood, due to the stable moisture content.
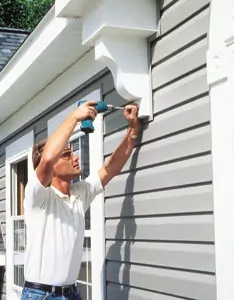
Plastic trim is also easy to shape, plane, cut and install. Standard woodworking tools are generally all that is required. Installing plastic trim, which offers decorative molding in single pieces, can significantly cut down on labor as compared to installing several layers of wood for complex molding designs. However, some of the large, single pieces of trim may not fit a standard miter saw, so a relatively inexpensive special miter box may be required for some products.
Plastic trim is available as single pieces, easing the installation procedure by eliminating the need to layer wood planks.
A couple of installation procedures differ from wood trim. With plastic trim, use butt joints (square ends) fastened with adhesive to splice together long runs, instead of 45-degree miters. However, you should cut 45-degree miters in plastic molding when forming a corner, rather than cope the piece as when forming wood corners.
A combination of urethane-base adhesive and noncorrosive fasteners achieves the best results for installing plastic trim. All joints, corners and splices must be coated with adhesive to prevent gaps from opening further down the road. Any dents or gashes should be quickly fixed with wood filler, and any broken molding can be rejoined with adhesive.
High-density polyurethane products can typically withstand temperatures of about 140 degrees Fahrenheit. However, they should never be installed in an area subject to solar buildup, such as behind a storm door. And although urethane trim will not warp or crack from moisture absorption, it may expand and contract with temperature change. To minimize the effect of expansion and contraction, install the trim pieces as tight as possible and closely follow the trim manufacturer’s storage recommendations.
During the summer, molding and other pieces that have been stored in an enclosed trailer under hot conditions should be allowed to cool down to normal temperature before installation. In the winter, however, molding and other pieces can be stored outside or in an unheated area and installed immediately.
Prior to installation, check local building codes. In some cases, installation procedures for plastic trim may require alterations to meet local specifications.

Tips and Techniques for Urethane Trim
Installing Over Vinyl Siding — Position the trim to be mounted and predrill all screw holes through the urethane piece and the vinyl siding. Remove the piece and enlarge the holes according to the siding manufacturer’s specifications. This allows the siding to expand and contract. Fasten the urethane trim with screws or nails through the vinyl and into the sheathing board. Caulk all openings and fill all holes with paintable exterior caulk or wood putty.
Installing Over Sheathing Board Using “J” Channel and Siding — Attach the “J” channel along the perimeter of the urethane piece. Using a quality exterior-grade construction adhesive, secure the urethane piece to the sheathing board. Apply finish nails through the face of the urethane and into the sheathing board. Fit the siding into the “J” channel, following the siding manufacturer’s instructions.
In some installations, fitting the “J” channel can be difficult. To ease installation of the “J” channel, attach the urethane trim piece to a sheet of plywood or urethane sheet. Using the urethane piece as a template, trace it onto the sheet of urethane or plywood. Make straight lines where curves would be difficult to install the “J” channel. Cut out the pattern, following the straight lines. Attach the urethane piece to the sheet of urethane or plywood pattern, using the steps discussed previously. By following this technique, the “J” channel and siding will butt against straight edges. Caulk all edges and fill holes with caulk or putty.
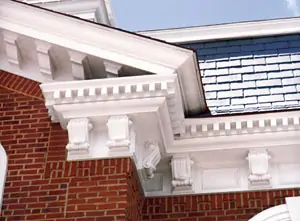
Installing Over Brick — Fasten the trim over brick using masonry screws, masonry anchors and a good exterior-grade construction adhesive.
An alternative to this method is to use wood or urethane blocking, construction adhesive and fasteners. Caulk all openings, where necessary, and fill all holes.
Molding Installation — Square the ends of the trim boards. Then determine the amount of board coverage required. For every 10 feet of length required, allow an additional 1/4 inch for contraction. Apply adhesive to the backs of the boards where they will contact the building structure. Apply adhesive along all joints and ensure a tight fit. Face-nail the boards to a solid base approximately every 16 inches. Any exposed urethane must be painted, filled or caulked.
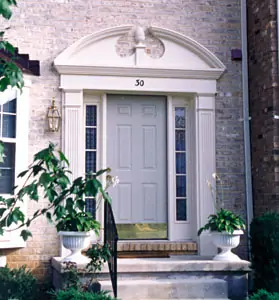
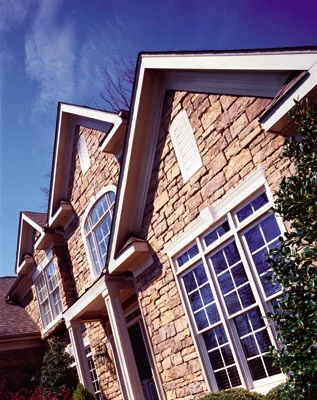
Crossheads, keystones, pilasters and pediments are available to dress up window and doors.
Repair Tip
So, your plastic trim has popped apart … To repair a butt joint that has separated due to insufficient adhesive, drive wood shims into the joint and below the surface of the trim. This will open up the separation and stabilize it. With the shims in place, fill the gap with adhesive, then sand the joint and touch up with paint.
Finishing Touches
Refer to the manufacturer’s recommendations regarding your product’s finishing options. Many trim products come with factory-applied coats and require no additional finishing. Some new products are being made available with factory color options. And some products are even available as “woodgrain stainable.”
However, if a different color is desired, first wipe the surface of the trim with a clean cloth. Lightly scuff the factory-applied finish with a fine-grit sandpaper or fine steel wool. But make sure not to remove the white finish or scratch into the part itself. Clean with mineral spirits to remove sanding dust and any debris. Allow the trim to dry and then finish with a high-quality exterior latex paint. Apply the paint lengthwise, in the direction the grain would run if the millwork were wood.
PRODUCT SPOTLIGHT
For easy corner construction when installing plastic-composite trim, try MoistureShield CornerLoc from AERT Inc. This unique tongue-and-groove corner board is made with the company’s MoistureShield brand composite material for long life, low maintenance and great looks. The system snaps together on the jobsite for perfect corners every time. CornerLoc comes in both 90- and 45-degree corners for a variety of applications.
Taking the urethane approach? The new Easy-Install Crosshead from Style Solutions comes in six colors and can be adjusted to fit above windows ranging from 24 to 54 inches wide. Molded from high-density, impact-resistant, fade-resistant polypropylene, the crosshead is 100-percent waterproof. It features a “living hinge” on the back of the crosshead that connects the front of the piece to the back installation plate, making for faster, easier installation.