Mold in a home … The words alone are black enough to strike fear in the hearts of homeowners, builders, insurance companies, architects, building product manufacturers, engineers, industry associations and more. The list of those affected goes on and on.
Any way you look at it, mold problems are costly, and much is at stake.
New construction has been more susceptible to large scale moisture problems. The 1970s focus on improving energy efficiency lead to more airtight construction, but it also meant a larger temperature drop across the thickness of the wall. In addition, increasingly complex home designs opened the door to the potential for moisture intrusion. Finally, a strong economy created a housing boom, which thinned the ranks of skilled carpenters. All of these factors have combined to put the building envelope at higher risk for the moisture conditions that support mold growth. Moisture problems are not a result of a wet exterior surface – that is what the exterior siding is for– or high humidity on the interior. Moisture problems occur when the water on the outside or humidity on the inside cause a wet condition within the wall, within the building envelope. Building envelopes that get wet and stay wet are vulnerable to mold. All credible sources on mold point to moisture control as the only viable method to prevent mold.
The Science of Moisture
Before jumping ahead to find solutions to moisture and mold problems, it’s important to understand the various sources that can cause moisture problems such as mold.
The building envelope can get wet in three different ways:
Bulk water: Liquid moves into the building envelope by some force such as gravity.
Air movement of vapor: Differences in air pressure transfer moisture into and out of the home.
Diffusion: Vapor moves because of differences in vapor concentrations, which happens slowly.
Bulk water can account for large amounts of water entering the wall cavity and accumulating over time. It takes much longer for air movement to accumulate a measurable amount of water, and it takes even longer for diffusion to accumulate a significant quantity.
Forensic study of failed buildings usually finds that bulk water intrusion is the primary source of moisture damage.
How Wet Can it Get?
Some moisture sources are obvious, such as snow or rain. One inch of rain falling on a 2,000 square foot area equals 1,247 gallons of water. Areas of the Upper Midwest typically receive 20 to 40 inches of rain annually. If just 1 percent of this rain got inside the structure, 250 to 500 gallons of water would enter the building envelope. And if the building envelope gets wet and is not allowed to dry, problems occur.
Other moisture problems are less obvious, such as improper grading around the foundation. Interior moisture sources (from cooking, bathrooms, etc.) also contribute to the moisture content inside the home. These inside moisture sources typically don’t have the impact that the outside moisture sources have, but they still need to be considered.
It’s also important to remember that moisture intrusion is not selective – it affects all building materials such as wood, stucco, foam or fiberboard. Moisture intrusion affects steel framing and fasteners as much as it does wood-frame construction.
Design Considerations
Any break in the surfaces of the building envelope can be a potential source for water, liquid or vapor to enter and get trapped within the envelope.
Openings such as doors and windows are most often the entry point for water. Water can also enter via gravity, often through a leak in the roof deck.
Water can also be introduced because of capillary action, which slowly but continuously draws water into the building envelope. Or, moisture can enter the home via water vapor transferred through walls and other surfaces.
Air leaks transport water into the building envelope as moisture trapped within the air (humidity). If the warm, moist air comes in contact with a cold surface the moisture condenses on that surface. If that surface happens to be within the envelope, that is where the water ends up.
Air leaks that cause condensation within a building envelope, such as that caused by a single improperly sealed electrical outlet opening, can add about 110 times more water than from diffusion. The cumulative effect of all air leaks in a moderately tight home would be equivalent to leaving a door or window open permanently.
What to Do?
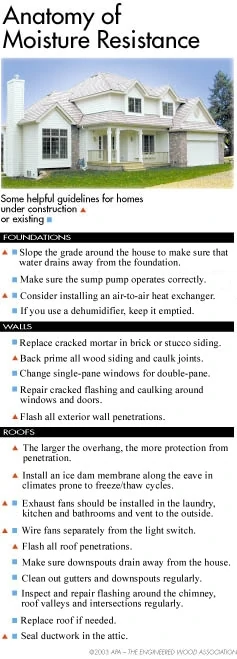
Here are some practical things that should be considered to reduce the moisture risk on a home:
Consider designing a home with larger overhangs because they deflect water away from the building.
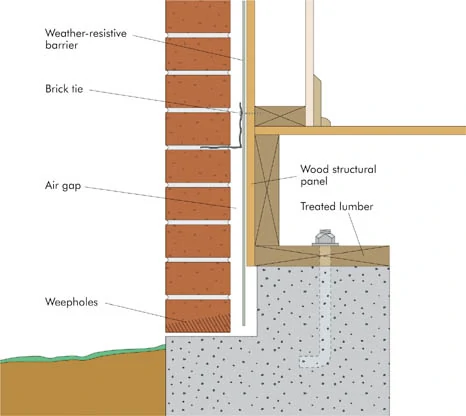
To minimize air leaks, use a weather-resistive barrier such as housewrap or building paper. Housewrap or building paper acts as a weather-resistive material, creating a drainage plane. APA recommends the installation of a weather-resistive barrier over OSB and plywood wall sheathing. This protective layer in combination with flashing can provide the essential drainage for leaks when they occur. When installed correctly, housewraps act as an air barrier as well. Since it is a breathable membrane, water in its liquid form will not penetrate the wrap, but water in its vapor form can pass through. To act as an air barrier, all joints must be carefully overlapped and taped. Tears must be repaired using tape.
Proper flashing and weep holes are critical with brick veneer. Install the weather-resistive barrier all the way down to the brick ledge, guiding any moisture to the outside of the building envelope through properly placed weep holes.
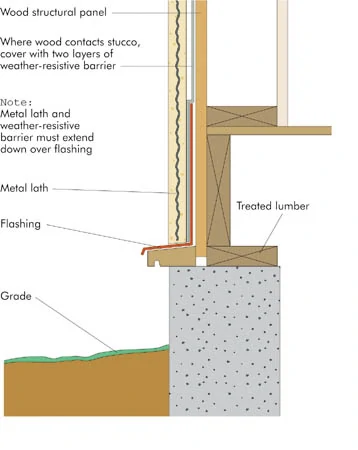
Stucco is another very porous material that allows moisture to enter through it, so model codes recommend using two layers of Grade D building paper. The first layer of paper may bond to the stucco and does not leave space between the stucco and building paper. A second layer of paper creates a capillary break that allows moisture to drain between the two layers.
Building Better
Several years ago, APA – The Engineered Wood Association developed a training program to educate designers and home builders on methods to reduce moisture problems within the envelope. Because wood products have performed properly for hundreds of years, APA focused on the need to promote better design and construction methods. Build a Better Home is an instructional program, which encourages proper building practices to improve building envelope performance.
Since mold is just one of many problems that result from prolonged, excessive moisture in a building envelope, Build a Better Home helps designers and builders avoid a raft of related problems by reducing common design and installation mistakes. For more information on APA’s Build a Better Home program, visit apawood.org/buildabetterhome
How to Install…
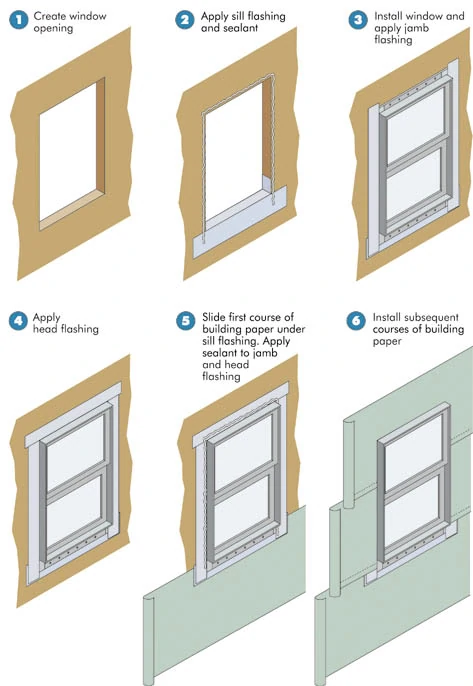
Building Paper: Follow the proper sequence to detail a window when installed with building paper as a drainage plane. Install sill flashing in the window opening. Then apply caulk on the top and both sides. Do not apply caulk to the bottom in order to allow drainage from the sill. Next, put in the window and install flashing on each side of the window, overlapping the bottom sill flashing. Install the head flashing above the window, which overlaps the side flashing. Now continue with building paper to the bottom of the window and tuck it under the sill flashing. Finally, install the remaining layers of building paper up the wall adjacent to the window.
Flashing: There are many choices for sill flashing, including metal flashing, self-adhered bituminous flashing, proprietary flashing such as Dupont’s flex wrap and others. The key is to install sill flashing so it covers the bottom and extends up the sides of the rough opening, and is applied over the drainage plane. These bottom corners are frequent culprits for bulk water intrusion. Other flashing is always to be installed so that it directs water out and down to the outside of the building envelope.
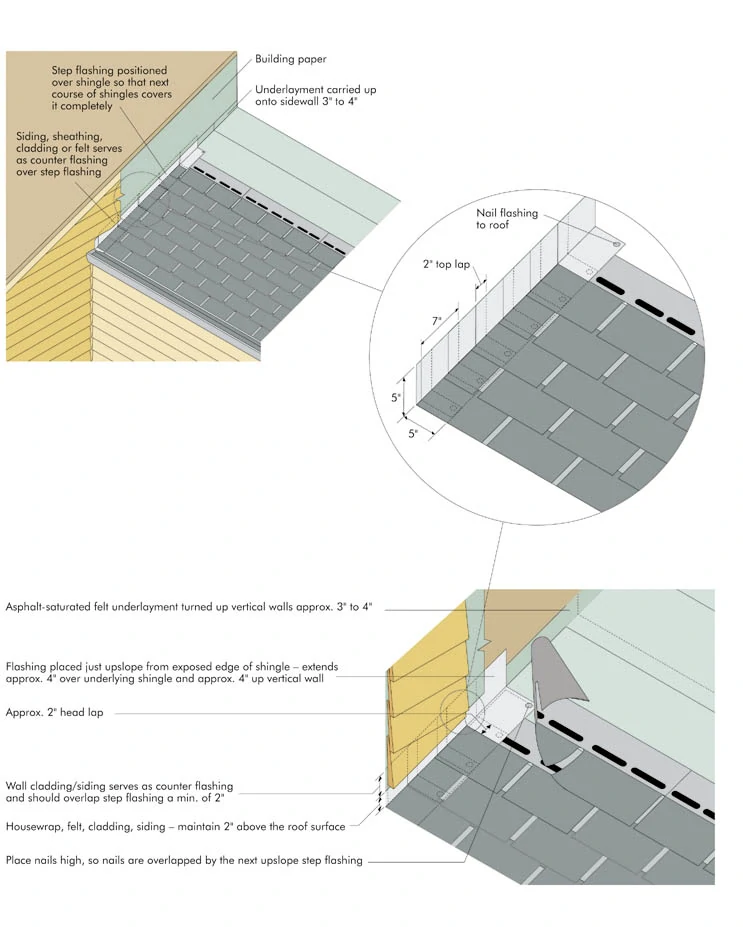
Wall-to-Roof Intersections: Properly detail the wall-to roof intersection. For a shingle-style roof, install underlayment from the roof plane up the side wall to a minimum of 3 inches. The step flashing is then interlaced with the shingles working up the slope. Building paper is then installed on the vertical wall overlapping the step flashing maintaining a 2-inch clearance.
Vents: Never vent appliances or air from the home into the attic. As much as builders know this is bad construction, this happens all too often.
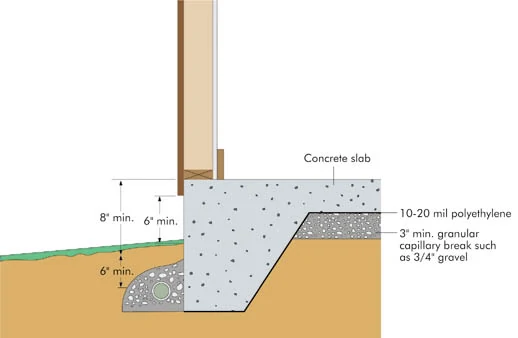
Drainage for a Slab-on-Grade Foundation: Proper draining away from the foundation is critical, especially when the level of the water table is changed from its natural state after construction. It is very important to have a properly installed perimeter drain. Gravel will act as a capillary break when covered by filter fabric. Install a vapor retarder (10- to 20-millimeter poly) under the slab to prevent moisture from wicking up through slab into the building.
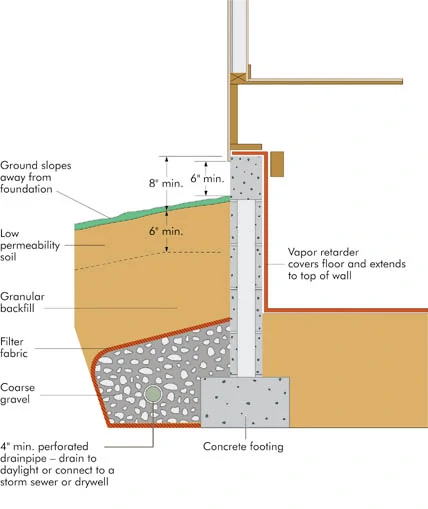
Drainage for a Concrete Masonry Crawlspace Foundation: In this application, the vapor retarder must extend across the ground and up the walls. There is much controversy over the use of ventilation in crawlspaces today – particularly depending upon the climate. An alternate method that may be allowed in your area is to add conditioned air into the crawl space in lieu of vents.


