


Plastic laminate is one of the most durable, beautiful and easy-to-care-for materials for kitchen, bath or bar countertops. Plastic laminate is also fairly easy for do-it-yourselfers to work, and the variety of colors and patterns available is almost unbelievable. For instance Formica Brand Laminate has added 25 new designs for 2003. These include artful renderings, subtle pallets and fine textures that evoke the delicate detail found in handmade paper, woven textiles, brushed watercolor, tooled leather and polished stone. The collection now totals 91 unique designs.
“Industrial chic” is one of the hottest trends in contemporary design homes. New metallic laminates fit right into this new trend. Formica has five new natural aluminum solid-metal designs. These include Stainless Aluminum, Soft Abrasion, Satin Aluminum, Herringbone and Vertical Stripes. Three new colored metals include: red aluminum, green aluminum and blue aluminum. Formica DecoMetal balances their cool aluminum looks by introducing warmer, antique looks to their collection. These include Copper Sargasso, Brushed Bronzetoned Aluminum and Brushed Black Aluminum.
Love the look of Corian®, but don’t love the cost? Well DIY solid surface countertops can be an extremely affordable and elegant option with material from SolidSurface.com. Using basic woodworking skills and tools, you too can install your own custom solid surface countertop, desktop, bathroom vanity, laundry prep areas, shower walls, or other surface of your choosing.
Wilsonart International has introduced Metalaminates, a line of foil-faced laminates that offers almost limitless design applications. They are laminate and metal all in one, combining the best of both products. The Metalaminates include the standard metallic looks of titanium, aluminum and stainless steel, in addition to glass-block green and champagne. Color options include: Pearl, a matte-finish silver; Champagne, a soft copper color with taupe and silver undertones; Marine, the metallic version of glass-block green; Satin-Brushed Natural; Satin-Brushed Iron; Satin-Brushed Gold and Stainless. Polished Natural and Polished Gold offer reflective chrome- and bright-brass looks.
Plastic laminate for countertops is available in two forms: as preformed top sections or as sheet laminate which you fasten to a support core constructed as desired. Preformed top sections offer a great variety of treatments including molded-in backsplash and a front lipped edge, called “cove.” Or the front edge can have other treatments including: square, rounded or bullnosed, with a 45-degree angle edge, or even wood edging applied. The front edge can be of the same design or a contrasting pattern for more variety. Preformed top sections are ordered to fit. If an L- or U-shaped top is desired, sections are joined together with a 45-degree miter joint.
The backsplash, if desired, for countertops with sheet laminates is created separately and fastened to the countertop. The front edge treatment for countertops, tables or other projects can be straight laminate edging, wood edging, a combination of the two, or even 45-degree edging.
Both preformed and do-it-yourself tops can feature a variety of edge treatments, ranging from straight edges to wooden edges to 45-degree angles, with the top and edge the same or different patterns.
Preformed Countertops
Preformed countertops require the least work. You’ll need a few tools, including a saber saw, drill and bit, block plane, belt sander, C-clamps, safety glasses, rubber mallet, square, hammer, level, fine-toothed handsaw (10-12 point), masking tape, scriber compass, adjustable wrench, screwdriver, caulking gun, caulk and sandpaper.
The first and most important step is carefully measuring the size of the desired countertop. Make sure to allow for the front and end overhangs. Preformed countertops are available in standard lengths. In addition to the countertop or sections needed for an L- or even U-shaped top, you‘ll need fastening bolts (for drawing the miter joints tight); a tube of sealant for caulking joints; end splash and/or end caps (kits are available to match countertop sections); nonflammable contact adhesive (for fastening end caps unless the kit has preapplied adhesive for an “iron-on” method); and woodworking glue for fastening build-up blocks.
If the standard-sized section is too long, it must be cut. Carefully measure, including the end overhang, which is normally 1 inch. Place a piece of masking tape over the area to be cut and mark the cut line with a sharp pencil. Use the fine-toothed handsaw to make the cut, cutting from the top, through the masking tape to avoid chipping the laminate. Sand and/or file the cut edge smooth.
Turn the countertop upside down on a flat surface. Cut 3/4-by-3/4-inch build-up wood strips or wood strips of a thickness to match the front build-up strips. Glue the strips on the end or ends using C-clamps to hold until the glue sets. Make sure the end edges are flush with the countertop edge. Sand if necessary.
Follow the instructions with the end cap kit for their installation. For glue-on kits, apply contact adhesive to the back side of the end cap and to the wood edge. Carefully position the end cap in place and then tap with a wooden block and lightweight hammer to seat properly. Sand or file the edges smooth.
For iron-on caps, set a household iron to medium heat. Using a back-and-forth motion, iron the end cap in place. Allow to set and cool for 1 minute, then tap the cap carefully with a wooden block and small hammer, or tap with a rubber mallet. Using a fine file, apply pressure only on the up or “in” strokes to smooth the end cap edge.
Sink cutouts can be cut in one of two ways. If the sink comes with a cutout pattern, position the pattern on top of the countertop, making sure there is no blocking beneath to obstruct the sink. Drill a starting hole along one edge, then use a saber saw with a fine-toothed blade to make the cutout. If the sink doesn’t have a pattern, place the sink rim or rangetop rim on the countertop in the desired location. Mark around the edge of the rim, and again make sure there is no blocking beneath the sink. Use a saber saw to cut a hole 1/4- to 3/4-inch smaller than the line, or following manufacturer’s instructions. Make sure the corners are clean and chip-free.
If the sections are to be made into L- or U-shapes, apply a bead of sealant to each precut mitered edge. Tighten the fasteners together just enough to hold the sections in place. Make sure to align all front edges as you tighten the fasteners. Tap the surfaces, using a wood block and lightweight hammer to avoid damaging the surface. Once all sections are properly aligned, tighten the fasteners securely. Remove any excess sealant.
Countertops with a molded-in backsplash also have provisions for scribing the backsplash to the shape of the wall (to a certain degree). Place the countertop on the cabinet and in the correct position. Use a scriber/compass to mark the top edge of the countertop or backsplash and then belt-sand or block-plane the line to the contour of the wall.
Place the top back in position, make sure it is in the correct location and level, then secure to the cabinet with wood screws from the underside. Install the sink or stove top as desired.
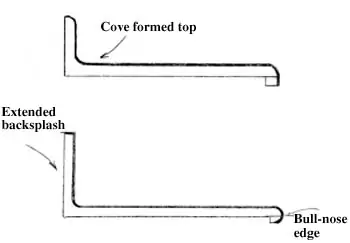
Countertops are available in premolded sections. The sections are called “cove” tops and have the backsplash and front edge molded in. Some feature a variety of front-edge treatments, including “bull-nosed.”
Working with Sheet Laminate
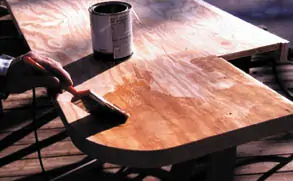
You can easily create your own countertops for bath or kitchen cabinets, bars or even decorative tables by using sheet laminate on a constructed surface. In most instances this should be solid one-side plywood, particleboard or medium-density fiberboard (MFD) – materials with a smooth surface for properly gluing the laminate in place. You can also install laminate over existing laminate, provided it has been cleaned, degreased and lightly sanded. You will need a saber saw with a metal-cutting or fine-toothed cutting blade, safety glasses, a J-roller, fine-toothed mill file, brush, roller or trowel, (see adhesive can for recommendations), contact cement and spacer strips of thin wood (or dowel rods).
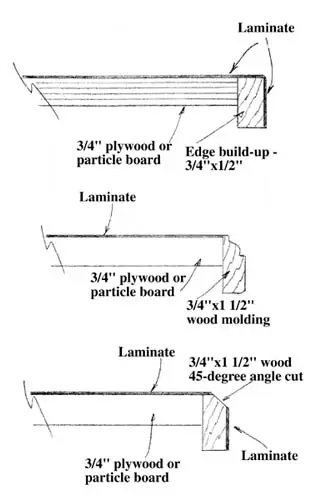
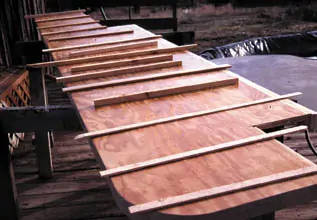
The first step is to construct the support core. Cut the wood pieces to size and shape, making sure all cuts are square. If the top is to be a “U” or “L,” you can cut separate sections, cover them with laminate and then join the sections using fasteners just as with preformed tops. If the top is not too large and cumbersome, you can join the wood sections first, and then cover them with the laminate. If the top has a backsplash, it is constructed separately, covered and then anchored to the back of the top. The most common edge treatment is with strips of laminate, matching or contrasting with the top surface. In most instances the edge must be built up to create an overhang and add “depth” to the front edge. A 3/4-by-1 1/2-inch wood strip is fastened to the front of the wood surface. Glue and clamp, and/or use cement-coated nails and glue to fasten the wood strip in place. In some instances, a 3/4-by-3/4-inch wood strip may be installed on the underside and flush with the front edge of the support-core surface to create this build-up. This is commonly used when a rounded corner is created. When creating a rounded corner edge, do not use a sharp radius. A gentle curve is the best tactic. A piece of plywood or support-core board of the same thickness is usually used to create the underside build-up in this case. Glue and clamp the piece in place, and then scribe the radius of the curve and use a saber saw to cut the glued-up section. Then use a belt sander to smooth the cut.
Measure the support-core piece and the laminate carefully. Cut the top laminate piece 3/8 to 1/2 inch larger than the surface to be covered. Then cut the edge strip, again making it 3/8 inch wider and longer than the edge to be covered. The laminate can be cut with a saber saw using a fine-toothed blade. Make sure the laminate is well supported so it doesn’t crack or chip. A table saw or radial arm saw with a fine-toothed blade can also be used, and produces a cleaner and more even cut. I keep an old plywood blade on hand just for this chore.
Begin by fastening the edging in place. Apply the adhesive to the back of the edging piece with a brush. I like to lay the piece on the top surface, next to the edge. Any excess adhesive brushed past the edge piece will be removed later. Make sure the surface of the edge of the support-core piece is free of sanding dust or dirt. Apply two coats of adhesive to the support-core edge. Allow all to dry thoroughly, and then bond the edge piece to the support-core piece. If it’s a long piece, take a hint. Have someone help hold and support the strip as you align and press the strip in place. Use the J-roller to bond the strip firmly in place.
My dad ran a cabinet shop for many years, and I learned several good tricks from him. After gluing the edge strip in place, turn the top upside-down and use a belt sander, sanding from the edge inward to smooth the bottom cut edge. Then turn the top over and do the same for the top edge. This removes any glue from the application of the edge piece, smoothes up any joint between the support core and front edge build-up piece and smoothes the laminate edge with the support-core top.
The next step is to apply the top laminate piece. Lay the laminate piece on the support core, topside downward. Apply the adhesive with a roller, brush or trowel, following the recommendations on the can. Allow it to dry thoroughly. Set the laminate piece aside. Thoroughly clean the support-core surface and apply two coats of adhesive. Be careful not to allow the adhesive to run down over the applied edge. One trick is to brush outward toward the edge; this prevents runs.
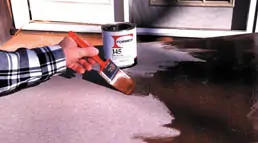
Adhere the plastic laminate using contact-type adhesive. If using flammable adhesive, it’s a good idea to do the chore outside. Apply adhesive to the underside of the laminate top.
Set the laminate aside and apply the adhesive to the top core surface. Allow both to dry.
Allow the adhesive to dry thoroughly, and then place dowel rods or wood strips 6 inches apart on the support-core surface. Position the laminate on the strips. Align the laminate with the support-core edges. Pull out an end strip and apply pressure with the J-roller. Continue pulling out strips and applying pressure until the entire laminate piece is solidly secured. Pay special attention to all edges.
Lay wooden dowels or wooden sticks across the countertop core.

Lay and align the laminate. Pull out one end stick and use a roller to roll the laminate solidly into place. Continue removing sticks and rolling the laminate solidly to the countertop core.
Cut the laminate piece flush with the sides.
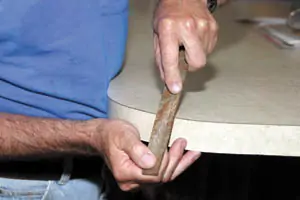
File down the laminate to a smooth edge.
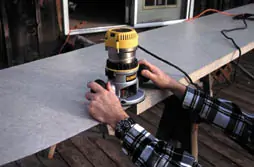
Use a laminate trimming bit in a router to cut away the excess laminate and trim the edge. Finally, use the mill file with downward and “outward” strokes to smooth up all the edges.
Once you’ve experienced the ease of installing plastic laminate, you’ll probably be looking for more projects than your kitchen countertop.
Sources:
Formica Brand Laminate, 800-FORMICA, www.formica.com
Wilsonart International, 800-433-3222, www.wilsonart.com
