

By Monte Burch
Above-ground pools are inexpensive ways to beat the heat in hot summer months. Most above-ground pools are surrounded with a free-standing deck that is typically between 3 and 4 feet high.
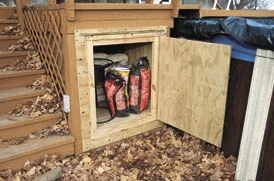
Although the deck itself gets plenty of use, the space beneath the deck is usually wasted. Building a storage area beneath provides storage for pool, deck and garden supplies and equipment. Although the storage unit shown is built to suit the specific deck, the same construction can be used to create a storage unit for any deck, merely change the dimensions to suit.
The unit pictured can be made wider, deeper, shallower or taller, depending on the situation. The top is sloped to allow rainwater to run off. The unit is designed to fit just under the deck joist. A 2-by-4-inch support strip is fastened to the front of the deck posts to support the front of the unit. The bottom is supported under the deck on concrete blocks. Additional support can be provided by strap hangers anchored to the deck’s underside and to the storage unit’s sides or end. The unit is positioned in place with its front edge flush with the deck posts and support boards. You may need to build out the posts with a 2-by-4 to make them flush with the upper and lower support boards.
The entire storage unit is constructed of pressure-treated materials for longevity. Pressure-treated plywood is used for the sides, end, bottom, top and door, as well as the door trim. Galvanized deck screws are used for the entire construction. The inside is framed with 2-by-4’s and 2-by-2’s.
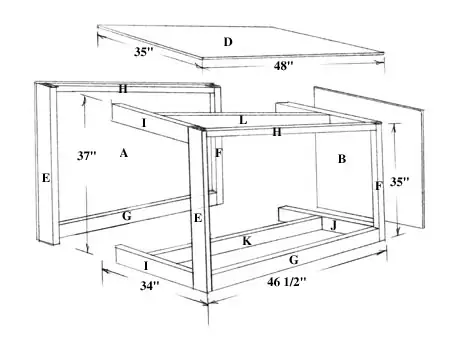
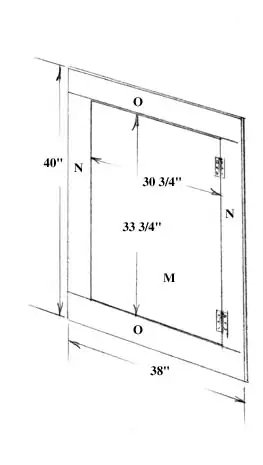
Materials List Note the dimensions and drawing are for a unit with outside measurements of 35 wide, 37 1/2 tall and 47 1/2 deep.
- Sides: 1/2 plywood, 37 x 46-1/2, 2 required.
- Back: 1/2 plywood, 35 x 35, 1 required.
- Bottom: 1/2 plywood, 34 x 46-1/2, cut to fit, 1 required.
- Top: 1/2 plywood, 35 x 48, 1 required.
- Front side-supports: 2 x 4 x 37, 2 required.
- Rear side-supports: 2 x 2 x 35, 2 required.
- Bottom side-supports: 2 x 4 x 43-1/2, 2 required.
- Top side-supports: 2 x 2 x 44, cut to fit, 2 required.
- Bottom and top front supports: 2 x 4 x 27, 1 each required.
- Bottom and top rear supports: 2 x 4 x 31, 1 each required.
- Floor joist: 2 x 4 x 43-1/2, 1 required.
- Rafter: 2 x 4 x 44, cut to fit, 1 required.
- Door: 1/2 plywood, 30-3/4 x 33-3/4, 1 required.
- Side trim pieces: 1/2 plywood, 3 x 34, 2 required.
- Upper and lower trim pieces: 1/2 plywood, 3 x 38, 2 required.

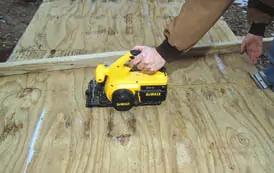
Dive In First, cut the sides to shape. With the plywood positioned on a pair of sawhorses, mark the shape using a straight edge or chalk line. With the work piece well supported, make the cut. Note that as you continue the cut, the cut plywood edges will sag and can cause the saw to kickback dangerously out of the work. Prevent this by placing a brace beneath the beginning of the cut and across the sawhorses to support the cut edges.
With the rip gauge on a portable circular saw, or using a table or radial arm saw, rip 2-by-4’s into the 2-by-2’s needed for the inside supports. Measure and cut the front side-supports to length, angling the top ends slightly to allow for the sloping roof (about 10 degrees). It’s a good idea to cut both front side-supports (E), and then cut the back side-supports (F) while the saw is set at the angle needed. Fasten the front edge of the sides (A) to the side-supports (E) with their 4 inches facing outward. Fasten the 2-by-2-inch back side-supports (F) to the sides. Measure and cut a 2-by-2-inch top side-support and 2-by-4-inch bottom side-support (H and G, respectively) for each side. Fasten to the side and uprights.
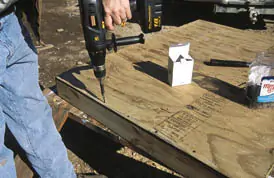
Cut the 2-by-4-inch front bottom and top support pieces (I). Place the side assemblies on a smooth, flat surface, such as a garage floor. With someone helping, hold them upright and fasten the front support pieces between the sides with 1/2-by-6-inch lag bolts and washers. Cut the rear top and bottom support pieces (J) to length and fasten with 1/2-by-4-inch lag bolts and washers. Cut a center floor joist (K) and fasten between the front and rear bottom support pieces. Cut the bottom to size, making sure it is cut square, and then cut notches around the front and rear upright support pieces. Fasten the bottom in place.
Cut a 2-by-4-inch center rafter (L) and anchor between the top and rear upper supports. The center rafter will have a slight angle to fit properly and follow the roof slope. Cut the roof to size. Apply a bead of caulking around the top supports to provide further rain protection, and then install the roof.
Installation Time
Installation is tough work, so recruit a friend or neighbor to help. Position the four concrete block supports under the deck, one in each corner. Place the back edge of the assembly on the deck’s lower support board, and then slide the unit in place onto the concrete blocks. The front edge of the unit must be flush with the outside edge of the deck pieces. Dig down or add pressure-treated shims to level the blocks if necessary. A sturdy pry bar may be needed to lift the rear of the storage unit for leveling. Make sure the storage unit is installed plumb.
The door can be hinged to swing either direction. Cut the hinge-side trim piece. Anchor the trim piece to the storage unit and the deck support post, overlapping the deck post by 11/2 inch. Cut the door, which is 1/2 inch smaller than the door opening and hinge to the hinge-side trim. The screws will protrude slightly through the backside and the sharp points should be ground down with a hand grinder such as a Dremel.
Fasten the latch-side trim piece to the front of the storage unit and the deck post. Install the latch and grind the screw points inside the door. Cut and install the upper and lower trim pieces, again fastening to the storage unit and to the deck supports.
Customize the interior of the storage unit to suit your particular storage needs. Stain or paint the unit and trim to match the deck or to match the trim on your house.
