

Technology has affected almost every aspect of the daily life of modern man. This being said, it would seem that some menial tasks have been overlooked, like installing a doorknob. However, the hand of technology has simplified even this job.
Keep in mind that manufacturers have predrilled the majority of doors for doorknobs, and their measurements will be standard; any door bought from the millworks department of big-box retailers like Lowe’s and Home Depot, for example, will be predrilled. In such cases, you can skip the first couple of steps that are detailed below. The only tool you need is a #1 or #2 Phillips Head Screwdriver or a cordless or power drill with a Phillips head bit. If you use the drill you can save a substantial amount of both elbow grease and time. How is that for simple?
However, this article is geared toward those die-hard do-it-yourselfers that wouldn’t dream of using a pre-drilled door. For that hearty bunch, the materials you will need are as follows:
- Phillips head screw driver
- Power or cordless drill with Phillips head
- Doorknob installation kit (consisting of one 2-1Z8″ hole saw and one 1″ spade bit Tape Measure
- Carpenter’s pencil
- 1″ chisel
The doorknob used in this project is Kwikset’s Hancock hall and closet doorknob. This product is part of Kwikset’s Ultra Max line, featuring Grade 2 Security and a patented installation feature (EZ-install), which simplifies the actual installation process through the use of factory pre-installed screws and a self-locking metal plate.
Get Started
To begin, measure 36″ above the bottom of the door with a tape measure, and mark this spot with a carpenter’s pencil. This is the standard height at which most doorknobs are installed. If this is not the case for the doorknob you are installing, simply measure the distance to the center of the mortise in the doorjamb, and use that distance as your measurement.
Use the diagram found inside the contents of the doorknob package to measure a spot 2 3/8″ back from the face of the door. This is the backset measurement. Mark this spot with a carpenter’s pencil, and use a drill equipped with the 2 1/8″ hole saw — centered on the pencil mark — to drill a hole through the door. This hole is the cross bore and also the hole through which the doorknob will fit.
Next, go back to the first mark and — using the diagram — mark a spot for the latch bore. Then use the drill equipped with the 1″ spade bit to drill a hole for the latch that will join the cross bore. Assuming that the mortise for the strike plate is already drilled, pick up the latch, place it in the latch bore and trace the edge of the faceplate on the door edge. Use a chisel to cut out a 2 1/4″-long traced spot, centered on the latch bore so the latch will fit flush with the edge of the door. After these steps have been completed, pat yourself on the back, because the hard part — the door prep — is over.
Closing the Door
Now it’s time to finish the job. Open the doorknob package and separate the parts: the two halves of the doorknob (one with chassis and one without); the metal, self-locking mounting plate; the adjustable latch; and the strike plate and screws.
Take the strike plate and the 3″ screws and, using a drill, fasten the strike into the mortise of the doorjamb. Take the adjustable latch and make sure it is adjusted to fit a 2 3/8″ backset; simply slide the black plastic piece of the latch backward or forward to take this measurement.
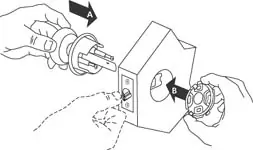
Next, take the latch and use the shortest set of screws to fasten the latch into the latch bore so that the latch faceplate fits flush with the edge of the door. Then slide the half of the doorknob containing the chassis and spindle through the latch. Kwikset utilizes a half-moon shaped spindle so it will only fit properly if you have installed the latch with the correct side facing up. As mentioned before, the benefit of EZ-install is that the screws holding the knob snug to the door have been pre-installed on the half of the doorknob containing the chassis. This effectively knocks out the most painful step in the process, which is trying to align and start the screws through the two holes in the trim. It also has a cleaner look with concealed screws and protects against accidentally scratching the door.
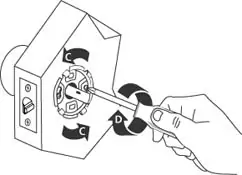
In some cases the screws might have been installed a little to far. This is likely attributed to the assembly-line employee at the doorknob manufacturing plant who wasn’t paying close attention to his or her job. In such cases, it is a good idea to go ahead and back the screws out until a splotch of paint is visible on the threads of each screw. Then, take the self-locking metal plate, fit it over the exposed screws and carefully rotate the plate until it snaps into place. Next, tighten the screws back down over the metal plate until it’s snug.
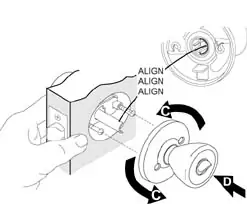
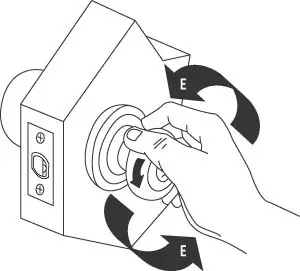
Pick up the only remaining unused portion of the knob, which should be the non-stemmed knob, and make sure the two sets of arrows on the underside of the trim piece are aligned. Fit this portion of the knob over the exposed portion of the spindle. It also will only fit one way. Finally, push the knob until it is flush with the door, and rotate both knobs to the left at the same time until the latch fully retracts.
After completing the above steps, you can ‘close the door’ on this project. Thanks to the design engineers at Kwikset for simplifying the project.
3-Step Installation
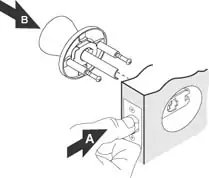
Install the latch and the half of the doorknob containing the chassis and spindle.
Slip on the other half and carefully align and start the screws (often a frustrating and time-consuming step).
Tighten the screws while trying not to scratch the doorknob.
Installation with the “EZ Install” Process
The first step in both models is the same.
Step two is different in that a plate is slipped over the preinstalled and aligned screws. Twist the plate into locking position and tighten the screws.
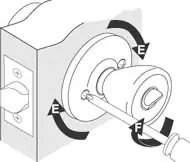
Take the other half of the doorknob and slip it over the spindle. Turn the knob both ways, and the job is complete. Notice the neat look of the concealed screws.
Vocabulary Lesson
Backset – The measured distance from the edge of the door to the center of the bored hole, usually 2 3Z8″ for interior doors and 2 3Z4″ for exterior doors.
Chassis – The body of the lock itself, without the trim.
Cross bore – The bore through the face of the door, usually 2 1Z8″.
Face Plate – The part of any latch that lies flush with the door’s edge upon installation.
Latch/Side Bore – The 1″ hole bored through the edge of the door that aligns with the mortise in the doorjamb and houses the latch.
Mortise – A recess cut into the surface or edge of the door or doorjamb, usually for the purpose of housing hardware like hinges or lock parts.
Strike Plate – A metal part with a hole or recess for receiving a door latch. Strike plates fit into mortises in doorjambs and are screw-fastened.
Spindle – The elongated, half-moon shaped piece that fits through the latch and, when the doorknob is turned, actually retracts or extracts the latch.
